IN THIS ARTICLE
在 C++ 中创建自定义工具 Gem 以扩展 Open 3D Engine Editor
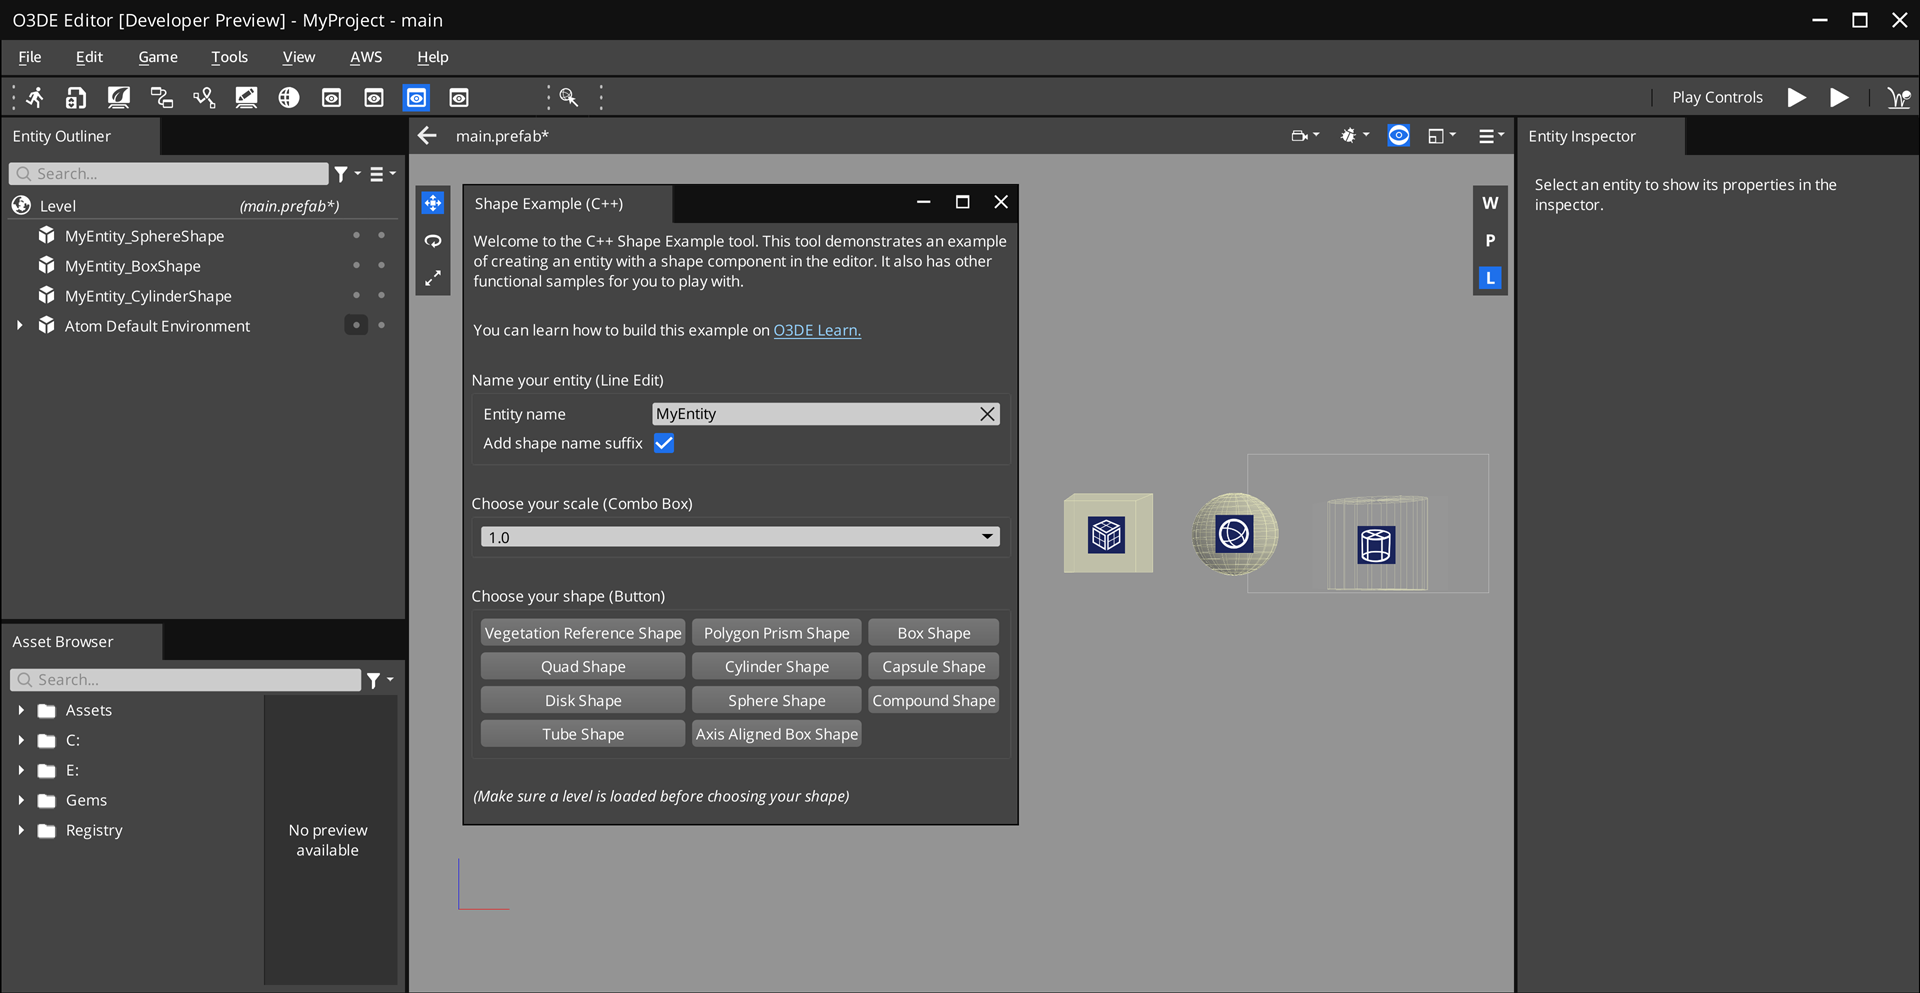
在本教程中,您将学习如何使用CppToolGem 模板扩展 Open 3D Engine (O3DE) 编辑器,以创建名为 MyShapeExample 的自定义工具 Gem。此自定义工具允许您使用 Shape 组件创建实体并配置其组件属性。Gem 是使用
Qt 、O3DE 工具 UI API 和其他 O3DE API C++编写的。
ShapeExample Gem 是
o3de/sample-code-gems repository 中的示例 Gem,演示了您在本教程中创建的成品 Gem。在学习本教程时,您可以参考 ShapeExample Gem 示例。
在本教程结束时,您将能够通过创建自己的 C++ 编写的自定义工具来扩展 Editor。
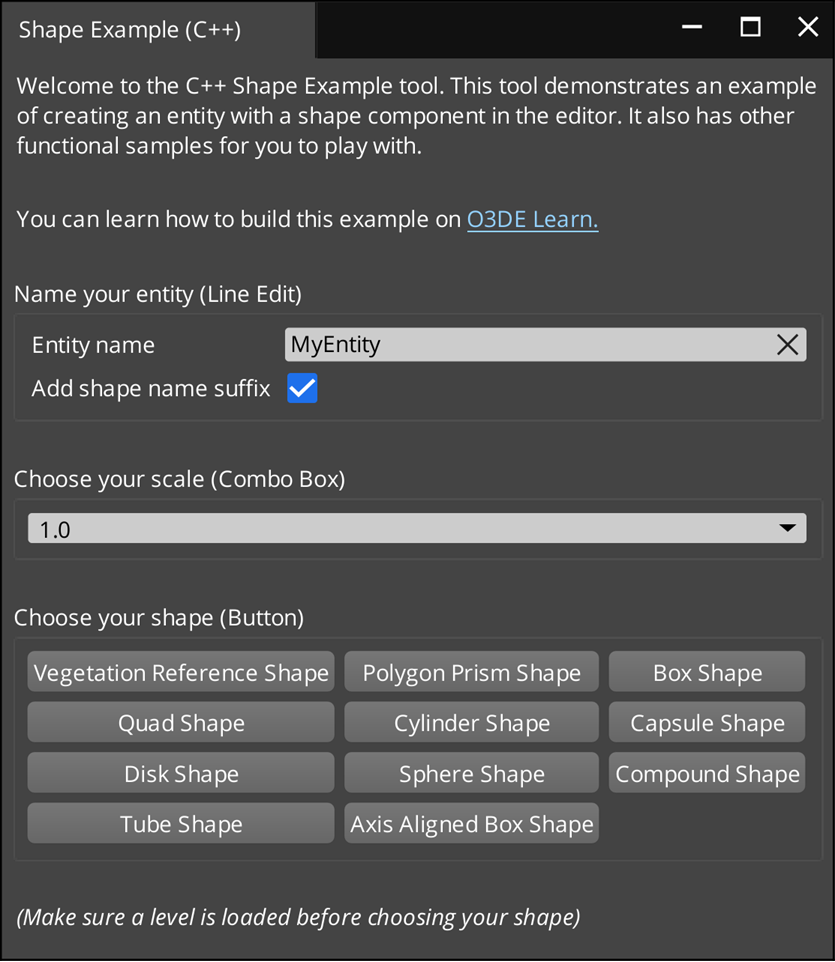
下图是您创建的自定义工具的预览。
先决条件
在开始本教程之前,请确保您具备以下条件:
- 搭建 O3DE 开发环境。有关说明,请参阅 设置 Open 3D Engine.
教程细节
本教程在示例中使用以下 Windows 目录名称和位置。您可以在磁盘上选择不同的文件夹名称和位置。
O3DE 引擎目录:
C:\o3de
包含引擎的源目录。CppToolGem模板:C:\o3de\Templates\CppToolGem
自定义 Gem 所基于的 Gem 模板。MyCppShapeExample Gem:
C:\o3de-gems\MyCppShapeExample
您的自定义 Gem。您可以在磁盘中选择不同的文件夹名称和位置。
从 CppToolGem 模板创建 Gem
首先,从 CppToolGem模板创建一个 Gem,该模板包含一个基本的 C++ 框架,用于在 Editor 中创建可停靠的工具(小组件)。
要从 CppToolGem模板创建 Gem,请完成以下步骤:
使用引擎目录中的 O3DE CLI (
o3de) 脚本创建 Gem。scripts\o3de create-gem --gem-name MyCppShapeExample --template-name CppToolGem --gem-path C:\o3de-gems\MyCppShapeExample此命令指定以下选项:
--gem-name,-gn: 新 Gem 的名称。--gem-path,-gp: 创建新 Gem 的路径。--template-name,-tn: 要从中创建新 Gem 的模板的路径。
此 Gem 基于
CppToolGem模板。在此示例中,将 Gem 命名为MyCppShapeExample,并在C:\o3de-gems\MyCppShapeExample中创建它。根据 Gem 路径,此命令会自动将 Gem 注册到其中一个清单文件:
.o3de\o3de_manifest.json,<engine>\engine.json, 和<project>\project.json.(可选)将 Gem 注册到您的项目中。此步骤是可选的,因为当您在上一步中使用 O3DE CLI 创建 Gem 时,它会自动注册 Gem。如果您从示例代码 Gem 存储库下载了 ShapeExample Gem,则必须将其注册到您的项目中。
scripts\o3de register -gp C:\o3de-gems\MyCppShapeExample -espp <project-path>在您的项目中添加 Gem。
scripts\o3de enable-gem -gn MyCppShapeExample -pp <project-path>或者,使用 Project Manager 启用 Gem(请参阅 在项目中添加和删除 Gem).
使用 O3DE CLI 构建项目(参见 构建项目)。或者,使用 Project Manager(请参阅 Project Manager) 中的 Build 操作)页面。
在 Editor 中打开您的项目。
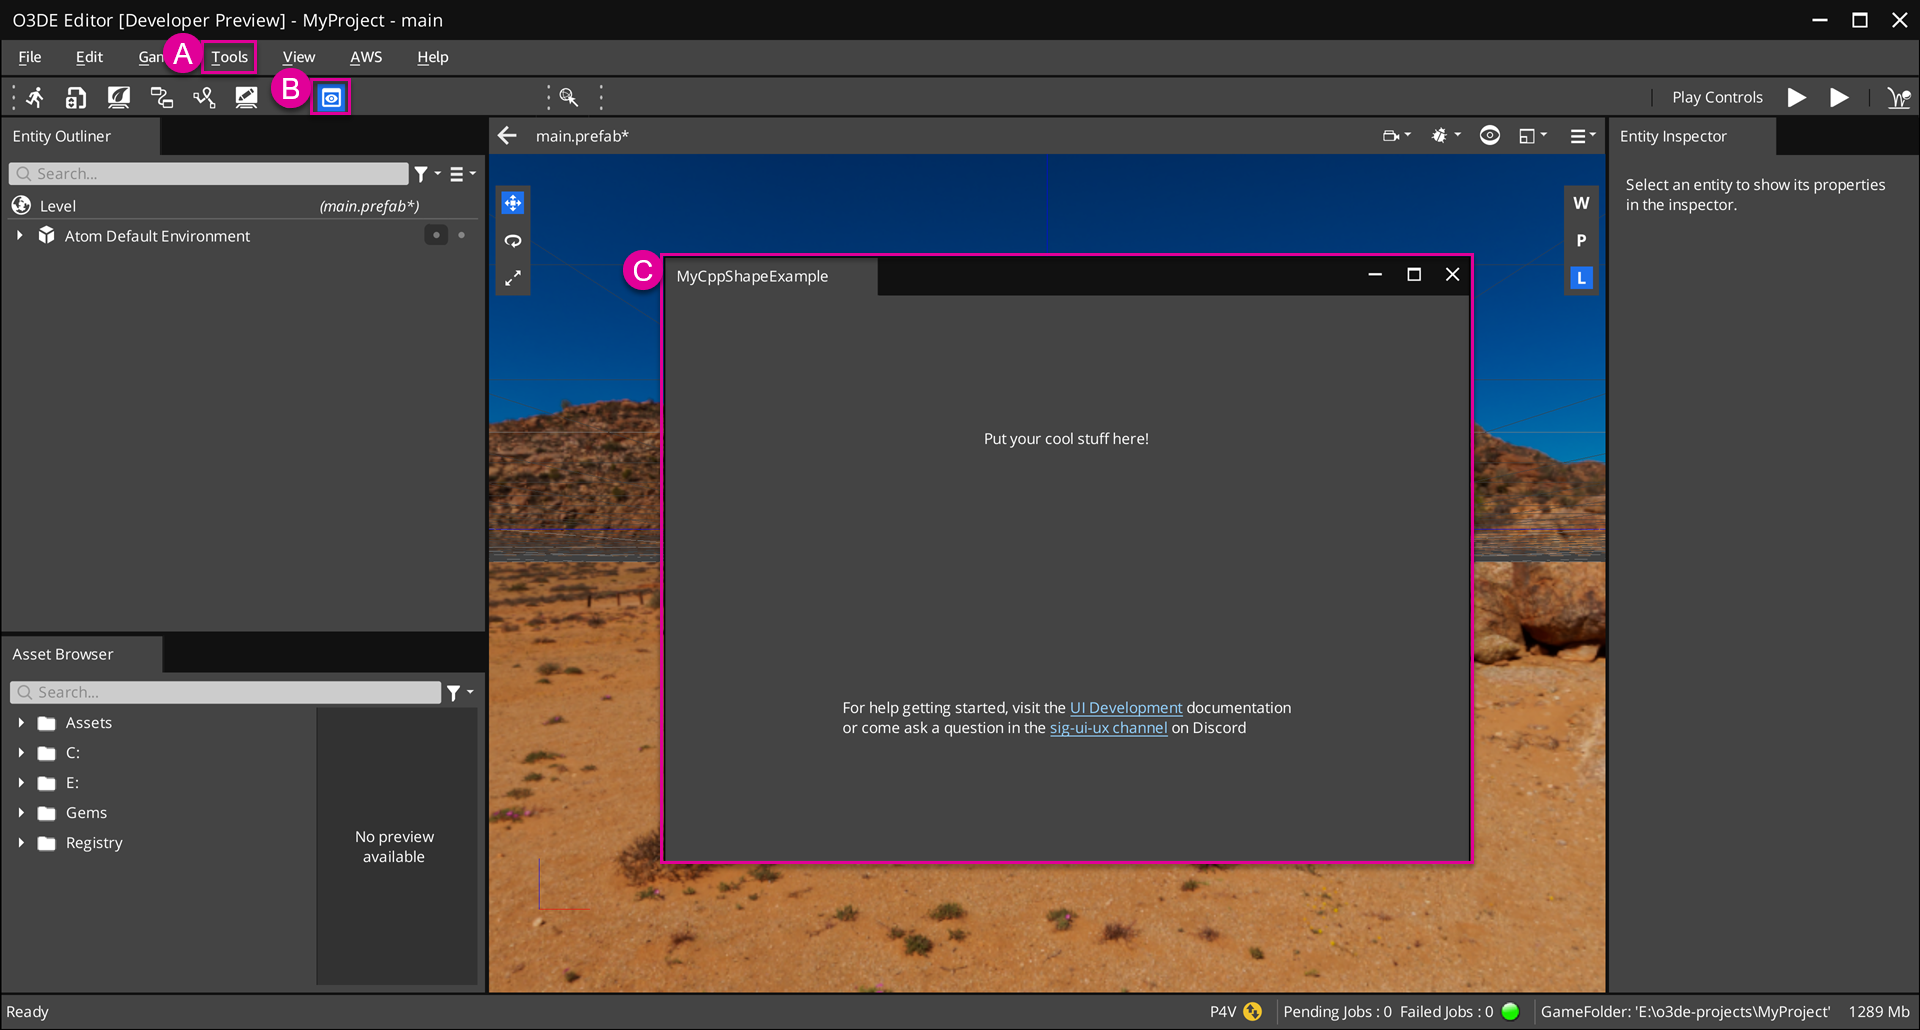
通过从文件菜单选择Tools > Examples > MyCppShapeExample。 (请参阅下图中的 A。)
或者,通过单击 Edit Mode Toolbar(编辑模式工具栏)中的工具图标直接打开该工具。(见 B.)
现在,您可以访问 Shape Example 工具了!默认情况下,此工具包含一个简单的用户界面 (UI)。在接下来的步骤中,我们将设计该工具的 UI 并对其功能进行编码。(见 C.)
代码目录
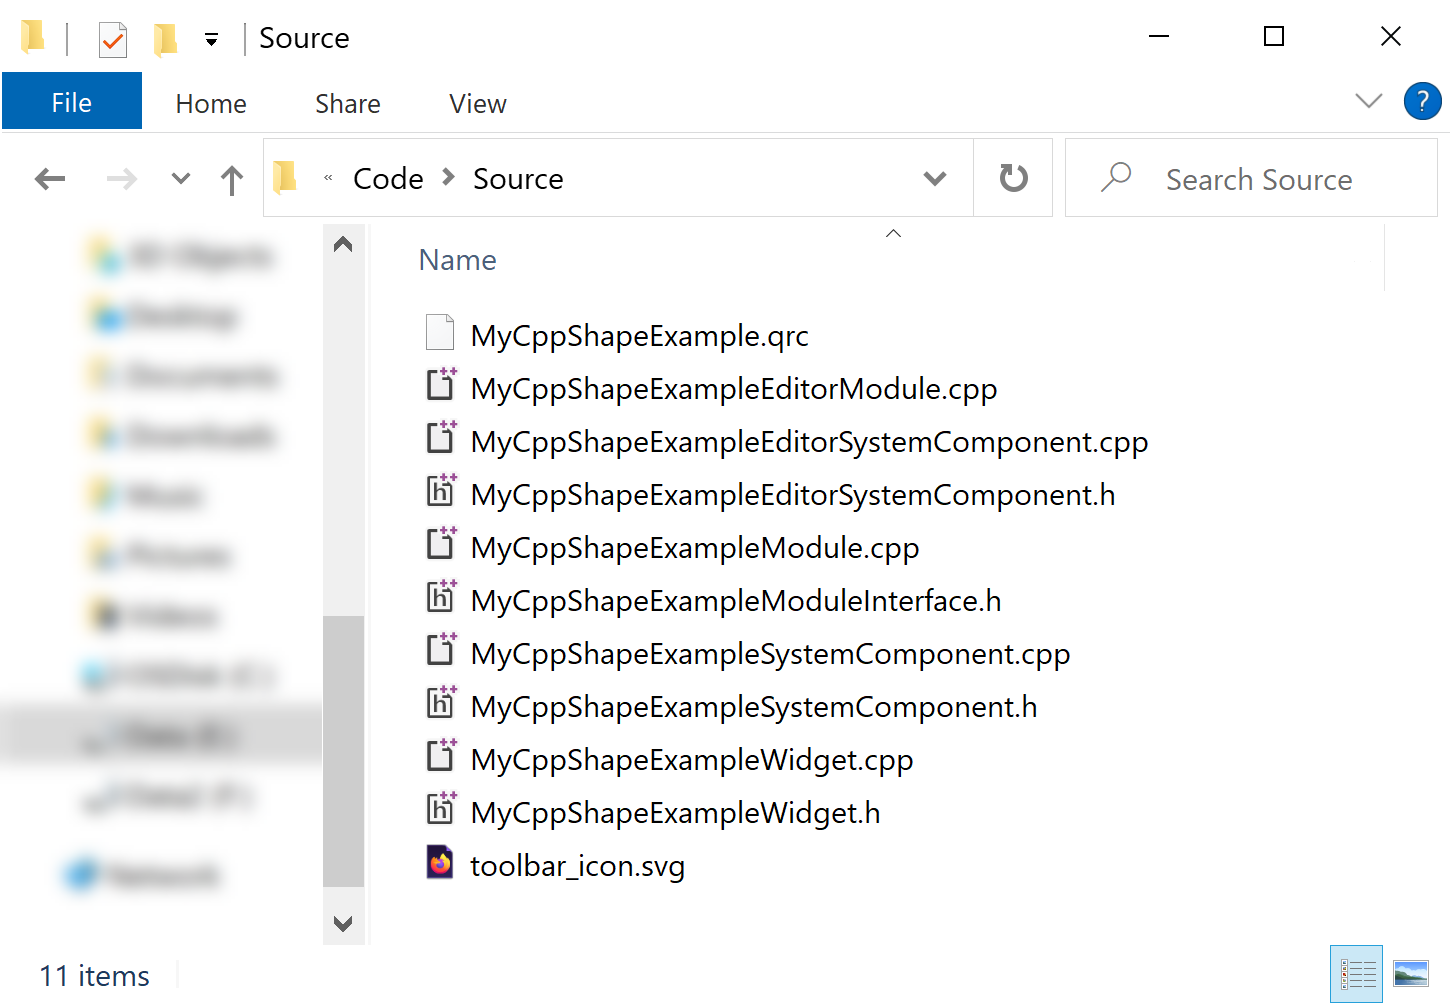
本节介绍了 MyCppShapeExample Gem 的代码结构。熟悉 Gem 的代码结构非常重要,因为这是您将对工具的自定义功能进行编程的入口点。在此示例中,您的 Gem 目录位于: C:\o3de-gems\MyCppShapeExample。这是您在创建 Gem 时指定的路径。Gem 的代码位于子目录Code\Source中,其中包含构成自定义工具的以下类和框架。
Code\Source 目录示例:
Modules and system components
所有 Gem 都有用 C++ 编写的模块和系统组件类,这些模块和组件类将工具连接到 O3DE 并允许它与其他系统通信。CppToolGem模板已经包含在编辑器中运行该工具所需的所有代码。您可以在Code\Source中找到这些 C++ 文件。
有关 Gem 模块和系统组件的更多信息,请参阅 Open 3D Engine Gem 模块系统概述 页面。
O3DE 和 Qt 框架
O3DE 扩展了 Qt 框架,因此您将使用 Qt Widgets Module 来创建图形用户界面 (GUI)。您还将使用 O3DE 的事件总线与其他 O3DE 接口(如实体和组件)进行通信,并将它们连接到 Qt 元素。
您将在位于 Code\Source\ShapeExampleWidget.h 和 Code\Source\ShapeExampleWidget.cpp 中的 ShapeExample 类中编写工具的大部分功能和 UI 元素。
Qt 资源
Qt Resource System 允许 Gem 通过.qrc 文件存储和加载图像文件。这样就无需从绝对路径加载图像文件,从而简化了 Gem 的分发。稍后,您将存储图像文件以为您的工具创建图标。
依赖模块
在 Code\Source\ShapeExampleWidget.cpp文件中导入以下依赖模块。 你将创建的ShapeExample 类使用这些模块中的对象。
#include <AzCore/Component/TransformBus.h>
#include <AzCore/Utils/Utils.h>
#include <AzToolsFramework/API/EntityCompositionRequestBus.h>
#include <AzToolsFramework/Component/EditorComponentAPIBus.h>
#include <AzToolsFramework/Entity/EditorEntityAPIBus.h>
#include <QComboBox>
#include <QDoubleValidator>
#include <QFormLayout>
#include <QGridLayout>
#include <QGroupBox>
#include <QLabel>
#include <QLineEdit>
#include <QPushButton>
#include <QVBoxLayout>
#include "ShapeExampleWidget.h"
小组件和布局
使用 Qt,您可以创建 小部件,它是 UI 元素的容器,以及定义这些 UI 元素如何排列的 布局。您的自定义工具是一个主 Widget,其中包含 UI 元素的子 Widget。每个小组件都可以有自己的布局。嵌套的 Widget 和布局结构允许您组织 UI 元素组。
ShapeExampleWidget类继承自QWidget,后者创建主 widget。以下说明将指导您完成如何设置主 Widget 的布局。请注意,某些指令可能已经由 CppToolGem 模板完成。
在构造函数的顶部,实例化一个名为
mainLayout的QVBoxLayout。稍后,您将创建各种 UI 元素并将它们添加到
mainLayout中。我们建议您使用
addStretch()在mainLayout的底部添加一个 stretch。这将在调整窗口大小时填充任何扩展的空间。最后,使用
setLayout(...)将mainLayout设置为此小部件的布局`.
ShapeExampleWidget::ShapeExampleWidget(QWidget* parent)
    : QWidget(parent)
{

    QVBoxLayout* mainLayout = new QVBoxLayout(this);        // 1

    // ...                                                  // 2

    mainLayout->addStretch();                               // 3

    setLayout(mainLayout);                                  // 4
}
输入字段和复选框
在此步骤中,为实体名称创建一个输入字段,并为一个选项创建一个复选框,用于将后缀—组件的名称—附加到实体的名称。例如,假设您将实体的名称设置为 “MyEntity” 并启用该复选框。然后,当您创建具有 Box Shape 组件的实体和另一个具有 Sphere Shape 组件的实体时,它们将分别命名为“MyEntity_BoxShape”和“MyEntity_SphereShape”。
在此步骤结束时,您的输入字段和复选框应如下所示:

实例化 mainLayout 后,将输入字段和复选框包装在它们自己的子 widget 中,设置布局,并将其添加到主 widget。
首先,实例化一个名为
entityNameWidget的QGroupBox和一个名为formLayout的QFormLayout。稍后,您将创建输入字段和复选框并将它们添加到此小部件中。
最后,将
entityNameWidget的布局设置为formLayout,并将entityNameWidget添加到mainLayout。
    QGroupBox* entityNameWidget = new QGroupBox(this);  // 1
    QFormLayout* formLayout = new QFormLayout();

    // ...                                              // 2

    entityNameWidget->setLayout(formLayout);            // 3
    mainLayout->addWidget(entityNameWidget);
创建输入字段
输入字段是获取用户文本输入的 UI 元素。使用 Qt,您可以使用QLineEdit对象创建输入字段。
在ShapeExampleWidget.h中,创建一个 private QLineEdit* 变量。在此示例中,命名为m_nameInput。
    private:
        QLineEdit* m_nameInput = nullptr;
        //...
在ShapeExampleWidget.cpp中,执行以下操作:
通过实例化
QLineEdit并将其分配给m_nameInput来创建输入字段。通过调用
setPlaceholderText(...)设置m_nameInput中的占位符文本`.启用一个按钮以使用
setClearButtonEnabled(true)清除文本。
    m_nameInput = new QLineEdit(this);
    m_nameInput->setPlaceholderText(QObject::tr("Set custom Entity name here..."));
    m_nameInput->setClearButtonEnabled(true);
创建复选框
复选框是一个选项按钮,用户可以启用或禁用该按钮以触发用户定义的行为。在 Qt 中,您可以使用QCheckBox 对象创建一个复选框。在此示例中,该复选框控制是否将后缀附加到实体的名称。在运行时,它将开始禁用,并在用户将实体名称输入到输入字段时启用 enable。稍后将定义此行为。
在 ShapeExampleWidget.h 中,创建一个私有QCheckBox*变量。在此示例中,将其命名为m_addShapeNameSuffix。
    private:
        //...
        QCheckBox* m_addShapeNameSuffix = nullptr;
        //...
在ShapeExampleWidget.cpp中,执行以下操作:
通过实例化
QCheckBox并将其分配给m_addShapeNameSuffix来创建一个复选框。使用
setDisabled(true)将复选框设置为以禁用状态启动。
    m_addShapeNameSuffix = new QCheckBox(this);
    m_addShapeNameSuffix->setDisabled(true);
添加带有插槽处理程序的信号侦听器
Qt使用信号和插槽在对象之间进行通信(参考Qt文档中的 信号和插槽 )。设置信号侦听器,以便当用户在运行时将文本输入到输入字段中时,该复选框将自动启用。
在此示例中,信号侦听器使用插槽处理程序,它本质上是信号可以连接到的 C++ 函数。
使用
Q_SLOTS宏在Code\Source\ShapeExampleWidget.h中声明一个插槽。private Q_SLOTS: void OnNameInputTextChanged(const QString& text);调用
QObject::connect(...)在输入字段 (m_nameInput) 到信号 (QLineEdit::textChanged) 和插槽 (ShapeExampleWidget::OnNameInputTextChanged)直接创建一个连接。请参阅以下ShapeExampleWidget.cpp行。QObject::connect(m_nameInput, &QLineEdit::textChanged, this, &ShapeExampleWidget::OnNameInputTextChanged);在
ShapeExampleWidget.cpp中定义OnNameInputTextChanged(...)。此函数检查m_nameInput是否存在文本,如果存在,则启用m_addShapeNameSuffix。void ShapeExampleWidget::OnNameInputTextChanged(const QString& text) { m_addShapeNameSuffix->setEnabled(!text.isEmpty()); }
将 UI 元素添加到布局
创建 UI 元素—输入字段和复选框—并将信号侦听器连接到它们后,将它们添加到布局中。要确保它们属于子小部件entityNameWidget,请使用addRow(...)将它们添加到相应的布局 formLayout中。
    formLayout->addRow(QObject::tr("Entity name"), m_nameInput);
    formLayout->addRow(QObject::tr("Add shape name suffix"), m_addShapeNameSuffix);
组合框
在此步骤中,您将创建一个组合框,其中包含可用于缩放实体大小的值列表。
在此步骤结束时,您的组合框应如下所示:

首先,将组合框包装在其自己的子 Widget 中,设置子 Widget 的布局,并将其添加到主 Widget。
首先,实例化一个名为
comboBoxGroup的QGroupBox和一个名为comboBoxLayout的QVBoxLayout。稍后,您将创建一个组合框并定义一个比例值列表。
最后,将
comboBoxGroup的布局设置为comboBoxLayout,并将comboBoxGroup添加到mainLayout中。
    QGroupBox* comboBoxGroup = new QGroupBox("Choose your scale (combobox)", this);    // 1
    QVBoxLayout* comboBoxLayout = new QVBoxLayout();

    // ...                                                                              // 2


    comboBoxGroup->setLayout(comboBoxLayout);                                           // 3
    mainLayout->addWidget(comboBoxGroup);
创建一个 Combobox
使用组合框,用户可以从弹出的项目列表中选择一个项目。在 Qt 中,您可以使用 QComboBox 对象创建输入字段。
在ShapeExampleWidget.h中,创建一个私有的QComboBox*变量。在此示例中,命名为m_scaleInput。
    private:
        //...
        QComboBox* m_scaleInput = nullptr;
在ShapeExampleWidget.cpp中,执行以下操作:
定义刻度值列表。在此示例中,将其命名为
scaleValues。通过实例化
QComboBox创建一个组合框。在此示例中,命名为m_scaleInput。允许用户通过调用
setEditable(true)在组合框中输入自定义选项。如果用户输入自定义选项,请通过调用
setValidator(...)来验证他们输入的值是否是特定范围和小数位内的数值。在此示例中,将下限设置为 ‘0.0’,将上限设置为 ‘100.0’,将小数位数设置为 ‘3’。通过调用
addItems(...)将值列表添加到组合框.调用
addWidget(...)向comboBoxLayout添加组合框。
    QStringList scaleValues = {                                                 // 1
        "1.0",
        "1.5",
        "2.0",
        "5.0",
        "10.0"
    };
    m_scaleInput = new QComboBox(this);                                         // 2
    m_scaleInput->setEditable(true);                                            // 3
    m_scaleInput->setValidator(new QDoubleValidator(0.0, 100.0, 3, this));      // 4
    m_scaleInput->addItems(scaleValues);                                        // 5
    comboBoxLayout->addWidget(m_scaleInput);                                    // 6
按钮
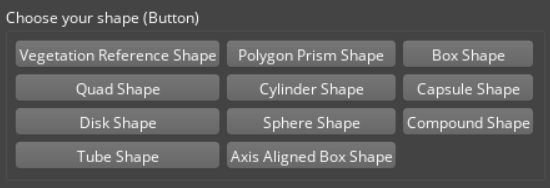
在此步骤中,您将创建一个按钮集合,这些按钮创建具有不同 Shape 组件(例如,使用 Box Shape、Sphere Shape、Cone Shape 等)的实体。
在此步骤结束时,您的按钮应如下所示:
首先,将这些 UI 元素包装在它们自己的子 widget 中,设置布局,并将其添加到主 widget。
首先,实例化一个名为
shapeButtons的QGroupBox和一个名为gridLayout的QGridLayout。稍后,您将查询向引擎注册的所有类型的形状组件,向此小组件添加按钮,并向按钮添加信号侦听器。
最后,将
shapeButtons的布局设置为gridLayout,并将shapeButtons添加到mainLayout。
    QGroupBox* shapeButtons = new QGroupBox(this);      // 1
    QGridLayout* gridLayout = new QGridLayout();

    // ...                                              // 2

    shapeButtons->setLayout(gridLayout);                // 3
    mainLayout->addWidget(shapeButtons);
查询 Shape 组件
查询向引擎注册的 Shape 组件的类型。在 O3DE 中,所有组件都有一个已提供服务的列表,您可以从中进行查询。在此示例中,您正在寻找 Shape 组件,这些组件都提供 “ShapeService”。
创建
AzToolsFramework::EntityCompositionRequests::ComponentServicesList命名为providedServices并添加"ShapeService"。获取组件类型列表。调用
AzToolsFramework::EditorComponentAPIBus::BroadcastResult(...)并分发AzToolsFramework::EditorComponentAPIRequests::FindComponentTypeIdsByService,它接受要包含的服务列表 (providedServices) 和要排除的服务 (空列表),并将组件类型存储到typeIds。
    AzToolsFramework::EntityCompositionRequests::ComponentServicesList providedServices;
    providedServices.push_back(AZ_CRC_CE("ShapeService"));

    AZ::ComponentTypeList typeIds;
    AzToolsFramework::EditorComponentAPIBus::BroadcastResult(
        typeIds,
        &AzToolsFramework::EditorComponentAPIRequests::FindComponentTypeIdsByService,
        providedServices,
        AzToolsFramework::EntityCompositionRequests::ComponentServicesList()
    );
查询要添加到按钮的组件的名称。
- 获取组件名称列表。调用
AzToolsFramework::EditorComponentAPIBus::BroadcastResult(...)并调度AzToolsFramework::EditorComponentAPIRequests::FindComponentTypeNames,它获取组件类型列表 (typeIds) 并将相应的组件名称存储到componentNames。
AZStd::vector<AZStd::string> componentNames; AzToolsFramework::EditorComponentAPIBus::BroadcastResult( componentNames, &AzToolsFramework::EditorComponentAPIRequests::FindComponentTypeNames, typeIds );- 获取组件名称列表。调用
Note:您可以通过调用组件的GetProvidedServices()方法来查询组件提供的服务列表。
添加按钮
按钮是一个 UI 元素,用户可以单击该元素来触发用户定义的行为。在 Qt 中,您可以使用 QPushButton对象创建按钮。在此示例中,当用户单击按钮时,它将创建一个具有 Shape 组件的实体。稍后将定义此行为。
遍历组件名称列表,创建按钮,并将它们添加到gridLayout 中。对于每个组件:
存储您之前查询的组件名称和类型列表中的组件名称和类型。在此示例中,我们将它们命名为
name和typeId。通过实例化
QPushButton创建一个按钮。在此示例中,将其命名为shapeButton。传入name以将组件的名称添加到按钮上。稍后,您将
shapeButton连接到信号侦听器。将
gridLayout拆分为 3 列,并添加按钮。
    const int maxColumnCount = 3;
    for (int i = 0; i < componentNames.size(); ++i)
    {
        AZStd::string name = componentNames[i];                                             // 1
        AZ::TypeId typeId = typeIds[i];

        QPushButton* shapeButton = new QPushButton(QString::fromUtf8(name.c_str()), this);  // 2

        // ...                                                                              // 3

        int row = i / maxColumnCount;                                                       // 4
        int column = i % maxColumnCount;
        gridLayout->addWidget(shapeButton, row, column);
    }
添加具有 lambda 处理程序的信号侦听器
接下来,创建一个信号侦听器,这样当用户单击该按钮时,将在场景中创建一个实体,并将相应的 Shape 组件添加到该实体中。
在此示例中,信号侦听器使用 lambda 处理程序,因此您可以定义 C++ 函数,而无需定义槽。
在
ShapeExampleWidget.h中将CreateEntityWithShapeComponent定义为标准 C++ 函数。此函数接受AZ::TypeId&作为参数,以便它可以创建具有指定组件类型的实体。private: void CreateEntityWithShapeComponent(const AZ::TypeId& typeId);在您之前创建的循环中,创建从
shapeButton中的clicked信号到this中的 lambda 函数的连接。lambda 函数调用CreateEntityWithShapeComponent(...)并捕获正在迭代的 Shape 组件的typeId。QObject::connect(shapeButton, &QPushButton::clicked, this, [this, typeId]() { CreateEntityWithShapeComponent(typeId); });
与 EBuse 通信
定义 CreateEntityWithShapeComponent(...),它与 O3DE 事件总线通信,以使用由 typeId参数指定的组件创建新实体。
调用
EditorRequestBus::BroadcastResult(...)发送请求以创建新实体。分发EditorRequests::IsLevelDocumentOpen事件,如果关卡已加载,则返回 true/false。- 尝试在未加载关卡的情况下创建 Entity 将导致崩溃,因此如果未加载关卡,我们将打印警告消息,然后返回。
调用
EditorRequestBus::BroadcastResult(...)发送请求以创建新实体. 分发EditorRequests::CreateNewEntity事件,这将创建一个新实体并返回其AZ::EntityId。 新实体的AZ::EntityId被存储在newEntityId中。如果用户在输入字段中输入了名称,请更新实体的名称。
通过调用
text()获取实体的名称,并将其存储在entityName中。如果用户启用了复选框以将组件名称的后缀应用于实体名称,请查询组件的名称。调用
EditorComponentAPIBus::BroadcastResult(...)并调度EditorComponentAPIRequests::FindComponentTypeNames事件,该事件将查找所提供列表的组件名称并将其存储在componentNames中。设置名称和后缀的格式(如果有)。
调用
EditorEntityAPIBus::Event(...)并调度EditorEntityAPIRequests::SetName设置newEntityId的名称为entityName。
设置实体的比例。
通过调用
currentText()获取组合框中的值,并将其存储在scale中。通过调用
AZ::TransformBus::Event()设置实体的缩放。调度SetLocalUniformScale以设置newEntityId的缩放。
将 Shape 组件添加到实体。调用
EditorComponentAPIBus::Broadcast(...)并调度EditorComponentAPIRequests::AddComponentsOfType,这会将所提供列表中的组件添加到newEntityId。
void ShapeExampleWidget::CreateEntityWithShapeComponent(const AZ::TypeId& typeId)
{
    // 1
    bool isLevelLoaded = false;
    EditorRequestBus::BroadcastResult(isLevelLoaded, &EditorRequests::IsLevelDocumentOpen);
    if (!isLevelLoaded)
    {
        AZ_Warning("ShapeExample", false, "Make sure a level is loaded before choosing your shape");
        return;
    }

    // 2
    AZ::EntityId newEntityId;
    EditorRequestBus::BroadcastResult(newEntityId, &EditorRequests::CreateNewEntity, AZ::EntityId());

    // 3
    if (!m_nameInput->text().isEmpty())
    {
        QString entityName = m_nameInput->text();

        if (m_addShapeNameSuffix->isChecked())
        {
            AZStd::vector<AZStd::string> componentNames;
            EditorComponentAPIBus::BroadcastResult(
                componentNames,
                &EditorComponentAPIRequests::FindComponentTypeNames,
                AZ::ComponentTypeList{ typeId }
            );

            AZ_Assert(componentNames.size() == 1, "Unable to find component name");

            QString shapeName(componentNames[0].c_str());
            shapeName.replace(" ", "");

            entityName = QString("%1_%2").arg(entityName).arg(shapeName);
        }

        EditorEntityAPIBus::Event(newEntityId, &EditorEntityAPIRequests::SetName, entityName.toUtf8().constData());
    }

    // 4
    bool validFloat = false;
    float scale = m_scaleInput->currentText().toFloat(&validFloat);
    if (validFloat)
    {
        AZ::TransformBus::Event(newEntityId, &AZ::TransformInterface::SetLocalUniformScale, scale);
    }

    // 5
    EditorComponentAPIBus::Broadcast(&EditorComponentAPIRequests::AddComponentsOfType, newEntityId, AZ::ComponentTypeList{ typeId });
}
图标
图标是用于在 Editor 中表示工具的图像文件。该图标显示在 Editor 的 Edit Mode 工具栏中(请参阅下图)。
添加图标
以下说明将指导您了解如何使用 Qt 资源系统存储图标并从 Gem 模块加载它。请注意,某些指令可能已经由 CppToolGem 模板完成。
将图像文件添加到
Code\Source目录以用作图标。在此示例中,图标名为toolbar.svg。我们建议您的图标遵循 UI 开发最佳实践中的准则。通过使用新图标的文件名更新
Code\Source\MyCppShapeExample.qrc,将您的图标添加到 MyCppShapeExample Gem 的资源中。<!DOCTYPE RCC><RCC version="1.0"> <qresource prefix="/MyCppShapeExample"> <file alias="toolbar_icon.svg">toolbar_icon.svg</file> </qresource> </RCC>通过在
Code\Source\EditorModule.cpp中添加以下代码,将 MyCppShapeExample Gem 的资源注册到 Qt 资源系统。- 定义函数
InitShapeExampleResources()并调用Q_INIT_RESOURCE(...)注册MyCppShapeExample.qrc中列出的 Qt 资源。
void InitShapeExampleResources() { Q_INIT_RESOURCE(MyCppShapeExample); }- 在
EditorModule类构造函数中调用InitShapeExampleResources()。
- 定义函数
构建和测试你的工具
窗户
对于 Windows,请使用 Visual Studio 构建和调试您的自定义工具。
启动 Visual Studio 并打开 O3DE 解决方案。
在 Solution Explorer 中找到您的 Gem。右键单击并选择 Build 或 Debug。
在 Editor 中打开您的项目并加载 Gem。
祝贺!您创建了一个用 C++ 编写的自定义工具 Gem,构建了它,并将其加载到 Editor 中。您的 Shape Example 工具应如下所示:
下载 ShapeExample Gem 示例
现在,您已经完成了本教程,您可以将 MyCppShapeExample Gem 与
o3de/sample-code-gems repository 中的示例 Gem ShapeExample Gem 进行比较。
下载此示例并将其加载到 Editor 中。
下载或克隆存储库。ShapeExample Gem 位于
<repo>\sample-code-gems\cpp_gems\ShapeExample中。git clone https://github.com/o3de/sample-code-gems.git在打开“形状示例”工具之前,请执行以下操作:
注册您的 Gem。
在您的项目中启用它。
重新构建您的项目。
在 Editor 中打开该工具。
本教程前面将介绍这些步骤。请参阅 从
CppToolGem模板创建 Gem.