IN THIS ARTICLE
第32章 Auto组件
第32章 Auto组件
介绍
Note:本章随附的源代码和资源可以在 GitHub 上找到: https://github.com/AMZN-Olex/O3DEBookCode2111/tree/ch32_auto_components
在 O3DE 中,多人游戏组件是根据其 XML 定义生成的代码,如上一章中的 MyFirstNetworkComponent.AutoComponent.xml。auto-component 是代码生成的多人游戏组件。本章将涵盖足够的 auto-components 理论,以帮助我们完成多人游戏的其余部分。
- 如何创建新的多人游戏组件?
- 什么是控制器?
- 什么是(网络)组件?
- 代码生成的类是在何处创建的?
- 覆盖控制器和组件的基类。
Note:在本书的这一部分中,多人游戏和网络术语可以互换使用。
代码生成
例 32.1.一个 auto-component
<?xml version="1.0"?>
<Component
  Name="MyFirstNetworkComponent"
  Namespace="MyGem"
  OverrideComponent="false"
  OverrideController="false"
  OverrideInclude=""
  xmlns:xsi="http://www.w3.org/2001/XMLSchema-instance">
</Component>
根据上述 XML 定义,将为您生成以下文件:
- MyFirstNetworkComponent.AutoComponent.h
- MyFirstNetworkComponent.AutoComponent.cpp
这些文件位于 build code-generation 部分,例如C:\git\book\build\External\MyGem-409da4e6\ Code\Azcg\Generated\Source\AutoGen\MyFirstNetworkComponent.AutoComponent.h.
Tip:您的特定构建路径可能有所不同,但如果您在构建文件夹中搜索这些组件,您将找到它们。
通常,您不应过多关注这些文件,但您应该知道它们提供了组件多人游戏功能的主干以及各种 Editor 和脚本反射。
代码生成的头文件 (*.AutoComponent.h) 声明两个重要的类:Component 和 Controller。
组件和控制器
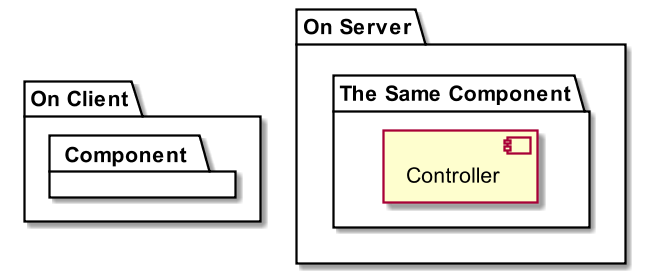
在多人游戏组件的上下文中,它们的 Controller 具有对组件状态的写入访问权限,而其组件具有只读访问权限。在 Client 端,组件将没有控制器,因此无法直接修改其数据。可以在控制器可用的服务器上进行更改。
Note:对于需要能够本地预测自身的自治实体(例如玩家实体),有一个例外。在这种情况下,客户端上也有一个控制器,但仅适用于客户端控制的玩家实体。我在第 40 章 多人游戏中介绍了这个独特的情况。
图 32.1.组件和控制器
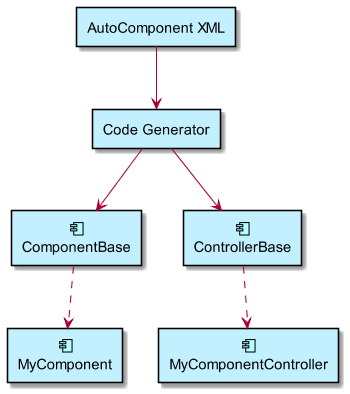
这些控制器和组件来自哪里?它们由我们在上一章中配置的代码生成器创建。XML 定义是定义多人游戏组件的数据和基本结构的根源。
查看 MyFirstNetworkComponent.AutoComponent.h 的顶部,了解描述组件的当前配置和选项的有用注释。
// No component roles have been overridden.  You can modify
// MyFirstNetworkComponent.AutoComponent.xml to specify derived
// classes for your desired network role.
// Once your modifications are complete, build the game. Your build
// will fail, but this comment will be replaced with a stub that
 // can be used as the basis for your derived component roles.
图 32.2.Auto-components 的代码生成概述
覆盖组件和控制器
正如代码生成的头文件中的注释所述,您可以覆盖组件和控制器。一个好的经验法则是,如果您希望提供特定于服务器的逻辑,那么您将需要使用以下 XML 属性覆盖控制器:
OverrideController="true"
如果您希望提供特定于客户端的逻辑,请使用以下方法覆盖该组件:
OverrideComponent="true"
下面是一个同时覆盖组件和控制器的组件示例。
<?xml version="1.0"?>
<Component
  Name="MyFirstNetworkComponent"
  Namespace="MyGem"
  OverrideComponent="true"
  OverrideController="true"
  OverrideInclude="Source/MyFirstNetworkComponent.h"
  xmlns:xsi="http://www.w3.org/2001/XMLSchema-instance">
</Component>
创建您自己的控制器
您创建的几乎任何新网络组件都需要在项目中使用三 (3) 个文件,无论 magic 在 build 文件夹中执行什么代码生成。以下是这些文件:
- XML auto-component 定义,MyFirstNetworkComponent.AutoComponent.xml
- 头文件 MyFirstNetworkComponent.h。
- 源文件,MyFirstNetworkComponent.cpp。
以下是在获得 XML 定义后编写网络组件代码的步骤。
- 创建一个覆盖组件和/或控制器的 XML 定义。
OverrideController="true"
- 指定 OverrideInclude,并将写入您自己的游戏逻辑的头文件的路径。此路径相对于 Gem 在 C:\git\book\Gems\MyGem\Code\Source 中的位置。
OverrideInclude="Multiplayer\MyFirstNetworkComponent.h"
这将期望在 C:\git\book\Gems\MyGem\Code\Source\Multiplayer\MyFirstNetworkComponent.h 中找到一个文件。
Note:添加 Multiplayer 文件夹是可选的。您可以创建自己的文件夹结构,也可以完全不创建文件夹,并将源代码直接放在 Source 下,在这种情况下,OverrideInclude 将为:
OverrideInclude="MyFirstNetworkComponent.h"
- 创建一个空的 MyFirstNetworkComponent.h 和 MyFirstNetworkComponent.cpp。
- 将对这些文件的引用添加到文件列表中。
例 32.2.mygem_files.cmake 与 auto-component
set(FILES
  ...
  # new
  Source/AutoGen/MyFirstNetworkComponent.AutoComponent.xml
  Source/Multiplayer/MyFirstNetworkComponent.h
  Source/Multiplayer/MyFirstNetworkComponent.cpp
)
- 构建 MyGem.static 目标。
Note:如果组件和控制器均未被覆盖,则可以跳过其余步骤。该组件将显示在 Editor 中,但不会特别有用,因为它不具有任何游戏逻辑。
您将收到大量构建错误,但请查找提及 MyFirstNetworkCompo nent 的错误。在 Visual Studio 中,您可以双击错误并跳转到生成的标头。或者通过在构建日志中查找路径来导航到那里。
打开 MyFirstNetworkComponent.AutoComponent.h。
在头文件顶部查找第一个大注释块。以“You may use the classes below as basis for your new derived classes”开头的注释块。注释块的其余部分将为您提供头文件和源文件的存根。
将代码从“/// Place in your .h”复制到“/// Place in your .cpp”复制到 MyFirstNetworkComponent.h 中。
将评论的其余部分复制到 MyFirstNetworkComponent.cpp。
再次编译项目。所有内容都应该干净地编译。
例 32.3.提供的 MyFirstNetworkComponent.h 存根
 #pragma once
 #include <Source/AutoGen/MyFirstNetworkComponent.AutoComponent.h>
 namespace MyGem
 {
    class MyFirstNetworkComponentController
        :  public MyFirstNetworkComponentControllerBase
    {
     public:
            MyFirstNetworkComponentController(                MyFirstNetworkComponent& parent);
       void OnActivate(Multiplayer::EntityIsMigrating) override;
       void OnDeactivate(Multiplayer::EntityIsMigrating) override;
     protected:
    };
 }
MyFirstNetworkComponentController 是一个控制器,但其接口与 AZ::Component 非常相似。
- OnActivate 的作用与 Activate 在常规组件上的作用相同。
- OnDeactivate 的作用与 Deactivate 在常规组件上的作用相同。
例 32.4.提供的 MyFirstNetworkComponent.cpp 存根
#include <Multiplayer/MyFirstNetworkComponent.h>
 #include <AzCore/Serialization/SerializeContext.h>
 namespace MyGem
 {
    MyFirstNetworkComponentController::
      MyFirstNetworkComponentController(MyFirstNetworkComponent& p)
        : MyFirstNetworkComponentControllerBase(p)
    {
    }
 void MyFirstNetworkComponentController::OnActivate(
        Multiplayer::EntityIsMigrating)
    {
    }
 void MyFirstNetworkComponentController::OnDeactivate(
     Multiplayer::EntityIsMigrating)
    {
    }
 }
Note:这里有一个对 MyFirstNetworkComponent 的引用。此组件由 Multiplayer gem 代码生成器为我们生成。此组件已反映并注册到引擎中。
尽管上面的代码看起来并不多,但它通过派生自 MyFirstNetworkComponentControllerBase 而具有强大的功能。例如,控制器可以随时通过 GetParent() 访问其组件,或者使用 GetEntity() 获取控制器所在的实体指针。
例 32.5.从 Controller 访问实体
 void MyFirstNetworkComponentController::OnActivate(
        Multiplayer::EntityIsMigrating)
    {
        AZ_Printf(__FUNCTION__, "we are on entity %s",
            GetEntity()->GetName().c_str());
    }
在下一章开始编写多人游戏逻辑时,我们将探索这些类的多人游戏功能。
覆盖组件
使用与控制器相同的步骤,您还可以覆盖组件以执行不需要对组件数据进行写入访问的各种逻辑。
Tip:这种逻辑的一个示例是,当服务器上得分时收到通知,以更新我们在第 23 章 在 C++ 中与 UI 交互中创建的客户端 UI。
- 修改 MyFirstNetworkComponent.AutoComponent.xml 并启用 OverrideComponent。
- 构建 MyGem.Static。
- 由于我们没有在 MyFirstNetworkComponent 中提供组件,因此会出现构建错误,但通过访问构建文件夹中的 MyFirstNetworkComponent.AutoComponent.h,您会发现存根已更新为包含控制器和组件,供您开始使用。
- 将存根复制到 MyFirstNetworkComponent.h 并MyFirstNetworkComponent.cpp。
- 构建项目。现在一切都应该干净地编译了。
例 32.6.MyFirstNetworkComponent.h 中,组件
 #pragma once
 #include <Source/AutoGen/MyFirstNetworkComponent.AutoComponent.h>
 namespace MyGem
 {
 class MyFirstNetworkComponent
        :
public MyFirstNetworkComponentBase
    {
 public:
        AZ_MULTIPLAYER_COMPONENT(MyGem::MyFirstNetworkComponent,
            s_myFirstNetworkComponentConcreteUuid,
            MyGem::MyFirstNetworkComponentBase);
 static void Reflect(AZ::ReflectContext* context);
 void OnInit() override;
 void OnActivate(Multiplayer::EntityIsMigrating) override;
 void OnDeactivate(Multiplayer::EntityIsMigrating) override;
 protected:
    };
 ...
 }
我的第一个网络组件是常规的 AZ::Component,但通过 MyFirstNetwork ComponentBase 派生。与控制器非常相似,使用 OnActivate 和 OnDeactivate 而不是使用常规的 Activate 和 Deactivate AZ::Component 方法。
例 32.7.MyFirstNetworkComponent.cpp
 #include <Multiplayer/MyFirstNetworkComponent.h>
 #include <AzCore/Serialization/SerializeContext.h>
 namespace MyGem
 {
 void MyFirstNetworkComponent::Reflect(AZ::ReflectContext* rc)
    {
 auto sc = azrtti_cast<AZ::SerializeContext*>(rc);
 if (sc)
        {
            sc->Class<MyFirstNetworkComponent,
                      MyFirstNetworkComponentBase>()
                ->Version(1);
        }
        MyFirstNetworkComponentBase::Reflect(rc);
    }
 void MyFirstNetworkComponent::OnInit()
    {
    }
 void MyFirstNetworkComponent::OnActivate(
        Multiplayer::EntityIsMigrating)
    {
 }
 void MyFirstNetworkComponent::OnDeactivate(
        Multiplayer::EntityIsMigrating)
    {
    }
 ...
 }
Reflect 是自动组件中一种更简单的方法,因为所有反射都是由代码生成的基类完成的,这些基类可以将反射属性处理到 Editor 和脚本上下文。
小结
Note:本章随附的源代码和资源可以在 GitHub 上找到: https://github.com/AMZN-Olex/O3DEBookCode2111/tree/ch32_auto_components
我们已经了解了网络组件的足够多的方面,可以开始编写我们的第一个多人游戏逻辑。要记住的重要思想如下:
- O3DE 多人游戏 gem 提供服务器授权的多人游戏系统。
- XML 定义用于生成网络组件基类。
- 多人游戏控制器具有对组件数据的写入访问权限。
- 多人游戏组件提供对组件数据的只读访问权限