IN THIS ARTICLE
第4章 编写自己的组件
第4章 编写自己的组件
官方参考如何创建 O3DE 游戏项目: https://www.o3de.org/docs/user-guide/project-config/project-manage
游戏工程文件简介
我们在第 2 章 创建新项目中创建了一个新项目。在本章中,我们将查看涉及的文件,并向项目添加新组件。
Note:在后面的章节中,一旦我们介绍了更多概念,例如 EBus、gem、预制件等,我们将重新审视 O3DE 中游戏项目的结构。现在,我将只介绍基础知识,让我们开始编写新组件。
本章包括以下主题:
- 基本项目结构。
- 添加新的 C++ 组件。
- 在 Editor 中查找新的 C++ 组件
新项目的基本结构
Note:此项目的源代码可以在 GitHub 上找到: https://github.com/AMZN-Olex/O3DEBookCode2111/tree/ch04_creating_components
之前,我们创建了一个新项目并将其放置在 C:\git\book\MyProject 中。我们在 C:\git\book\build 中生成了包含 Visual Studio 解决方案MyProject.sln的 build 文件夹。
这里有很多项目和子文件夹,但我们将专注于基本内容。
- ZERO_CHECK是一个特殊的 CMake 目标,它根据对 CMake 构建文件的任何更改重新构建 Visual Studio。当我们添加新组件时,我们需要构建此项目并使用更新重新加载解决方案。
- Editor 是在我们的项目中运行 O3DE Editor 的目标。它实际上并不构建任何 Editor 代码。编辑器二进制文件由 C:\O3DE\21.11.2 中的 O3DE 安装提供。
- MyProject.Static是用于添加新组件的静态库。
图 4.1.Visual Studio 中的 MyProject 解决方案
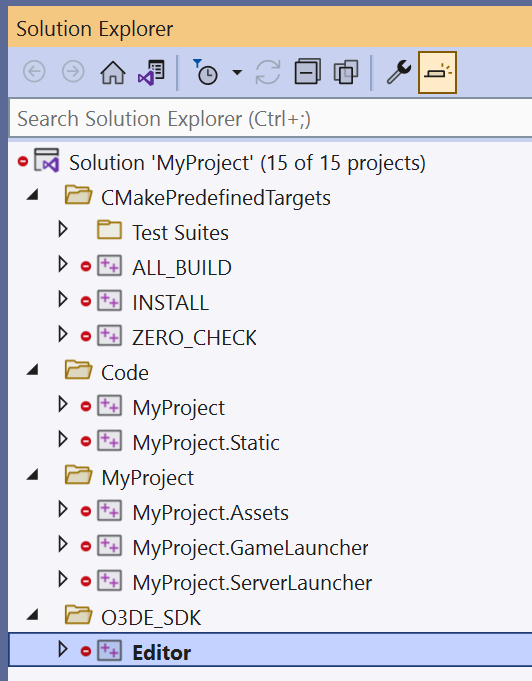
MyProject 是链接 MyProject.Static 并向 Editor 和游戏启动器提供组件信息的动态库。换句话说,MyProject.Static 定义组件,而 MyProject 为您的项目注册这些组件。
目前,我们在项目中拥有的唯一组件是默认的系统组件。
- C:\git\book\MyProject\Code\Source\MyProjectSystemComponent.h
- C:\git\book\MyProject\Code\Source\MyProjectSystemComponent.cpp
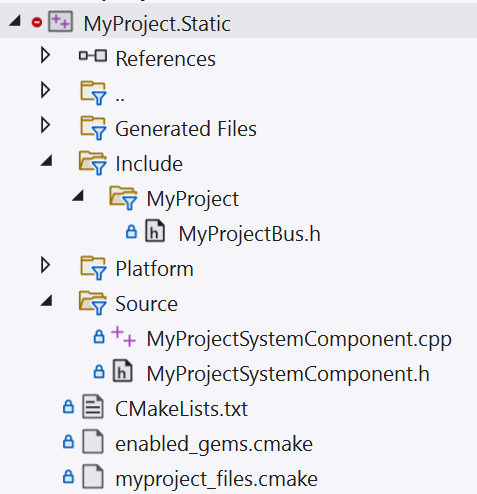
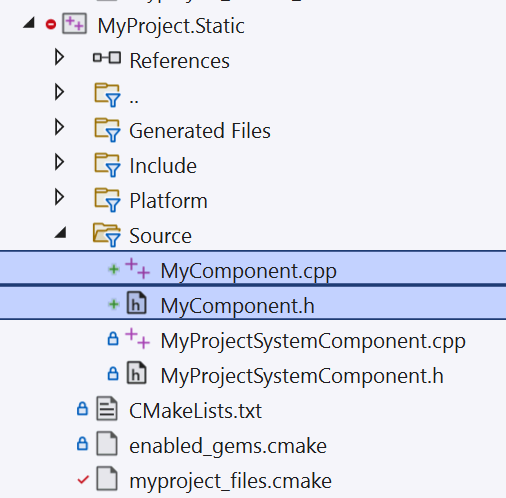
MyProject.Static 库的元素是什么?
- Include/MyProject包含各种公共接口。在后面的章节中,当我们处理组件之间的通信时,我将介绍 O3DE 中可用的各种选项,从第 5 章 什么是 FindComponent 开始?
- Source 包含组件的源文件和头文件,以及您可能编写的任何其他类和对象。
- CMakeLists.txt 是定义 MyProject.Static 的生成脚本。
- enabled_gems.cmake 处理 Gem 系统,我们将在第 12 章 什么是Gem?
- myproject_files.cmake 定义要包含在生成和 Visual Studio 解决方案中的源文件和其他文件的列表
图 4.2.MyProject.Static 库
通常,您编写的任何新组件都将放在 MyProject\Code\Source 下,直接放在 Source 文件夹中或您选择的子文件夹下。
如果要在 C:\git\book\MyProject 下搜索对 MyProjectSystemComponent 的引用,则会在引用它的位置找到另外两个文件。
myproject_files.cmake
*_files.cmake 是 O3DE 项目文件,其中列出了要为项目包含和编译的文件。
例 4.1. MyProject\Code\myproject_files.cmake
set(FILES
    Include/MyProject/MyProjectBus.h
    Include/MyProject/MyProjectTypeIds.h
    Source/MyProjectSystemComponent.cpp
    Source/MyProjectSystemComponent.h
)
Tip:如果您希望在 Visual Studio 中更轻松地访问它们,您还可以包含源代码以外的文件,例如各种配置文件、着色器文件。构建系统会将它们从编译中排除。
你可以看到对 MyProjectSystemComponent 的源文件和头文件的引用。文件路径必须是项目 Code 文件夹的本地路径:C:\git\book\MyProject\Code。
Important:为了将新文件添加到构建中,您必须在此文件中引用它们。
Note:O3DE 使用 CMake 作为其构建系统。本章将仅介绍 CMake 的基本要素,以便添加新组件。接下来的每一章都将介绍足够的 CMake 知识来完成每项任务。随着您逐步阅读这些章节,您将获得所有必要的基础知识,以便对 O3DE 对 CMake 的使用感到满意。
MyProjectModule.cpp
对 MyProjectSystemComponent 的另一个引用在模块文件中。模块源文件是项目的根文件,用于声明项目,对于本章来说,最重要的是,它注册了所有组件。
        MyProjectModule()
            : AZ::Module()
        {
            // Push results of [MyComponent]::CreateDescriptor() into m_descriptors here.
            m_descriptors.insert(m_descriptors.end(), {
                MyProjectSystemComponent::CreateDescriptor(),
            });
        }
在上面的代码片段中添加到 m_descriptors 的任何组件都可以在您的项目中使用,如果配置正确,还可以在 Editor 中使用。这是供参考的整个模块文件。
例 4.2.新项目的默认模块文件 MyProjectModule.cpp
#include <AzCore/Memory/SystemAllocator.h>
#include <AzCore/Module/Module.h>

#include "MyProjectSystemComponent.h"

#include <MyProject/MyProjectTypeIds.h>

namespace MyProject
{
    class MyProjectModule
        : public AZ::Module
    {
    public:
        AZ_RTTI(MyProjectModule, MyProjectModuleTypeId, AZ::Module);
        AZ_CLASS_ALLOCATOR(MyProjectModule, AZ::SystemAllocator);

        MyProjectModule()
            : AZ::Module()
        {
            // Push results of [MyComponent]::CreateDescriptor() into m_descriptors here.
            m_descriptors.insert(m_descriptors.end(), {
                MyProjectSystemComponent::CreateDescriptor(),
            });
        }

        /**
         * Add required SystemComponents to the SystemEntity.
         */
        AZ::ComponentTypeList GetRequiredSystemComponents() const override
        {
            return AZ::ComponentTypeList{
                azrtti_typeid<MyProjectSystemComponent>(),
            };
        }
    };
}// namespace MyProject

#if defined(O3DE_GEM_NAME)
AZ_DECLARE_MODULE_CLASS(AZ_JOIN(Gem_, O3DE_GEM_NAME), MyProject::MyProjectModule)
#else
AZ_DECLARE_MODULE_CLASS(Gem_MyProject, MyProject::MyProjectModule)
#endif
Note:请注意,GetRequiredSystemComponents() 是注册标记为系统组件的组件的特殊方法。系统组件放置在一个特殊的系统实体上,该实体在引擎启动后立即激活,并在游戏关卡之外持续存在,直到关闭。
创建您自己的组件
Note:创建 C++ 组件的官方参考可以在以下位置找到: https://www.o3de.org/docs/user-guide/programming/components/create-component/
您无法在 O3DE 中创建自己的自定义 AZ::Entity,但可以创建从 AZ::Component 派生的自定义组件。本章将介绍如何创建显示在 Editor 中的简单组件。我们将创建一个名为 MyComponent 的虚拟组件。通常,每当向项目添加新组件时,都必须执行以下步骤:
- 在 MyProject\Gem\Code\Source 中创建其头文件 MyComponent.h。
- 在同一文件夹中创建其源文件MyComponent.cpp。
- 使用对上述两个新文件的引用更新 myproject_files.cmake。
- 在 MyProjectModule 的构造函数中MyProjectModule.cpp注册 MyComponent。
- 构建项目。
现在,我将介绍每个步骤。
MyComponent.h
除了现有的组件之外,最基本和最简单的组件如下所示:
例 4.3.最简单的组件
#pragma once
#include <AzCore/Component/Component.h>

namespace MyProject
{
    // An example of the simplest O3DE component
    class MyComponent : public AZ::Component
    {
    public:
        AZ_COMPONENT(MyComponent,
            "{4b589f6b-79f3-47b6-b730-aad0871d5f8f}");

        // AZ::Component overrides
        void Activate() override {}
        void Deactivate() override {}

        // Provide runtime reflection, if any
        static void Reflect(AZ::ReflectContext* reflection);
    };
}
MyComponent 必须派生自 AZ::Component。所有 O3DE 游戏组件都必须直接或通过从它派生的另一个类从 AZ::Component 派生。
宏AZ_COMPONENT。此宏使用唯一的 guid 字符串标记组件类型。第一个参数是类名。第二个参数是 guid 格式的此类的唯一标识符。您负责创建一个带有大括号的唯一 GUID。
Note:Visual Studio IDE 在菜单中有一个内置的 guid 生成器:Tools → Create GUID。您还可以使用 Visual Code 插件甚至 PowerShell 命令生成 guid:
PS C:\work\book\MyProject> (New-Guid).ToString("B")
{dcbbe9e2-5630-4e4b-ad7a-308c7abe5abf}
AZ::Component 接口实现。Activate() 和 Deactivate() 是 AZ::Component 中的纯虚拟方法。它们不必执行任何工作,但必须被覆盖。AZ::Component 在 C:\O3DE\21.11.2\Code\Framework\AzCore\AzCore\Component\Component.h 中定义。我们稍后将讨论这些方法,因为现在它们不需要在 Editor 中显示 MyComponent。
Reflect() 方法:将此组件的运行时序列化提供给 O3DE 引擎。在下一节中,我将展示将组件反映到 Editor 所涉及的最少工作。
MyComponent.cpp
这是组件的描述和行为的位置。但是,现在我们只提供一个简单的存根。
例 4.4.最简单的MyComponent.cpp
#include "MyComponent.h"
#include <AzCore/Serialization/EditContext.h>

using namespace MyProject;

void MyComponent::Reflect(AZ::ReflectContext* reflection)
{
    auto sc = azrtti_cast<AZ::SerializeContext*>(reflection);
    if (!sc) return;

    sc->Class<MyComponent, Component>()
        ->Version(1);

    AZ::EditContext* ec = sc->GetEditContext();
    if (!ec) return;

    using namespace AZ::Edit::Attributes;
    // reflection of this component for O3DE Editor
    ec->Class<MyComponent>("My Component", "[my description]")
      ->ClassElement(AZ::Edit::ClassElements::EditorData, "")
        ->Attribute(AppearsInAddComponentMenu, AZ_CRC("Game"))
        ->Attribute(Category, "My Project");
}
Tip:AZ_UNUSED 是一个宏,它什么都不做,只是假装使用参数来使某些编译器警告静音。在现代 C++ 中,您还可以在参数声明中使用 [[maybe_unused]]。
这足以编译项目。一切就绪后,我们将返回到 Reflect 方法。尝试 Reflect 的不同实现并查看结果会很有用。因此,让我们完成所需的其余 C++ 代码更改。
myproject_files.cmake
该项目的文件列表位于 C:\git\book\MyProject\Code\myproject_files.cmake。由于我们只添加了一个组件,因此以下更改就足够了:
set(FILES
    Include/MyProject/MyProjectBus.h
    Include/MyProject/MyProjectTypeIds.h
    Source/MyProjectSystemComponent.cpp
    Source/MyProjectSystemComponent.h
    Source/MyComponent.cpp
    Source/MyComponent.h
)
MyProjectModule.cpp
最后,项目需要通过将新组件的描述符添加到项目模块来注册新组件。
...
#include "MyComponent.h"
...
        MyProjectModule()
            : AZ::Module()
        {
            // Push results of [MyComponent]::CreateDescriptor() into m_descriptors here.
            m_descriptors.insert(m_descriptors.end(), {
                MyProjectSystemComponent::CreateDescriptor(),
                MyComponent::CreateDescriptor(),
            });
        }
您可以在 Visual Studio 中的 MyProject build target 下找到此模块文件。
图 4.3.Visual Studio 中的 MyProjectModule.cpp
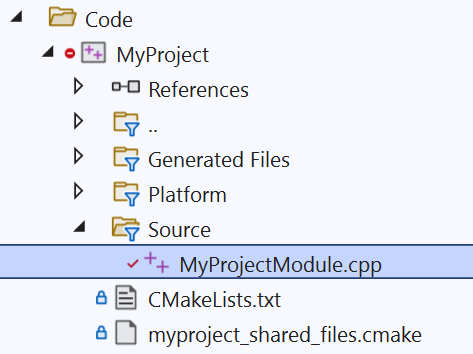
CreateDescriptor 是 AZ::Component 的一种方法。对于简单的任务,此时您无需担心它的作用。请注意,它为引擎提供了组件的描述。
重新编译项目
现在我们已经了解了新的空组件的基本 C++ 更改,让我们讨论更新项目所涉及的工作流程。
Tip:关闭 Editor 和 Asset Processor(如果它们正在运行)。否则,Asset Processor 或 Editor 可能会锁定您的某个项目二进制文件。在这种情况下,您将收到构建错误:
9>LINK : fatal error LNK1104: cannot open file
'C:\git\book\build\bin\profile\MyProject.dll'
我们有两种在 Windows 上编译项目的方法:Visual Studio 解决方案或通过 CMake 命令行界面。
从命令行构建
在某些方面,这是编译项目的最简单方法。从命令行构建的好处是,它允许您使用所需的任何编辑器。执行:
例 4.5.从命令行构建项目
cmake --build C:\git\book\build\ --config profile
Note:“–build” 是一个开关,它告诉 CMake 我们项目的二进制文件夹在哪里。早期我们在 C:\git\book\build 中创建了它。–config 配置文件告诉 CMake 构建我们项目的配置文件风格。
Tip:如果需要调试组件,可以添加以下行,并且仍然使用配置文件二进制文件,而不是在调试版本中编译项目。
#pragma optimize( "", off )
/* unoptimized code section */
#pragma optimize( "", on )
有关更多详细信息,请参阅您的编译器文档,例如: https://docs.microsoft.com/en-us/cpp/preprocessor/optimize?view=msvc-170
从 Visual Studio 构建
一种更用户友好的方法是使用 Visual Studio。
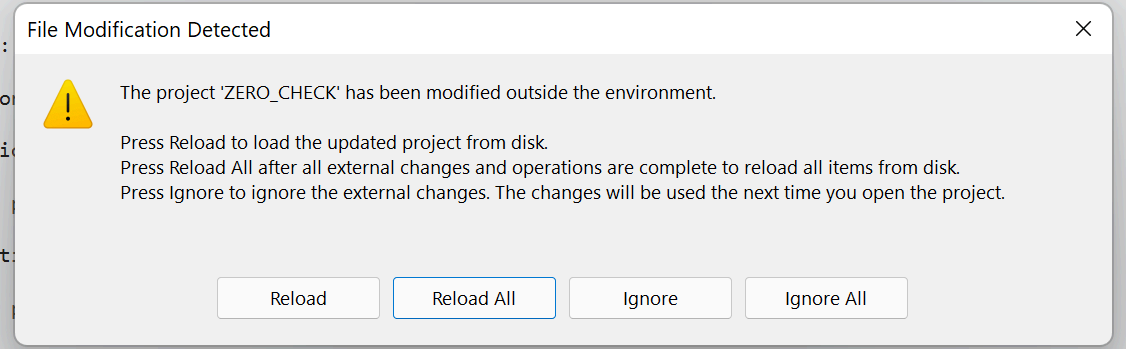
我们的 Visual Studio 解决方案位于构建文件夹:C:\git\book\build\MyProject.sln。在本章中,我们修改了其中一个构建文件 myproject_files.cmake,在编译解决方案时,您将看到以下构建日志。
Build started...
1>------ Build started: Project: ZERO_CHECK
1>Checking Build System
1>CMake is re-running because ...
1> the file 'C:/git/book/MyProject/Code/myproject_files.cmake'
1> is newer than ...
Tip:CMake 根据文件修改时间检测更改。仅当项目中的某个构建文件发生更改时,ZERO_CHECK 才应运行。如果您看到它在每个构建上运行,请检查构建日志并查看 CMake 认为自上次构建以来哪个文件已更改。
生成完成后,Visual Studio 将询问您是否要从磁盘重新加载解决方案,然后选择 Reload All。
重新加载 VS 解决方案
下面是项目现在在 Visual Studio 中使用 MyComponent 文件的样子。
图 4.4.使用 MyComponent 的 Visual Studio 解决方案
小结
如果要重新启动 Editor,则不会在 Entity Inspector 的 Add Component 菜单中找到该组件。这是因为 MyComponent::Reflect() 是空的,因此它没有告诉编辑器 MyComponent。让我们改变一下,以结束本章。
Note:将组件反映到 Editor 是一种设计选择。并非所有组件都需要在 Editor 中可见。我们将在后面的章节中看到双方的各种原因。
例 4.6.使用 Editor 反射MyComponent.cpp
#include "MyComponent.h"
#include <AzCore/Serialization/EditContext.h>

using namespace MyProject;

void MyComponent::Reflect(AZ::ReflectContext* reflection)
{
    auto sc = azrtti_cast<AZ::SerializeContext*>(reflection);
    if (!sc) return;

    sc->Class<MyComponent, Component>()
        ->Version(1);

    AZ::EditContext* ec = sc->GetEditContext();
    if (!ec) return;

    using namespace AZ::Edit::Attributes;
    // reflection of this component for O3DE Editor
    ec->Class<MyComponent>("My Component", "[my description]")
      ->ClassElement(AZ::Edit::ClassElements::EditorData, "")
        ->Attribute(AppearsInAddComponentMenu, AZ_CRC("Game"))
        ->Attribute(Category, "My Project");
}
O3DE 中的反射分为几个部分。现在,只需知道上述代码描述了以下内容就足够了:
- MyComponent 是一个没有属性的空组件,其版本是一 (1)。
    sc->Class<MyComponent, Component>()
        ->Version(1);
- MyComponent 是一个可在游戏(和 Editor)中使用的组件,其名称为 “My Component” ,位于 “My Project” 类别下。
    ec->Class<MyComponent>("My Component", "[my description]")
      ->ClassElement(AZ::Edit::ClassElements::EditorData, "")
        ->Attribute(AppearsInAddComponentMenu, AZ_CRC("Game"))
        ->Attribute(Category, "My Project");
现在,Editor 中的 Add Component 菜单将列出此组件。
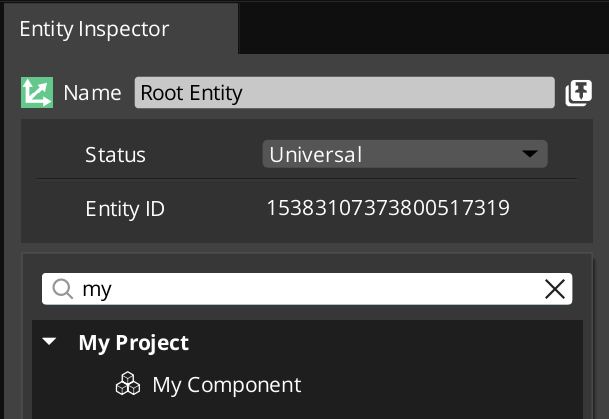
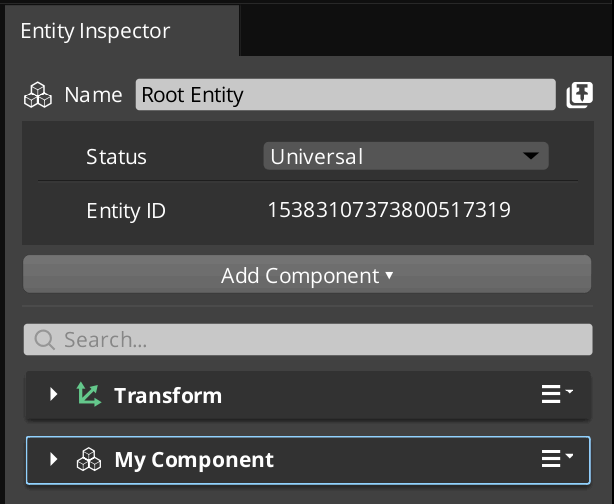
编辑器中的 MyComponent
你可以将其添加到任何实体中,例如添加到我们在第 3 章 实体和组件简介中构建的对象的根实体。
Note:此项目的源代码可以在 GitHub 上找到: https://github.com/AMZN-Olex/O3DEBookCode2111/tree/ch04_creating_components