IN THIS ARTICLE
第10章 在编辑器中配置组件
第10章 在编辑器中配置组件
Note:本章的源代码可以在 GitHub 上找到: https://github.com/AMZN-Olex/O3DEBookCode2111/tree/ch10_reflection
介绍
本章将涵盖以下主题:
- 如何为组件提供编辑器配置。
- 什么是序列化上下文?
- 什么是编辑上下文?
第 9 章,使用 AZ::TickBus 实现 OscillatorComponent。它确实完成了任务。但是,一旦您开始使用 CTRL+G 在编辑器中测试它,您将注意到一个痛点:如果您不喜欢该行为并想修改它,则必须返回 C++,进行更改,重新编译代码,重新启动编辑器,以最终查看您的更改是否达到了您想要的效果。
改变一个变量需要付出太多的努力和时间。具体来说,OscillatorComponent 有两个变量,可以向 Editor 公开:period 和 amplitude。
class OscillatorComponent
{
  ...
  float m_period = 3.f;
  float m_amplitude = 10.f;
};
Editor 中的组件属性
到目前为止,我们实现的组件没有向 Editor 公开任何内容。

没有编辑器参数的组件我们可以修改它的反射,以便我们可以在 Editor 中更改它的某些行为。通过向 Editor 公开 period 和 amplitude 值,Entity Inspector 将显示具有两个可修改字段的组件。
这样,您就可以输入新值并立即对其进行测试,而无需重新编译并重新启动 Editor。这可以通过组件的 Reflect 方法中的 O3DE 反射来实现。
反射层
魔力在于 OscillatorComponent::Reflect。从上一章开始,除了基本注册之外,它没有为 Editor 提供任何额外的配置。
void OscillatorComponent::Reflect(AZ::ReflectContext* reflection)
{
  auto sc = azrtti_cast<AZ::SerializeContext*>(reflection);
  if (!sc) return;
  sc->Class<OscillatorComponent, Component>()
    ->Version(1);
  AZ::EditContext* ec = sc->GetEditContext();
  if (!ec) return;
  using namespace AZ::Edit::Attributes;
  // reflection of this component for O3DE Editor
  ec->Class<OscillatorComponent>("Oscillator Component", "[oscillates the entity]")
    ->ClassElement(AZ::Edit::ClassElements::EditorData, "")
    ->Attribute(AppearsInAddComponentMenu, AZ_CRC("Game"))
    ->Attribute(Category, "My Project");
}
O3DE 中的反射以层(称为上下文)进行描述。第一个也是主层是 SerializeContext。在其上构建了两个层:EditContext(用于 Editor)和 BehaviorContext(用于脚本)。
目前,OscillatorComponent 的反射数据可以这样表示:
图 10.1.基本序列化
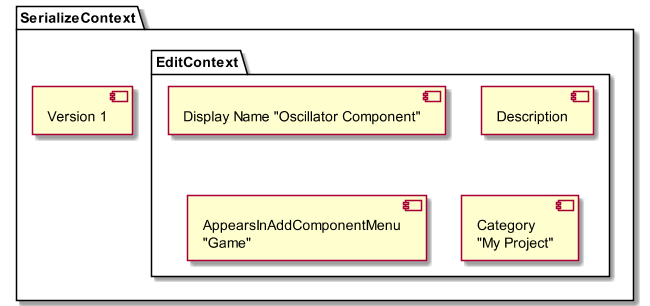
SerializeContext
例 10.1. AzCore\Serialization\SerializeContext.h
/**
* Serialize context is a class that manages information
* about all reflected data structures. You will use it
* for all related information when you declare your data
* for serialization.
* In addition it will handle data version control.
*/
class SerializeContext
SerializeContext 是数据结构的反射信息的全局存储。在本章中,我们将仅限于将自定义组件及其数据反映到其中的讨论。反映组件的起点是将其声明为 SerializeContext 中的类:
sc->Class<OscillatorComponent, Component>()
Class 遵循一种称为 Builder 模式的编程方法,在该方法中,您可以对其返回值连续调用 meth ods,因为它们的返回值始终是 ClassBuilder。
/**
* Internal structure to maintain class information while
* we are describing a class. User should call variety of
* functions to describe class features and data.
*/
class ClassBuilder
ClassBuilder 有很多方法,但我们将专注于我们在 OscillatorComponent 中使用的方法。这些方法也是最常见的。 ClassBuilder: Version.
sc->Class<OscillatorComponent>()
  ->Version(1);
这指定了组件在反射上下文中的版本。您可以将其用作版本控制的一种形式。在开发过程中,每当您对组件进行重大更改时,建议增加版本。
Note:这是 Version() 声明:
/// Add version control to the structure with optional converter.
/// If not controlled a version of 0 is assigned.
ClassBuilder* Version(
  unsigned int version,
  VersionConverter converter = nullptr)
EditContext
例 10.2. AzCore\Serialization\EditContext.h
/**
* EditContext is bound to serialize context. It uses it for data
* manipulation. Its role is to be an abstract way to generate and
* describe how a class should be edited.
  */
  class EditContext
Note:在 EditContext 中描述类之前,必须在 SerializeContext 中描述它。 EditContext 中也使用了类似的类生成器模式。
  EditContext: Display Name and Description.
  ec->Class<OscillatorComponent>("Oscillator Component",
  "[oscillates the entity]")
Class 是一个模板化方法,用于为 Editor 声明一个组件。第一个参数是将显示在 Add Component 菜单中的名称。它不需要匹配确切的类名,并且可以包含空格。第二个是描述 ,当您在 Editor 中将鼠标悬停在其 UI 元素上时,它将显示为工具提示。
Note:您可以在EditContext.h 中找到Class
() 的声明: template<class T> EditContext::ClassBuilder EditContext::Class(const char* displayName, const char* description)
接下来是类的各种特定于 Editor 的属性。但在指定 Attribute 之前,必须声明其 EditorData:
->ClassElement(AZ::Edit::ClassElements::EditorData, "")
这告诉序列化系统我们将描述特定于编辑器的数据。
Note:如果没有以下 Attribute,该组件将不会显示在 Editor 中!
->Attribute(AppearsInAddComponentMenu, AZ_CRC("Game"))
“Game” 这个值有点遗憾,因为它实际上意味着这个组件将出现在 Editor 的 Add Component 菜单中。如果您希望在 Editor 中隐藏您的组件,您可以完全省略此属性。
Note:您可能想知道 Editor 旁边是否有其他 Add Component 菜单。是的,还有一些类型,例如 System 组件 (“System”)、Level 组件 (“Level”) 和 User Interface 组件 (“UI”) 以及 Canvas User Interface 组件 (“CanvasUI”)。例如,可以使用以下命令指定系统组件:
->Attribute(AppearsInAddComponentMenu, AZ_CRC("System"))这些组件将在后面的章节中讨论。
另一个有用的属性是 Category。它允许您在 Add Component 菜单中将组件分组在一起。
->Attribute(Category, "My Project")
这是使 OscillatorComponent 显示在 Editor 中的 My Project 下的属性。

Add Component (添加组件) 菜单中的 Oscillator (振荡器) 组件
编辑器中的可配置字段
本章扩展了 OscillatorComponent 的反射,包括它的两个成员变量: m_amplitude 和 m_period。我们还将版本从 1 增加到 2,以便进行版本控制。
图 10.2.SerializeContext 和 EditContext
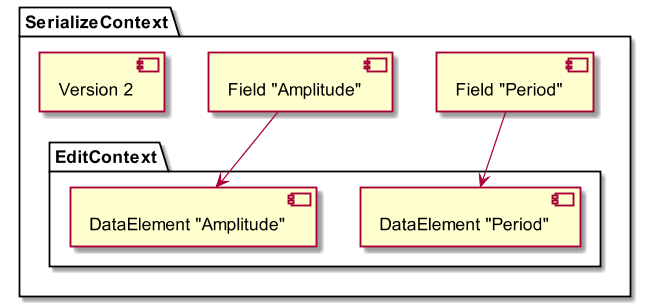
Note:在 Editor 中声明可配置字段之前,必须在 SerializeContext 中定义它。另请注意,名称必须相同。在这种情况下,不同的上下文会提供同一字段的附加描述。从某种意义上说,SerializeContext 声明并创建一个字段,而 EditContext 使用 Editor 配置扩展了该定义。
例 10.3.带有编辑器配置的 reflect()
void OscillatorComponent::Reflect(AZ::ReflectContext* reflection)
{
  auto sc = azrtti_cast<AZ::SerializeContext*>(reflection);
   if (!sc) return;
      sc->Class<OscillatorComponent, Component>()
   // serialize m_period
          ->Field("Period", &OscillatorComponent::m_period)
   // serialize m_amplitude
          ->Field("Amplitude", &OscillatorComponent::m_amplitude)
          ->Version(2);
      AZ::EditContext* ec = sc->GetEditContext();
   if (!ec) return;
   using namespace AZ::Edit::Attributes;
   // reflection of this component for O3DE Editor
      ec->Class<OscillatorComponent>("Oscillator Component",
   "[oscillates the entity]")
        ->ClassElement(AZ::Edit::ClassElements::EditorData, "")
          ->Attribute(AppearsInAddComponentMenu, AZ_CRC("Game"))
          ->Attribute(Category, "My Project")
   // expose the setting to the editor
          ->DataElement(nullptr, &OscillatorComponent::m_period,
   "Period", "[the period of oscillation]")
   // expose the setting to the editor
          ->DataElement(nullptr, &OscillatorComponent::m_amplitude,
   "Amplitude", "[the height of oscillation]");
 }
与之前的 Reflect 实现相比,有两个新的变化:Field 和 DataElement。
Field
回想一下,OscillatorComponent 有一个成员变量:m_period。鉴于此,可以使用以下命令将其声明为序列化字段:
->Field("Period", &OscillatorComponent::m_period)
Field 的第一个参数是 const char*,第二个参数是指向成员变量的点。
DataElement
Editor(和 Project Configurator)的对应项是 DataElement:
->DataElement(Default, &OscillatorComponent::m_period,
"Period", "[the period of oscillation]")
第一个元素是自定义 UI 标识符。通常,AZ::Edit::UIHandlers::D efault(或简称 nullptr)适用于大多数用例。这包括常规的单个值,例如整数、浮点数、字符串和向量(AZ::Vector3 等)。如果您必须明确指定默认 UI 处理程序,则可以参考 AZ::Edit::UIHandlers 下的可用选项列表。
例 10.4. AzCore\Serialization\EditContextConstants.inl
namespace UIHandlers
{
/**
* Helper for explicitly designating the default UI handler.
* i.e. DataElement(DefaultHandler, field, ...)
    */
 const static AZ::Crc32 Default = 0;
 const static AZ::Crc32 Button = AZ_CRC("Button", 0x3a06ac3d);
 const static AZ::Crc32 Color = AZ_CRC("Color", 0x665648e9);
 ...
DataElement 的第二个参数是指向组件的成员变量的指针。第三个参数是之前使用 Field 分配给成员变量的名称。最后一个参数是 description。
小结
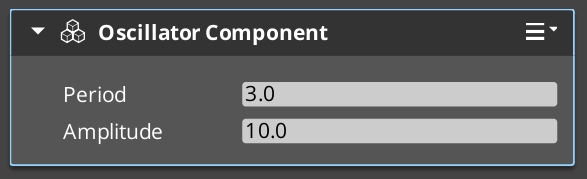
通过本章中的更改,现在可以在 Editor 中配置该组件。
Editor 中的可配置选项
Note:本章的源代码可以在 GitHub 上找到: https://github.com/AMZN-Olex/O3DEBookCode2111/tree/ch10_reflection
您可以通过修改值并使用快捷键 CTRL+G 立即在 Editor 中测试行为来快速测试更改。(ESC 在 Editor 中退出该剧。