IN THIS ARTICLE
植被弯曲的顶点变形教程
在本教程中,您将学习如何制作自己的材质类型,以及如何编辑顶点着色器以实现植被弯曲效果。虽然我们以植被弯曲为例,但本教程的主要目标是让您熟悉如何使用和创建自定义材质类型和顶点着色器。
本教程涵盖以下概念:
- 在 材质编辑器 中创建 材质
- 创建自定义 材质类型
- 为您的材质类型添加 可调属性
- 将 通道 添加到您的材质类型
- 编辑 顶点着色器
- 使用 可选顶点流
- 使用 通道树可视化器 调试通道
VegetationBending 材质类型允许材质弯曲和摆动,从而模拟风如何影响植被。它允许通过树枝和树叶的轻微移动以及整个对象的移动来弯曲细节。
本教程中的代码可以在 o3de/samples-code-gems 存储库中的
Atom Tutorials Gem 中找到。在那里,您可以找到本教程所需的模板代码和资源,以及最终代码。
在学习过程中,您可以参考 材质类型和着色器 教程,该教程对本教程中使用的机制进行了更高级别的解释。
创建材质类型
植被弯曲是通过使用顶点着色器创建效果的材质完成的。首先,通过以下步骤设置植被弯曲材料类型:
从 GitHub 下载并克隆
o3de/sample-code-gems。本教程的模板文件位于
atom_gems/AtomTutorials/Templates/VegetationBending/中。将所有文件移动到{your-project-path}\Materials\Types\。将
atom_gems/AtomTutorials/Assets/VegetationBending/Objects/中的所有文件移动到{your_project_path}\Objects。根据需要创建Objects文件夹。在文本编辑器中打开
{your-project-path}\Materials\Types\VegetationBending.materialtype。在
propertyLayout>propertyGroups下,请注意有许多条目带有{your-path-to-o3de}。将{your-path-to-o3de}` 替换为引擎的相应路径。例如,生成的路径可能如下所示:
C:/o3de/Gems/Atom/Feature/Common/Assets/Materials/Types/MaterialInputs/BaseColorPropertyGroup.json.已知问题:目前,O3DE 无法跨 Gem 导入属性组。因此,您必须对绝对路径进行硬编码作为概念证明,即使不建议使用硬编码,因为它会限制可移植性。
有一个 GitHub issue 用于启用跨 Gem 导入。
没有列出此问题的信息。通过引用一个 问题、讨论, 或拉取请求添加信息。打开 编辑器 ,资产应该会自动处理。您可以在 Asset Processor 中检查其状态。如果
VegetationBending.materialtype处理失败,请检查您在步骤 5 中使用了正确的路径。
以下列表是材质所需文件的概述: ``
.materialtype文件引用您将在此材质类型的材质上使用的着色器文件。.shader文件定义应使用哪些类型的着色器(如顶点和像素着色器),并引用.azsl文件中的实际着色器代码。它们还指定了DrawList,它控制哪个通道应该运行那个着色器。- 通常,
.azsl文件将包含.azsli文件,这些文件也是用 Amazon Shading Language (AZSL) 编写的。这些文件是独立的,因此多个.azsl文件可以重复使用.azsli文件中的着色器代码。
Tip:这些模板文件是通过复制StandardPBR文件的重要部分,然后对其进行修改来创建的。当您将来创建自己的材质类型时,您可以类似地复制StandardPBR文件并从那里开始工作。
添加材质类型为 VegetationBending 的材质
在开始编辑任何文件之前,请在 编辑器 中使用您的材质类型创建材质。
通过选择 File > New 来创建新材质。然后在Select Type下拉菜单中,选择VegetationBending,为材质命名,例如
my_material。选择文件位置位于项目文件夹中的某个位置,例如项目的Materials文件夹中。按 Ctrl-S 保存材质。然后,关闭 Material Editor。
返回编辑器,选择默认关卡中已包含的 shader ball。Entity Inspector现在应该显示 shader ball 对象的属性。
在 Entity Inspector 中,查找着色器球的 Mesh 组件,然后单击 Add Material Component。
在着色器球的 Material (材质) 组件中,单击 Default Material 旁边的文件图标。然后,选择您刚刚创建的名为
my_material的 VegetationBending 材质。

太好了,您用自定义材质类型创建了一个材质!
编辑顶点着色器
现在,您可以编辑着色器以更改引擎渲染材质类型的方式。
在偏移处渲染材质
首先,您将编辑顶点着色器以在偏移处渲染着色器球。
打开
{your-project-path}\Materials\Types\VegetationBending_ForwardPass.azsli。回想一下,.azsli文件包含着色器代码。此文件包含 VegetationBending 材质类型的 前向通道 的顶点和像素着色器代码。Caution:确保打开的是.azsli文件。还有一个VegetationBending_ForwardPass.azsl文件。查找函数
VegetationBending_ForwardPassVS。在函数的末尾,就在
OUT.m_worldPosition = worldPosition.xyz;之前,添加以下内容。这会将对象在 x 轴正方向上的位置调整5个单位。worldPosition.x += 5.0;Tip:您可能想知道为什么编辑的是worldPosition而不是m_position;m_position是此顶点相对于模型原点的位置,而worldPosition是此顶点相对于关卡(或世界)原点的位置。尝试编辑m_position和worldPosition的其他维度,看看它们有什么作用!确保 编辑器 已打开(如果尚未打开)。
使用 Ctrl-S Ctrl-S 保存文件,Asset Processor 应自动检测更改并处理文件。您可以打开 Asset Processor 并检查文件何时完成处理。
Note:如果您找不到 Asset Processor,请导航到右下角的 Windows 任务栏,然后单击 。
。当 Asset Processor 处理完更改后,您应该会在 Editor 中看到您的材质看起来不同!
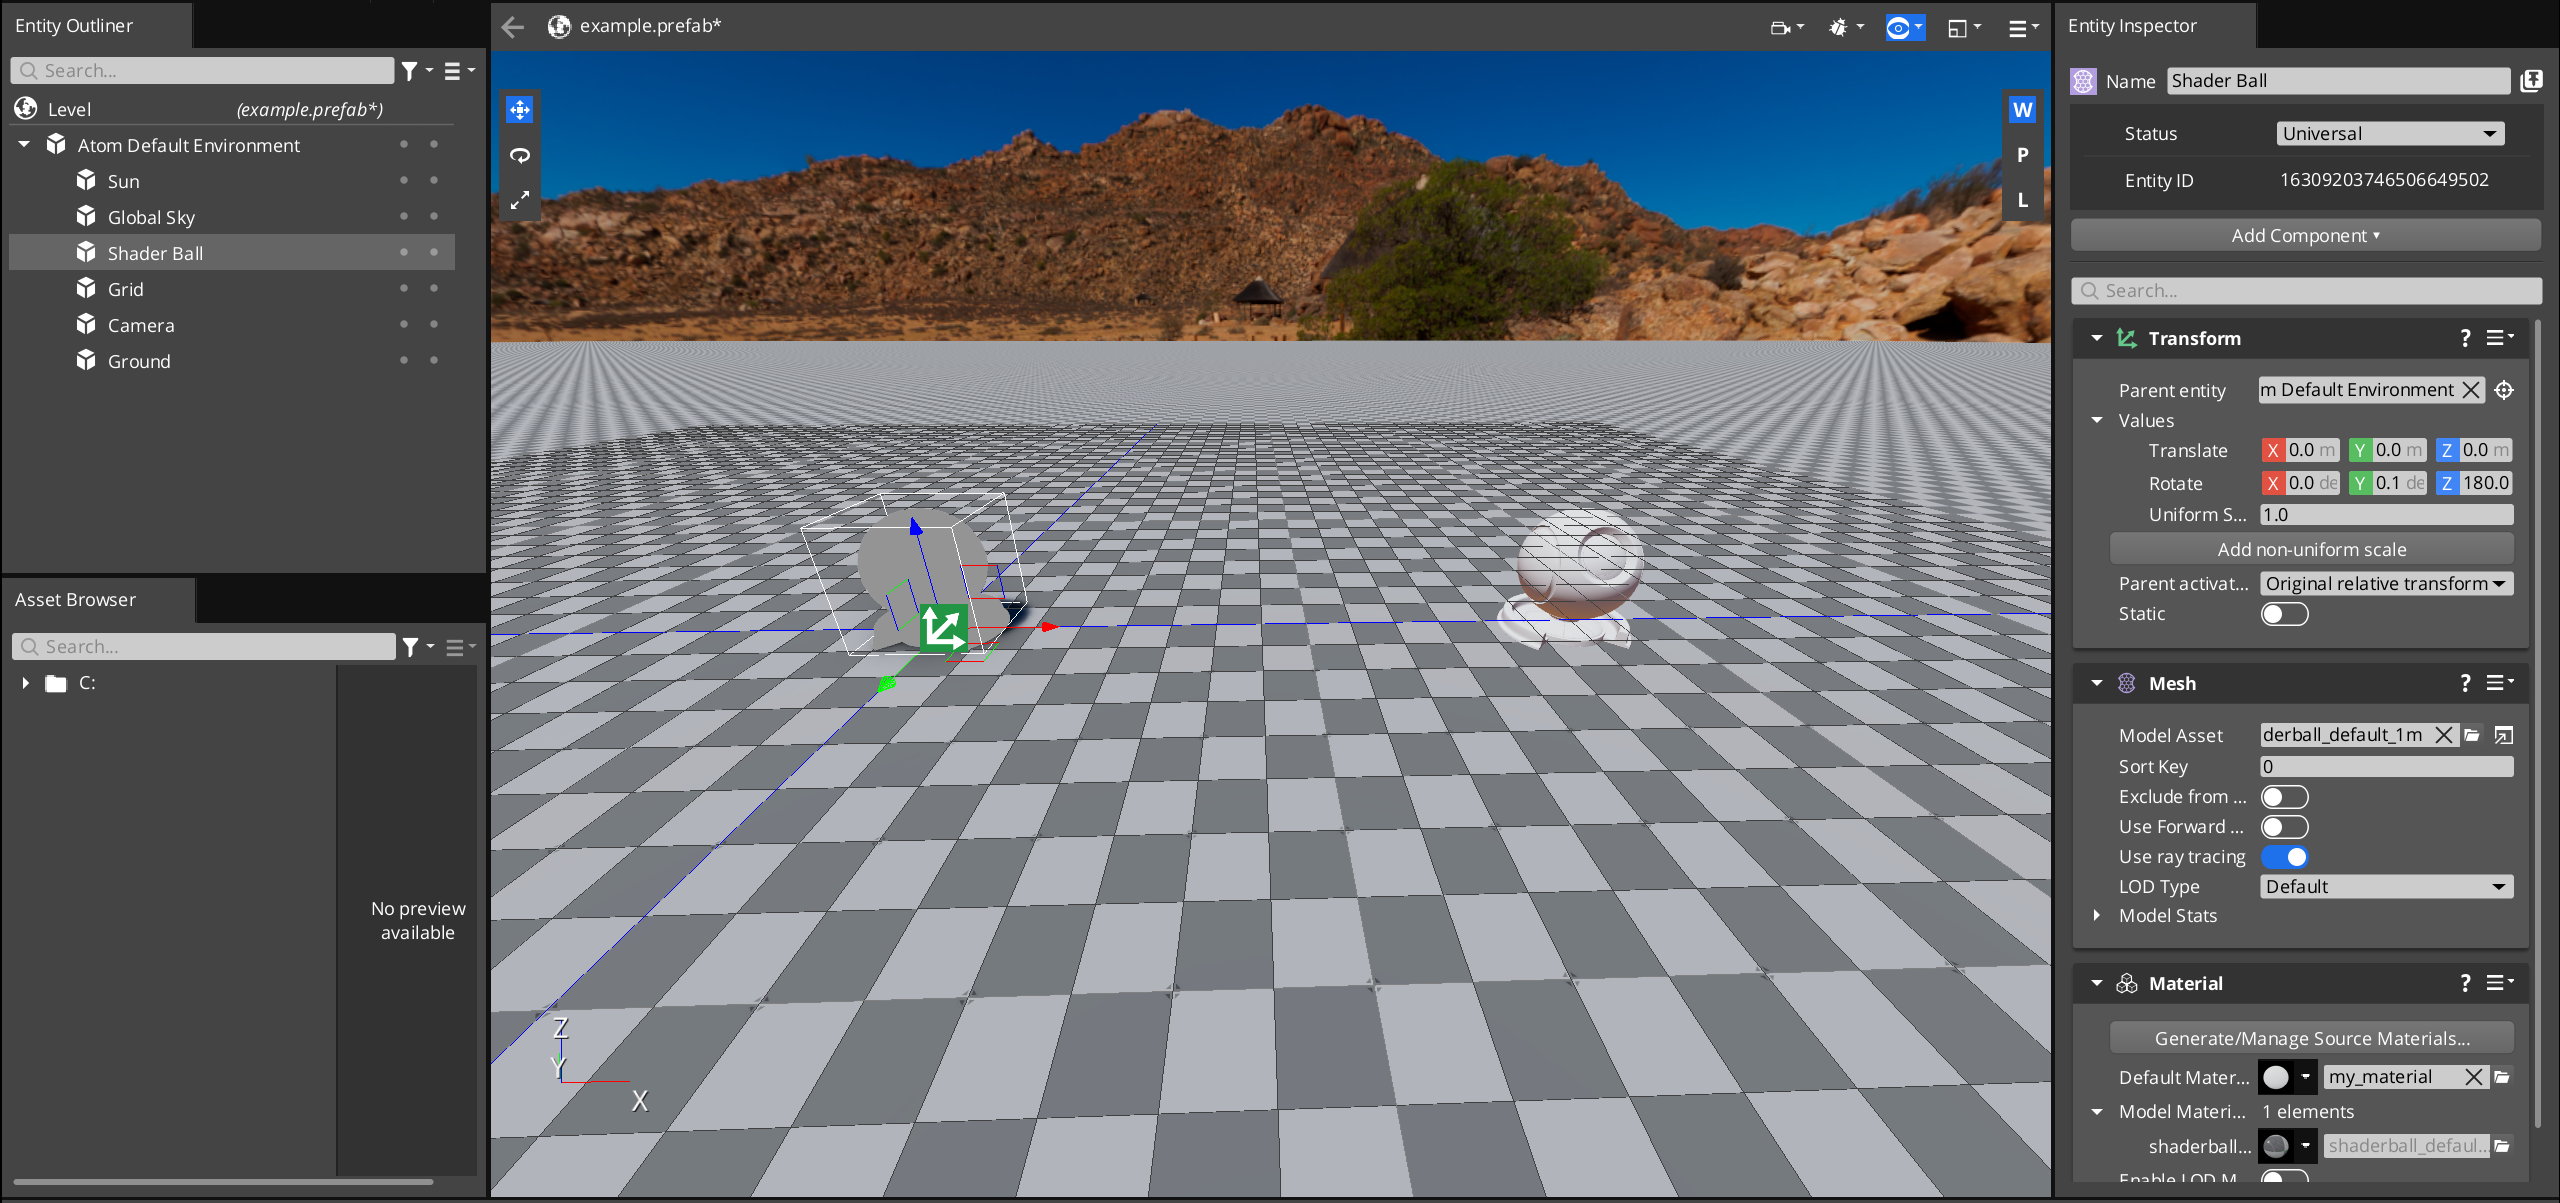
着色器球的主要纹理按预期以偏移量显示,但灰色轮廓仍位于对象的原点。这是因为您只编辑了前向通道,而尚未编辑 depth pass。此材质经过的所有通道都在 VegetationBending.materialtype 中引用。
请记住,不同的通道会渲染材质的不同部分,并且某些通道的输出用作其他通道的输入。您可以在
Passes部分找到有关通行证的更多信息。
对深度通道重复上述步骤:
打开
VegetationBending_DepthPass.azsli。Caution:确保你没有编辑VegetationBending_DepthPass_WithPS.azsli文件。查找函数
DepthPassVS。在函数的结尾,就在
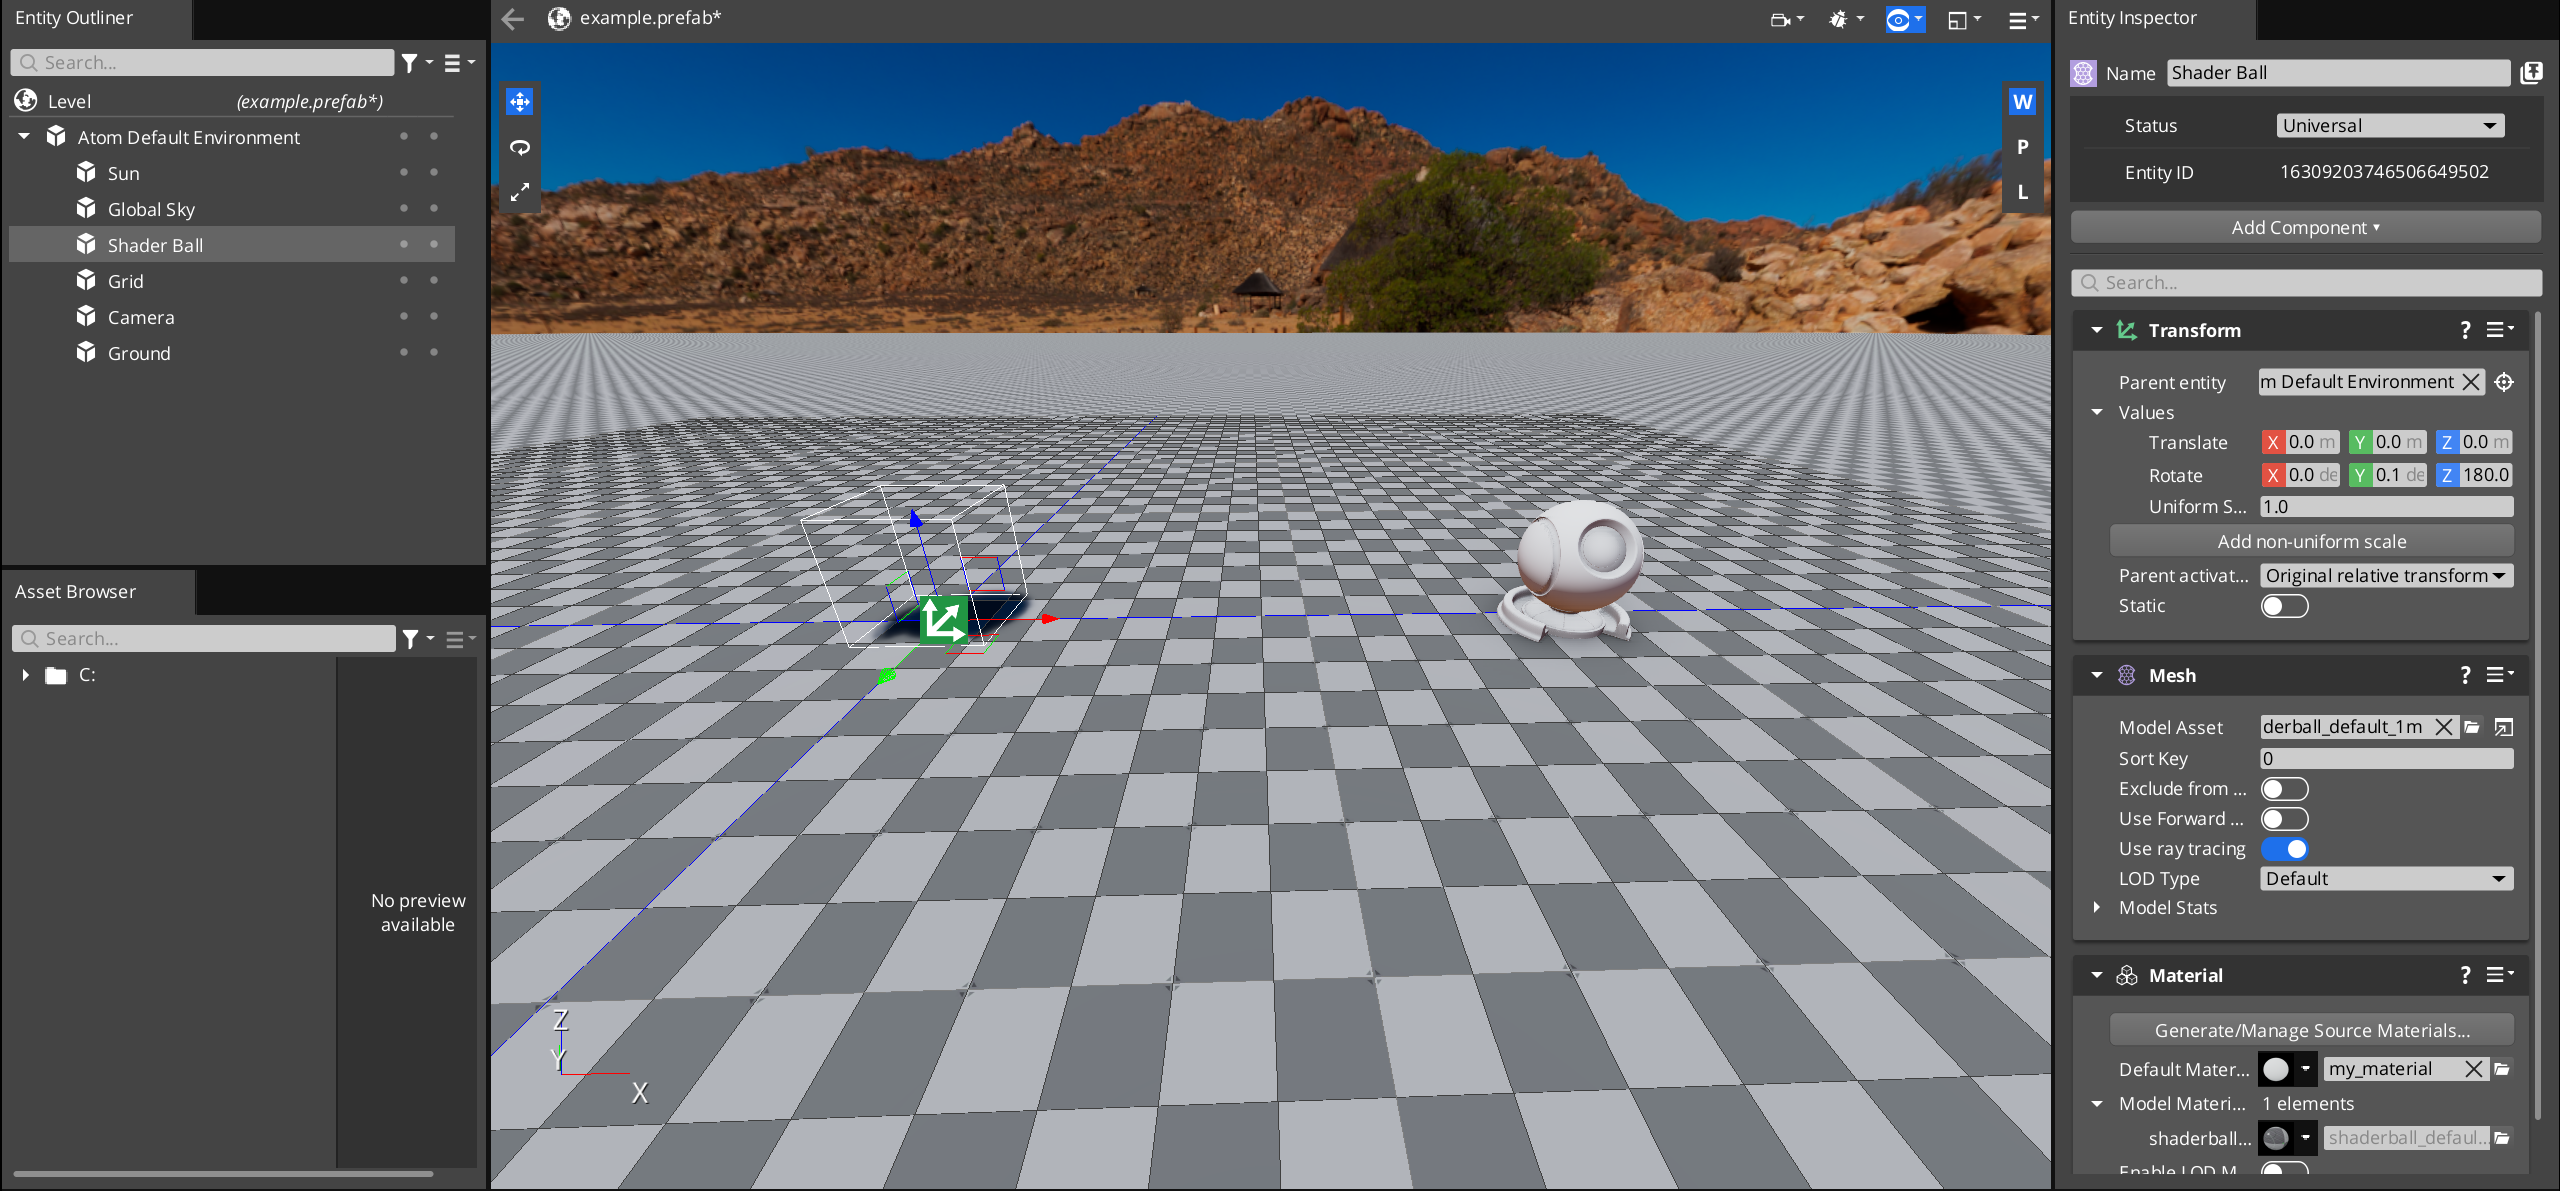
OUT.m_position = mul(ViewSrg::m_viewProjectionMatrix, worldPosition);, 添加:worldPosition.x += 5.0;保存您的文件并查看 Editor。着色器球现在应该以偏移量完全渲染!
Note:请注意,阴影仍处于原始位置。这是因为您尚未更新阴影贴图着色器。在本教程的后面部分,您将添加带有像素着色器的自定义阴影贴图,这将修复阴影。
添加材质属性
目前,代码指定以 5 个单位的偏移量移动球。但是,您可能希望使用一种更简单的方法来更改 Editor 中的偏移量,而不必更改代码。您可以使用 Material Editor 中的 adjustable properties 执行此操作。
在文本编辑器中打开
{your-project-path}\Materials\Types\MaterialInputs\VegetationBendingPropertyGroup.json。在
properties下,请注意xOffset属性已在此处写入。按照xOffset作为指导,添加另一个属性yOffset。代码最终应如下所示:{ "name": "yOffset", "displayName": "yOffset", "description": "The offset in the y direction.", "type": "Float", "defaultValue": 0.0, "min": 0.0, "max": 10.0, "connection": { "type": "ShaderInput", "name": "m_yOffset" } }Caution:不要忘记在xOffset属性的括号后添加一个逗号,以便文件是有效的 JSON。在文本编辑器中打开
{your-project-path}\Materials\Types\VegetationBending_Common.azsli。此文件包含在 VegetationBending 材质类型的每个通道中。它包括许多文件,用于其他着色器资源组 (SRG) 以及所有通道所需的其他函数。查找 SRG 定义:
ShaderResourceGroup MaterialSRG : SRG_PerMaterial。在这里,您将定义VegetationBendingPropertyGroup.json中的 连接名称 引用的变量,它应该是m_xOffset和m_yOffset。因此,在
MaterialSRG中,添加以下内容:float m_xOffset; float m_yOffset;您需要将属性包含在
.materialtype文件中。打开VegetationBending.materialtype,然后查看propertyLayout>propertyGroups,其中包含 JSON 文件列表。JSON 文件定义材质的属性,在此处列出它们允许在 Material Editor 中调整属性。 如果查看 Material Editor 并打开 VegetationBending 类型的材质,则可以看到该材质的可调整属性与 JSON 文件中定义的属性匹配。在列表顶部添加用于植被弯曲的属性组条目。
{
   "$import": "MaterialInputs/VegetationBendingPropertyGroup.json"
},
Note:
太好了,现在您已经包含了属性,您可以在代码中使用这些属性并查看它们。
在文本编辑器中打开
VegetationBending_ForwardPass.azsli。您可以使用
MaterialSrg::m_xOffset引用 x offset 参数。 因此,将worldPosition.x += 5.0替换为以下内容,并对 y 偏移量执行相同的操作:worldPosition.x += MaterialSrg::m_xOffset; worldPosition.y += MaterialSrg::m_yOffset;Tip:回想一下,您在VegetationBending_Common.azsli的材料 SRG 中定义了属性。这就是你在这里用MaterialSrg引用它们的方式。对深度通道重复步骤 2,
VegetationBending_DepthPass.azsli。保存文件并打开 Material Editor。
选择您之前制作的 VegetationBending 材质 (
my_material),然后在右侧的 Inspector 中找到 Vegetation Bending。根据需要调整 x 和 y 偏移量!保存并返回到编辑器。
观察偏移量如何与 Material Editor 中的输入相匹配!
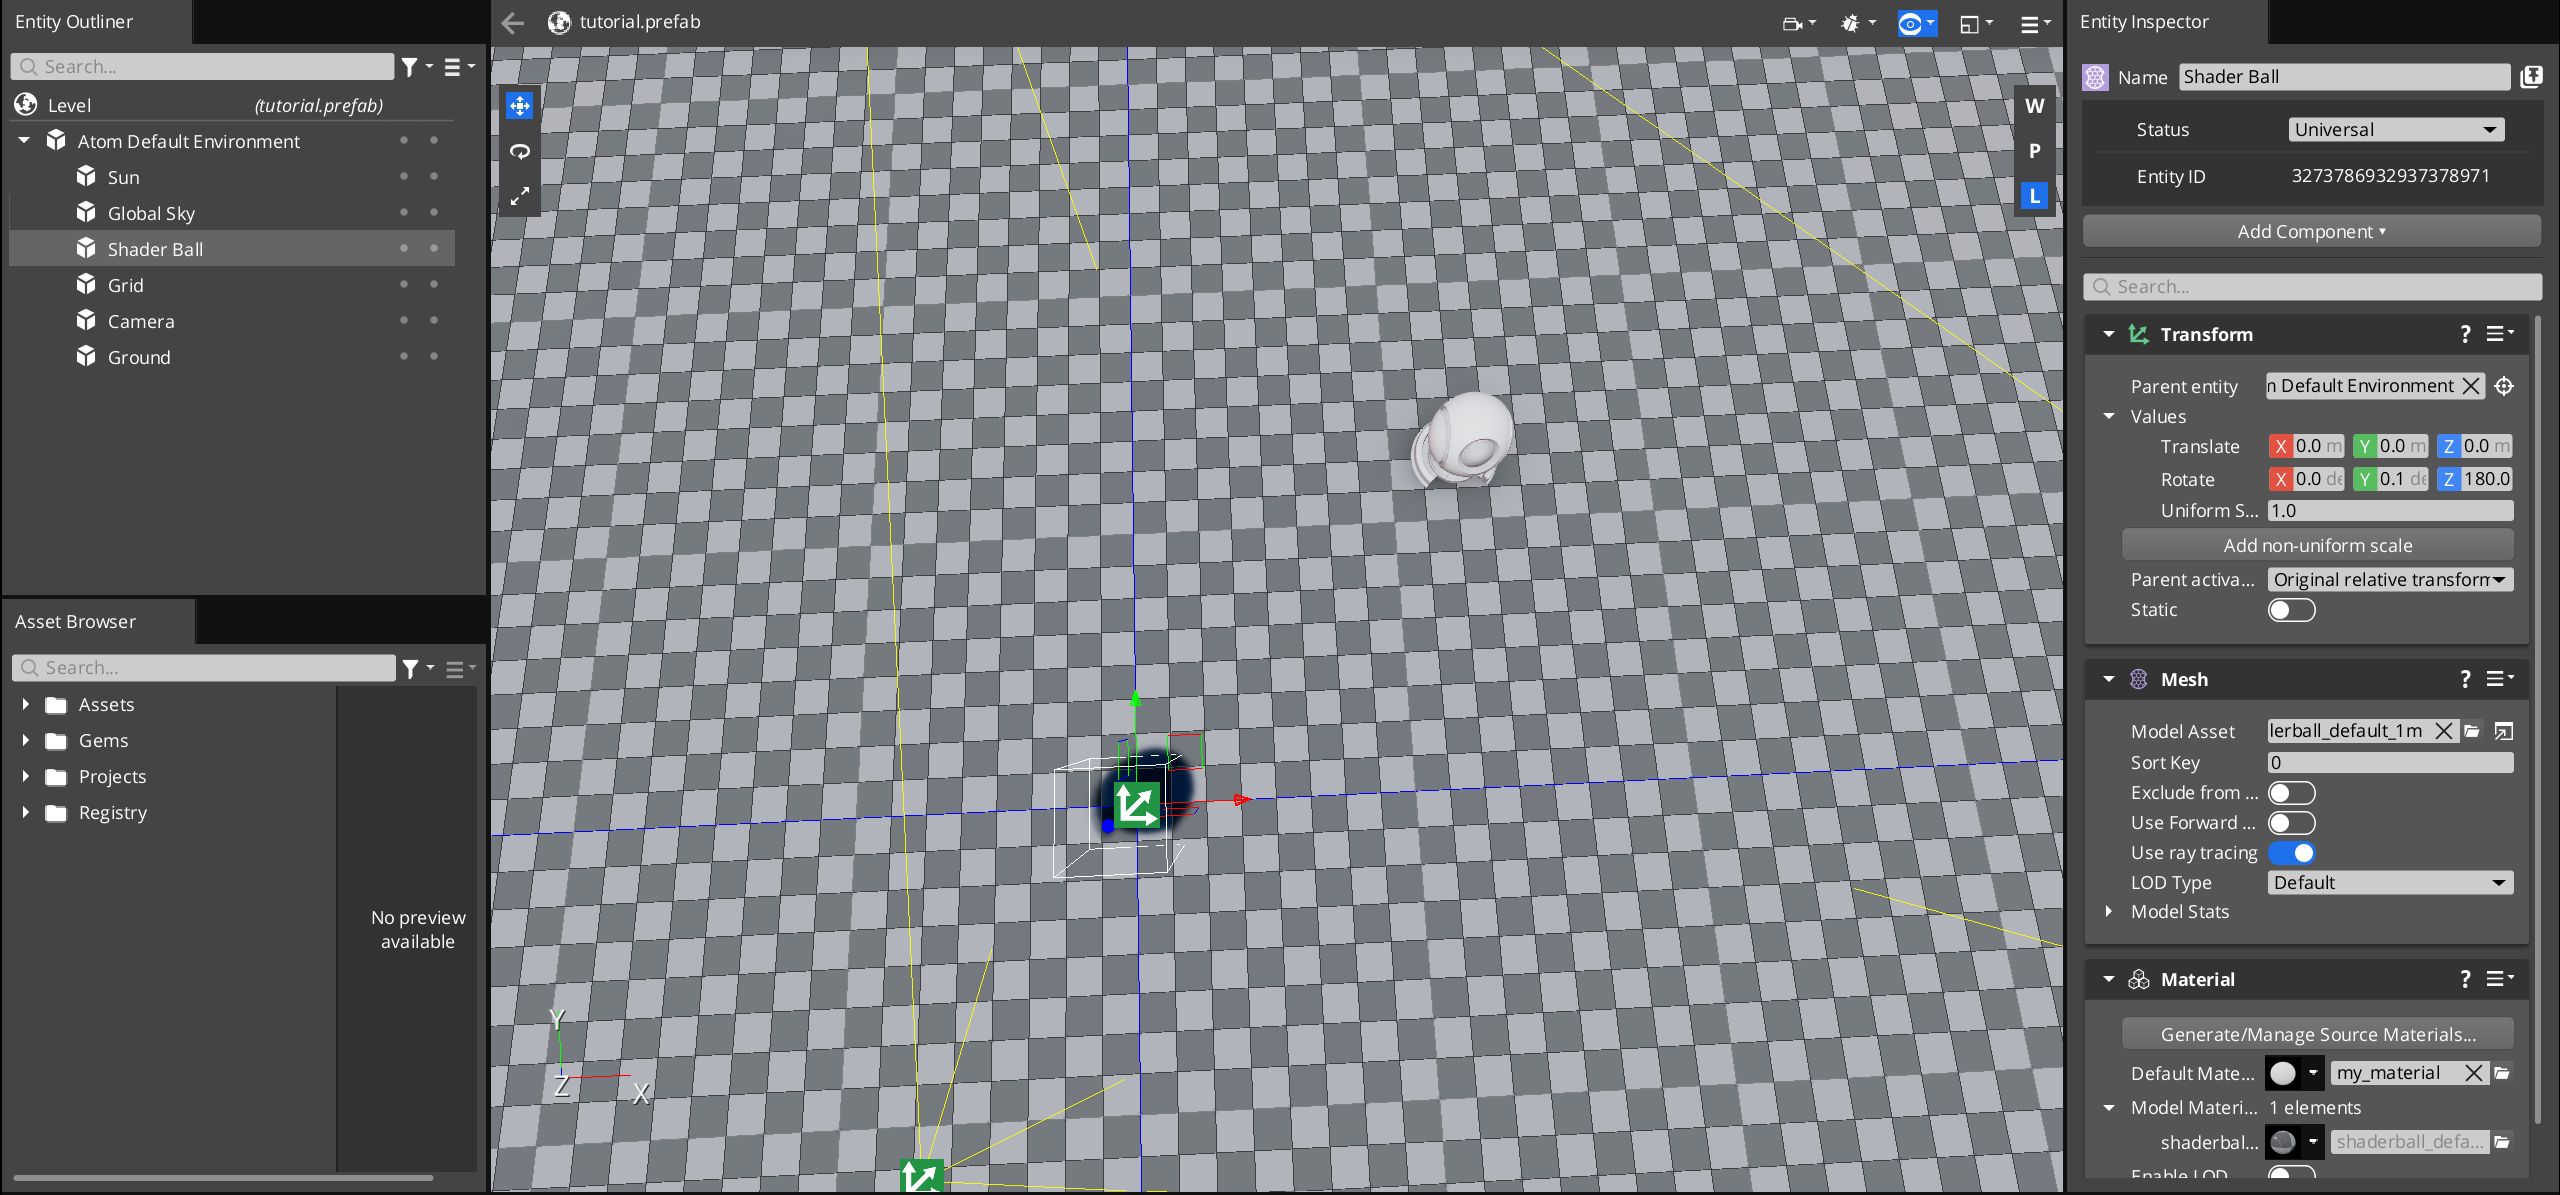
恭喜!现在,您已经迈出了编写自己的自定义着色器的第一步。
准备添加植被弯曲
在开始编写植被弯曲代码之前,您将添加树模型和材质,引入可选的顶点流,并添加更多通道。
添加树
下一步是添加一个模型,稍后您将向该模型添加植被弯曲。使用该模型,您还可以测试将在后续步骤中编写的代码。
打开 Editor 到您的项目和关卡。
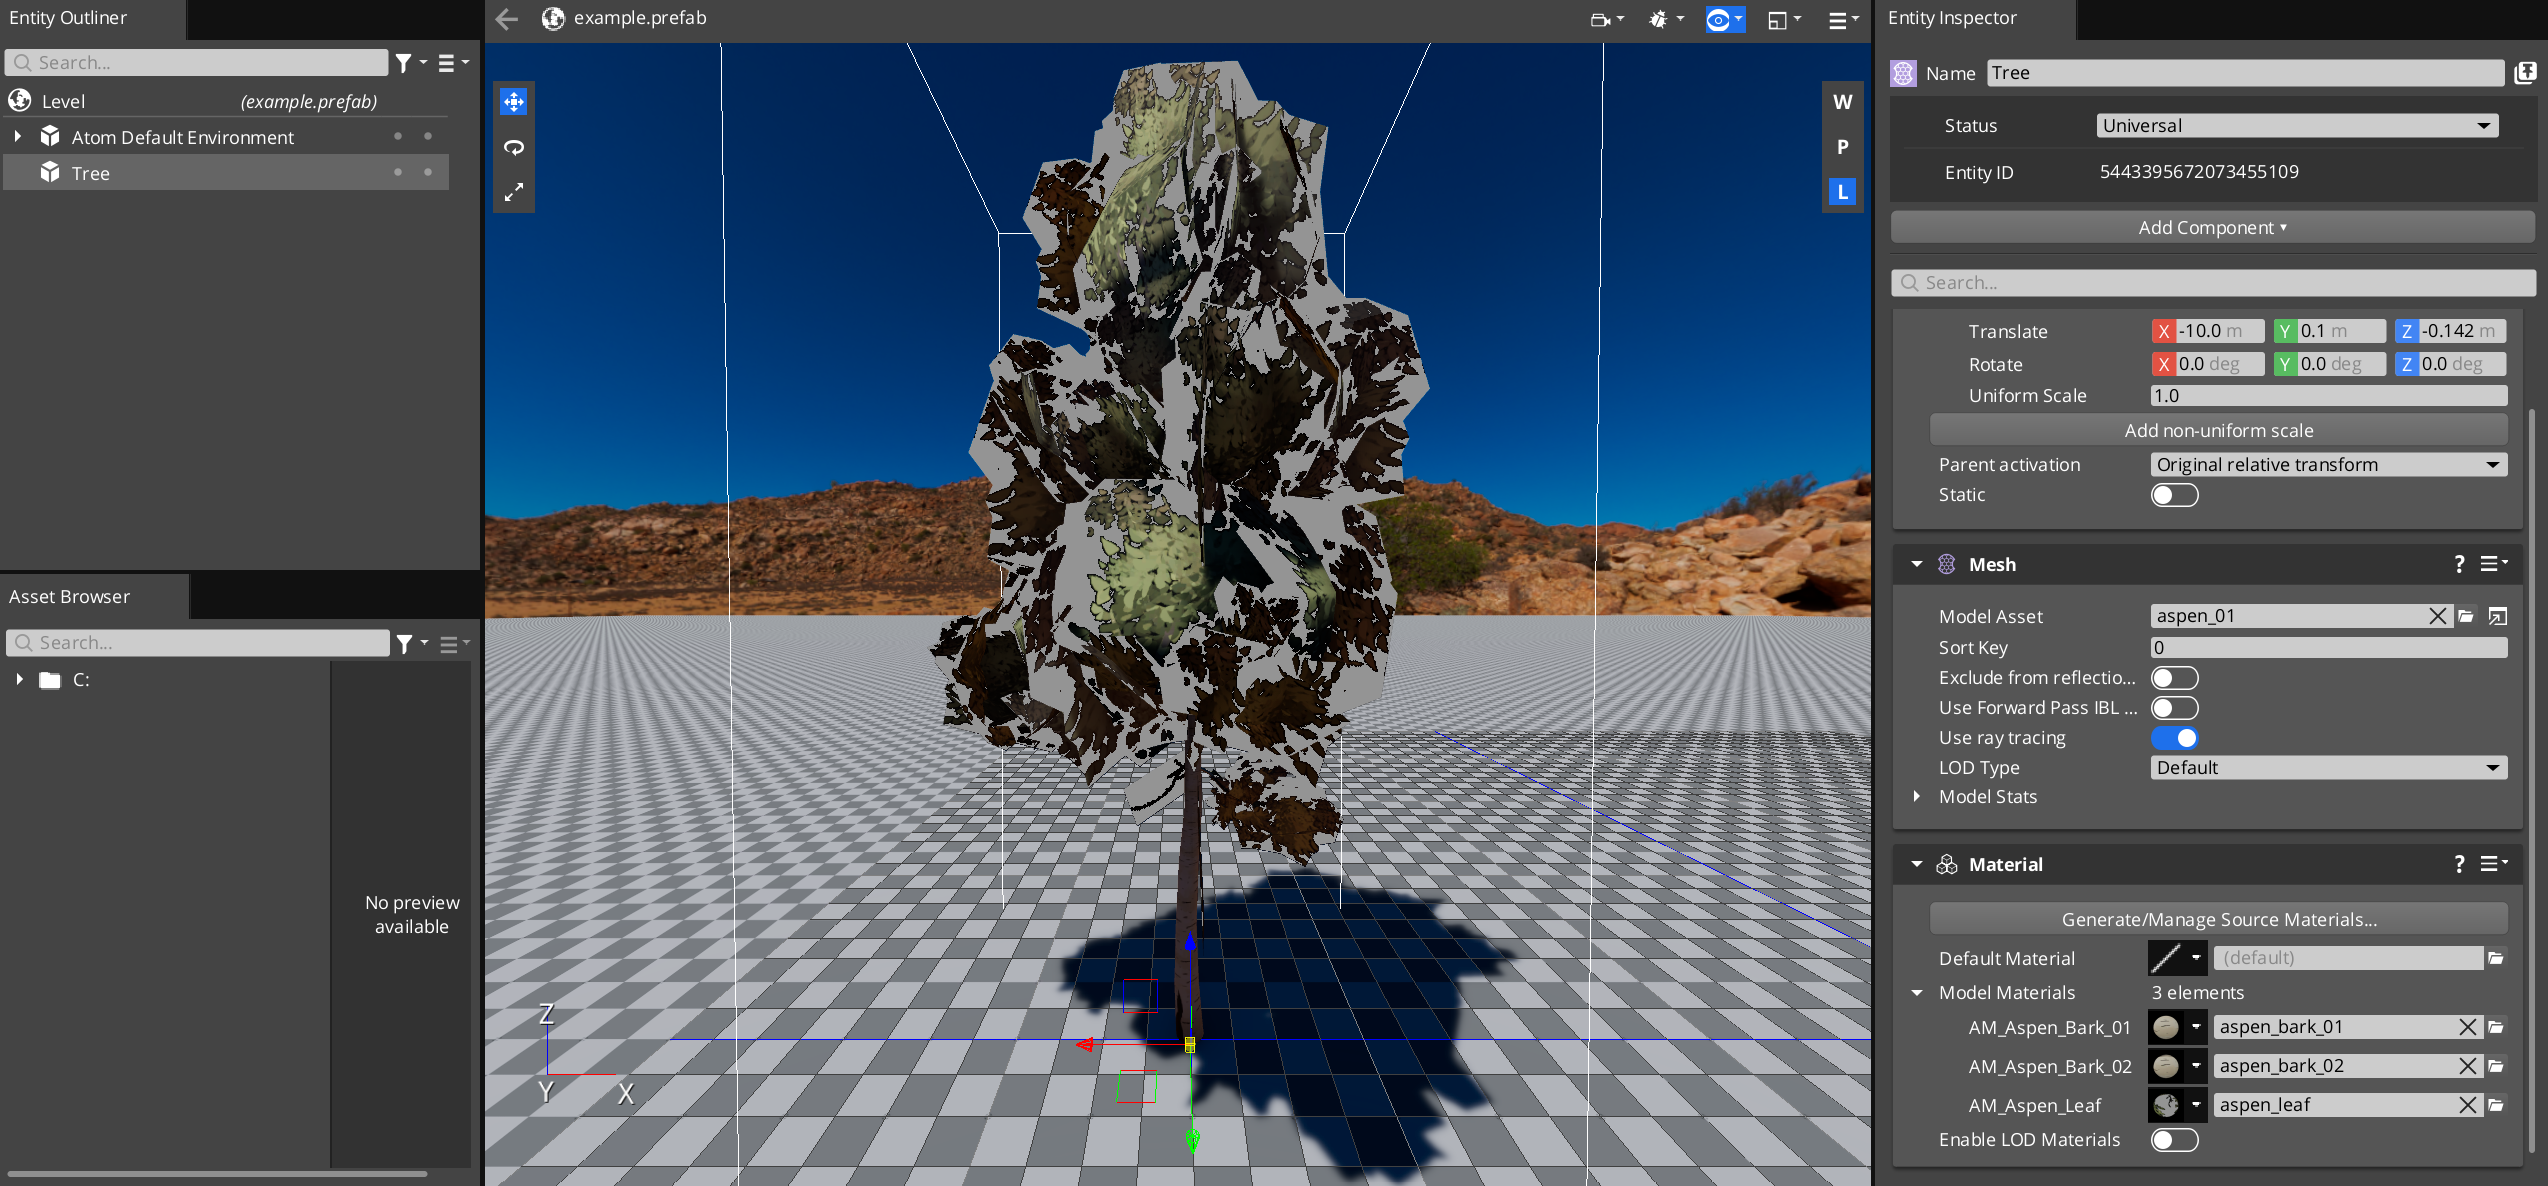
创建一个新实体并将其重命名为
Tree。如需帮助,请参阅 实体和Prefab基础知识页面。将 Mesh 组件添加到实体中。在 Entity Inspector 中,单击 Add Component,然后选择 Mesh。
将
tree.fbx模型添加到实体。在 Mesh (网格) 组件中,对于 Model Asset 属性,搜索并选择tree.fbx。仍在 Mesh (网格) 组件中,单击 Add Material Component。
在添加的 Material 组件中,对Default Material 属性,点击
 并选择您之前制作的材质(
my_material)。
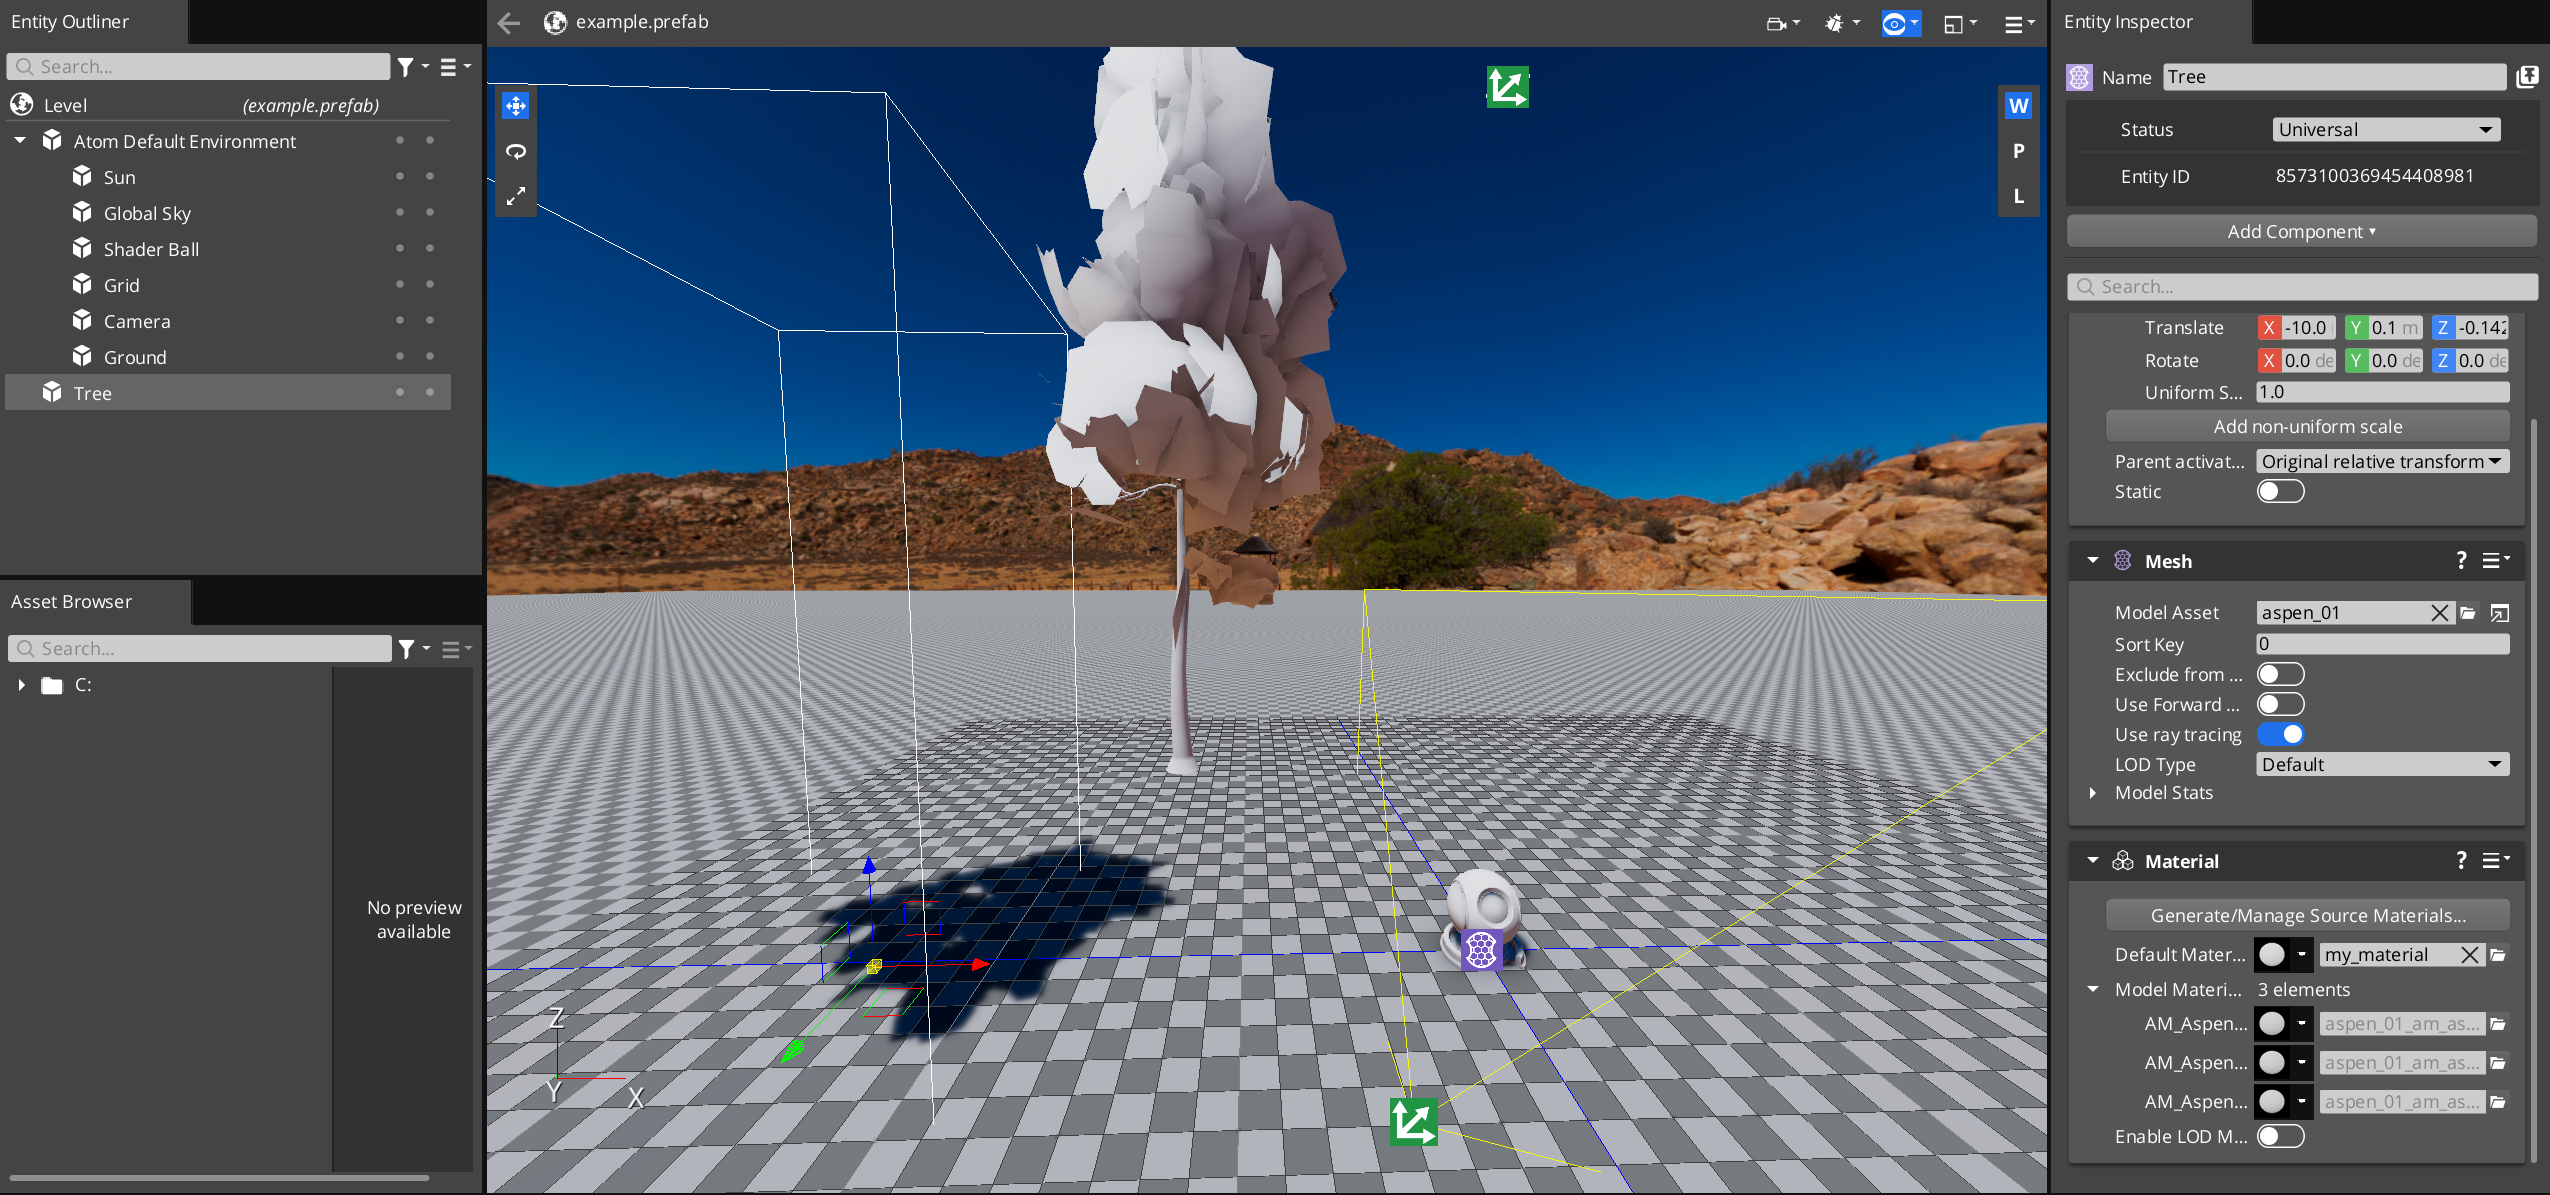
现在,您有一棵树(偏移处)!此树很重要,因为它使用_vertex stream_中的_vertex colors_,您将在着色器代码中使用这些来确定树应如何弯曲。顶点流是存储在模型顶点中的数据,而顶点颜色是存储在该顶点中的颜色。
Note:您可以使用数字内容创建 (DCC) 工具为树的每个部分的顶点着色。顶点颜色指示弯曲类型,如下所示:
- 红色:较小的运动,具有高频的随机正弦噪声。
- 绿色:延迟运动的开始,以产生高频的随机正弦噪声。
- 蓝色:较大的移动和弯曲,低频率的正弦噪声。
在树模型的情况下,树干的顶点是蓝色的,叶子是红色的。
使用可选的顶点流
您将添加一个采用顶点流的着色器输入,以便您可以使用这些颜色进行适当的弯曲。树网格已经有彩色的顶点;但是,其他网格可能没有彩色顶点。添加_shader option_允许顶点着色器处理这两种情况。
在底部的
VegetationBending_Common.azsli文件中,定义一个布尔着色器选项。您可以将此变量放在 common 文件中,以便可以在所有通道中使用它。option bool o_color_isBound;在
VegetationBending_ForwardPass.azsli文件中,在struct VegetationVSInput中,添加以下字段。float4 m_optional_color : COLOR0;Note:对于具有彩色顶点的网格,如果可用,将在运行时设置
m_optional_color。然后,柔名称约定将o_color_isBound设置为true,您可以使用它来确定材质是否应执行弯曲。这种软名称约定是着色器选项的一个非常具体的子功能,这些选项是根据可选顶点流的存在与否设置的着色器选项不同。所有字段都由 HLSL 语义 指示。引擎处理语义并相应地更新字段。
在函数
VegetationBending_ForwardPassVS中,使用布尔着色器选项将偏移代码用if条件括起来:if (o_color_isBound) { worldPosition.x += MaterialSrg::m_xOffset; worldPosition.y += MaterialSrg::m_yOffset; }对
VegetationBending_DepthPass.azsli中的深度通道重复步骤 2 和 3。保存两个文件,并在前面步骤中的 编辑器 中打开您的关卡。
您应该看到树实体是偏移的,但着色器球不是!这是因为 Shader Ball 没有顶点颜色流。
删除之前的偏移代码
删除之前的偏移代码,以便您可以实施植被弯曲。
删除以下内容:
- 添加了用于调整前向通道和深度通道的顶点着色器中的位置的代码。
VegetationBending_Common.azsli文件中MaterialSrg中的m_xOffset和m_yOffset变量声明。VegetationBendingPropertyGroup.json文件中的xOffset和yOffset属性。但是,请将文件的其余部分及其连接保留在VegetationBending.materialtype中。- 在 Editor 中,从树和着色器球的 Material 组件中的 Default Material 中
my_material。
请务必保留m_optional_color 和 o_color_isBound的声明。
为树创建材质
添加一些纹理,让您的树看起来更逼真!对于树,您需要 3 种材料:树干、树枝和树叶。
打开 Editor,然后打开 Material Editor。
创建名为
aspen_leaf.material的 VegetationBending 材质类型的新材质。将其保存在您保存先前材质的同一文件夹中,例如Materials文件夹。设置材质的底色纹理。在 Inspector 中,在 Base Color > Texture 属性下,点击
并选择 aspen_leaf_basecolora.tif。Note:后缀_basecolora告诉引擎使用特定的 preset处理纹理。在纹理名称后附加后缀会告知引擎使用相应的预设。在本例中,您将使用_basecolora预设,因为此纹理在 rgb 通道中具有基础颜色,在 alpha 通道中具有不透明度。设置不透明度模式。对于 Opacity > Opacity Mode 属性,选择
Cutout。您需要将其设置为Cutout,因为叶子纹理具有透明部分。确保 Alpha Source 为Packed。您可以根据需要选择调整 Factor。在 General Settings 下,启用 **双面 **。这将渲染材质的两侧。
保存
aspen_leaf.material材质。对树枝和树干材料重复上述步骤,但不要制作新材料。相反,使 branch 和 trunk 材料成为 leaf 材料的子对象。这使得这三种材料的材料属性都保持不变。
在材质编辑器的 Asset Browser 中,右击
aspen_leaf.material。- 选择 Create Child Material… 并将其保存到
aspen_bark_01.material,于aspen_leaf.material相同的文件夹中。 - 在Inspector 中查找 Base Color,并选择
aspen_bark_01_basecolor.tif。
- 选择 Create Child Material… 并将其保存到
对
aspen_bark_02.material重复以上步骤。使其成为aspen_leaf.material的一个子材质,设置Base Color为aspen_bark_02_basecolor.tif。
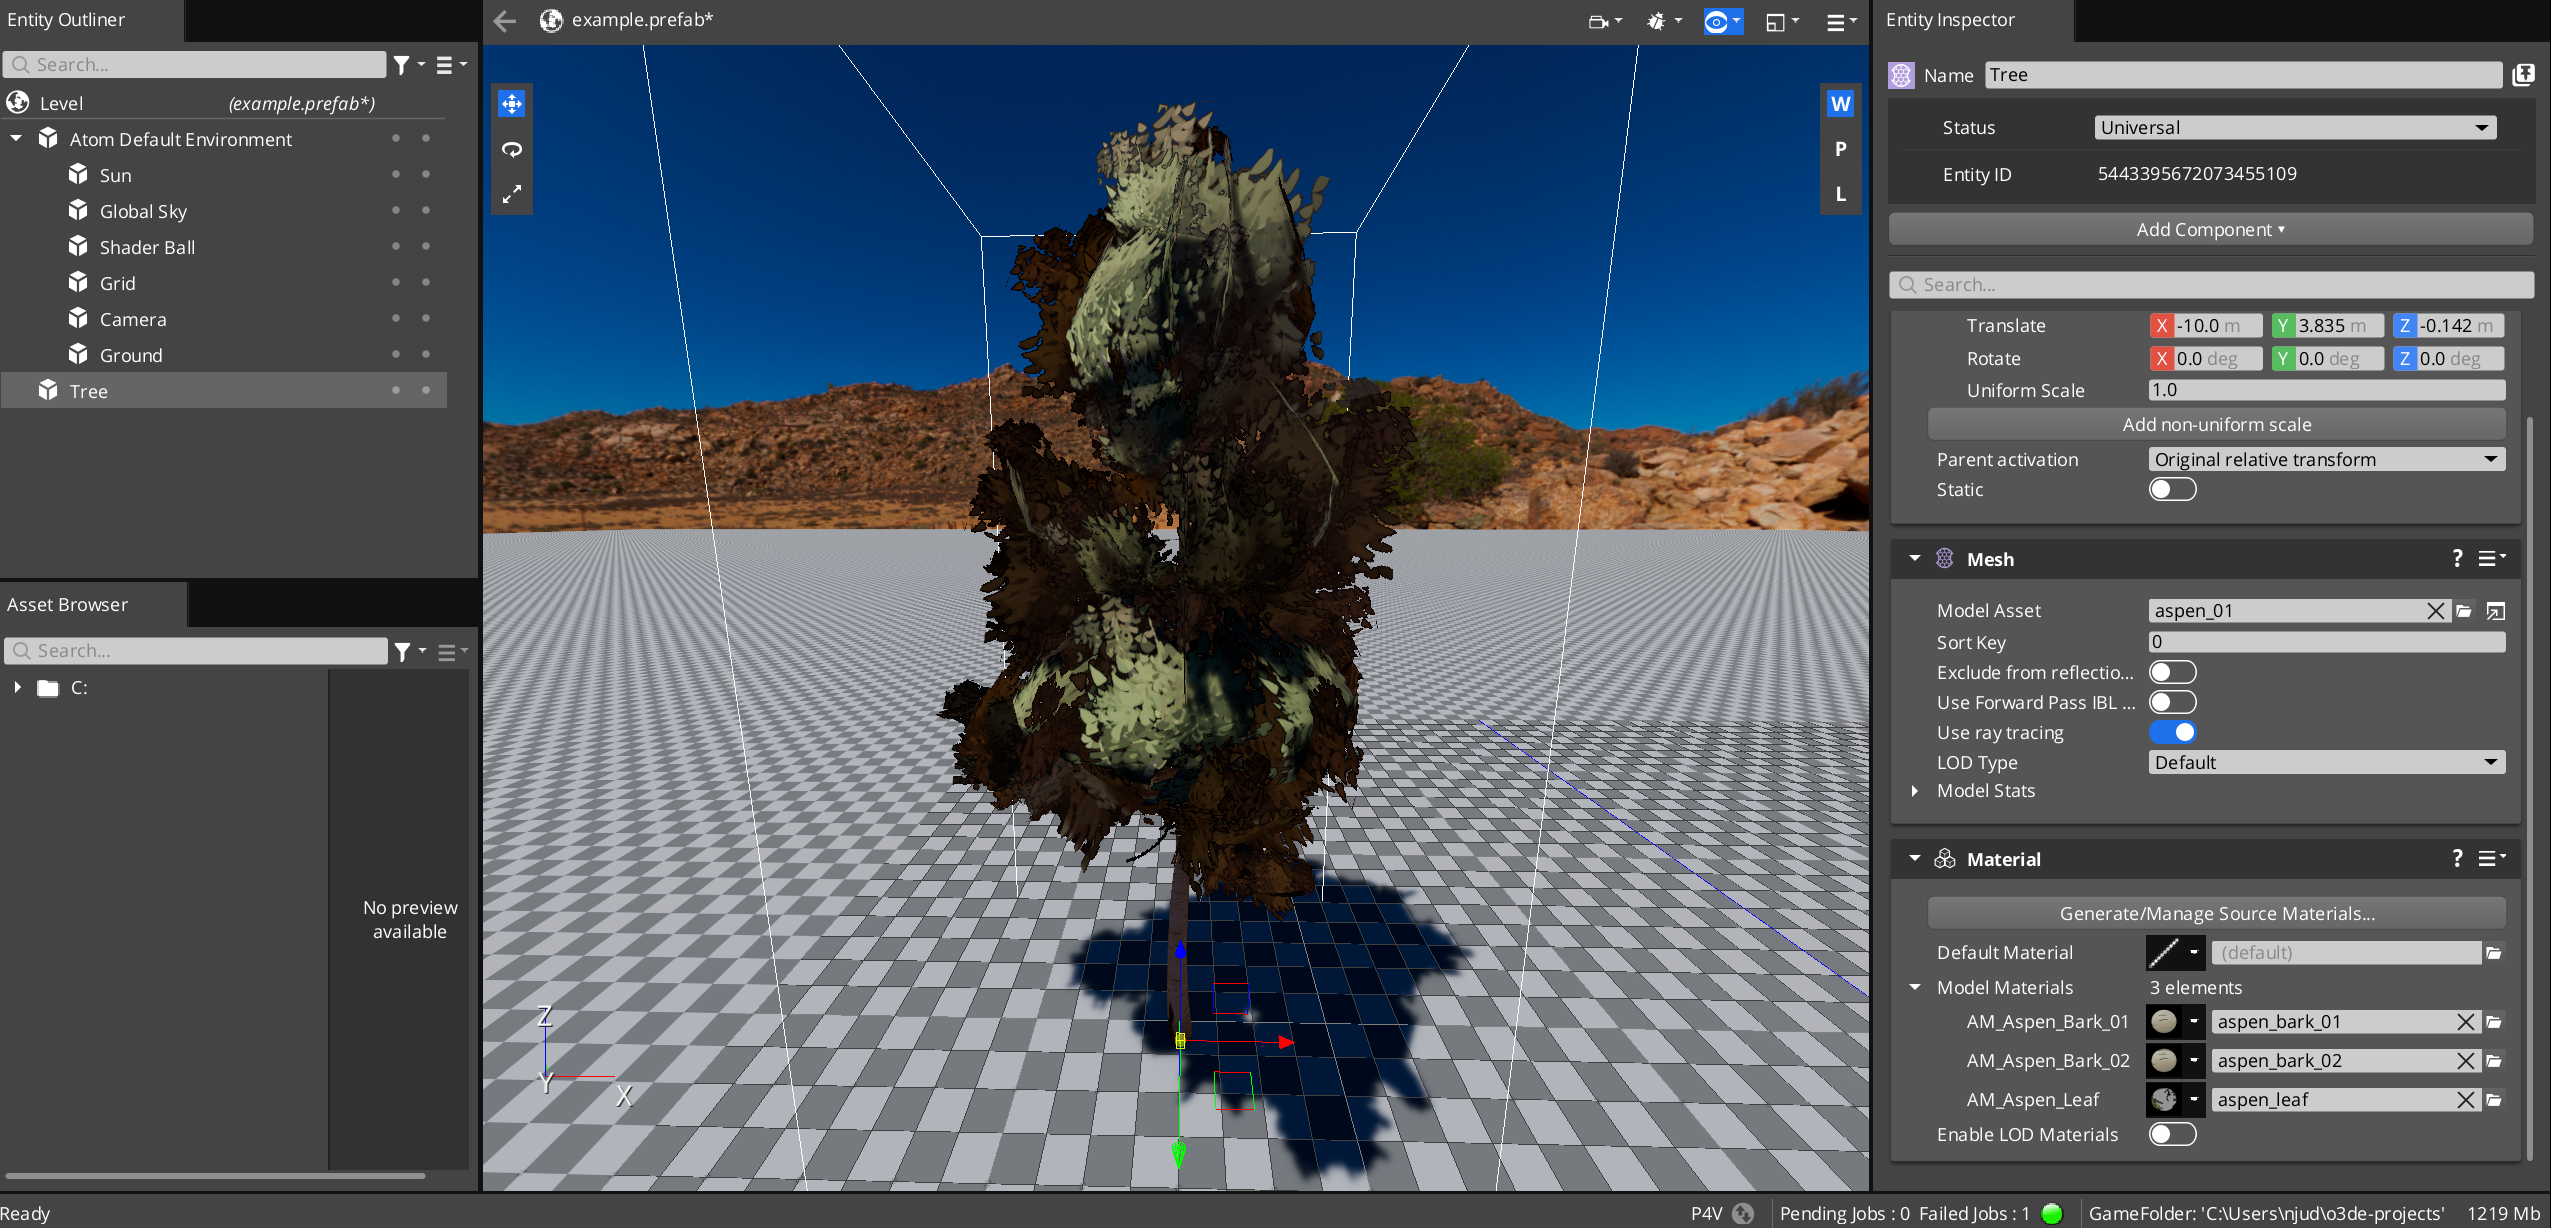
Note:请注意其他属性与 leaf 的属性相同!如果您在创建这些子材质后编辑父材质的属性,它将自动更新子材质的属性值。这在以后调整弯曲属性时非常重要,以便树的所有部分在弯曲时保持同步。保存所有 3 个材质并退出 Material Editor。在 Editor 中,选择树实体 (
Tree)。将您刚刚创建的材质添加到 Material 组件中。在 Entity Inspector 中,找到 Material 组件。对于 Model Materials 属性,映射以下材质:
- AM_Aspen_Bark_01:
aspen_bark_01.material - AM_Aspen_Bark_02:
aspen_bark_02.material - AM_Aspen_Leaf:
aspen_leaf.material
- AM_Aspen_Bark_01:
太好了,树看起来更好看!然而,请注意叶子周围仍然存在灰色区域 - 看起来很熟悉吗?回想一下,当您编辑前向通道时,有一个灰色区域,但深度通道没有。您将需要添加更多通行证!
使用像素着色器添加深度通道和阴影贴图通道
您现在使用的深度通道适用于不透明对象。它不使用像素着色器,因此深度通道不知道哪些像素应该是透明的,即使您已经指定了材质具有 Cutout 不透明度。因此,您需要使用带有像素着色器 (PS) 的深度通道!您还需要一个带有像素着色器的阴影贴图通道,以便树的阴影也能正确显示。
Atom Tutorials Gem 中的 Vegetation Bending 模板还包括DepthPass_WithPS和Shadowmap_WithPS。这些文件现在不需要编辑,但在此步骤中,您将添加与它们的连接,以确保您的材质类型使用它们。(它们已经包含您刚刚添加的顶点颜色输入。
打开
VegetationBending.materialtype。找到
shaders,这是您的材质类型可以使用的.shader文件的列表。请注意,每个着色器文件都用一个标签引用。该标签允许我们轻松引用着色器。在带有
"tag": "Shadowmap"的着色器下,使用 PS 为阴影贴图添加一个新条目:{ "file": "./VegetationBending_Shadowmap_WithPS.shader", "tag": "Shadowmap_WithPS" },同样,在带有
"tag": "DepthPass"的着色器下,使用 PS 为深度贴图添加一个新条目:{ "file": "./VegetationBending_DepthPass_WithPS.shader", "tag": "DepthPass_WithPS" }保存文件。
您已将相应的着色器添加到您的材质类型的着色器列表中。但是,您可能会注意到,仅添加到着色器列表不会更改树。您需要向引擎提供说明,说明要用于不同材质的着色器。这就是 Lua Material functor 的用武之地。
打开
VegetationBending_ShaderEnable.lua。在该文件中,观察如果启用了具有像素深度偏移的视差,或者使用了
OpacityMode_Cutout,它如何启用深度和阴影贴图通道的像素着色器版本(depthPassWithPS和shadowMapWithPS)。现在无需在此文件中编辑任何内容。
打开
VegetationBending.materialtype。创建一个函子并包含
VegetationBending_ShaderEnable.lua文件。这允许引擎处理它并确定要使用的着色器。"functors": [ { "type": "Lua", "args": { "file": "Materials/Types/VegetationBending_ShaderEnable.lua" } } ],保存文件,允许 Asset Processor 处理更改,然后再次打开 Editor。
观察树看起来如何更逼真!
添加植被弯曲
太好了,现在您可以开始添加植被弯曲的代码了!
首先,您需要设置风常数。然后,您将确定细节弯曲,即您在树叶和树枝末端看到的轻微运动。最后,您将添加主弯曲,即树的整体摇摆。
Note:以下弯曲函数源自 NVIDIA GPU Gems 3 中的 《孤岛危机》中的植被程序动画和着色 。
添加植被弯曲属性
您需要几个属性来确定材料应如何弯曲:
DetailBendingFrequency- 细节弯曲的频率。DetailBendingLeafAmplitude- 叶子可以弯曲的幅度。DetailBendingBranchAmplitude- 树枝可以弯曲的振幅。WindX- x 方向上的风量。WindY- y 方向的风量。WindBendingStrength- 植被因风而弯曲的量。WindBendingFrequency- 物体由风引起的来回摆动的频率。
DetailBending- 属性专门用于细节弯曲,而 Wind- 属性用于弯曲的所有部分。
打开
VegetationBendingPropertyGroup.json。删除之前添加的
xOffset和yOffset属性(如果尚未删除)。添加这 7 个:{ "name": "vegetationBending", "displayName": "Vegetation Bending", "description": "Properties for configuring the bending.", "properties": [ { "name": "DetailBendingFrequency", "displayName": "Detail bending frequency", "description": "Detail bending frequency.", "type": "Float", "defaultValue": 0.0, "min": 0.0, "max": 1.0, "connection": { "type": "ShaderInput", "name": "m_detailFrequency" } }, { "name": "DetailBendingLeafAmplitude", "displayName": "Detail bending leaf amplitude", "description": "Detail bending leaf amplitude.", "type": "Float", "defaultValue": 0.0, "min": 0.0, "max": 1.0, "connection": { "type": "ShaderInput", "name": "m_detailLeafAmplitude" } }, { "name": "DetailBendingBranchAmplitude", "displayName": "Detail branch amplitude", "description": "Detail branch amplitude.", "type": "Float", "defaultValue": 0.0, "min": 0.0, "max": 1.0, "connection": { "type": "ShaderInput", "name": "m_detailBranchAmplitude" } }, { "name": "WindX", "displayName": "Wind direction x", "description": "Wind in the x direction. This would typically come from a wind system instead of a material property, but is here as a proof of concept.", "type": "Float", "defaultValue": 0.0, "min": -1.0, "max": 1.0, "connection": { "type": "ShaderInput", "name": "m_windX" } }, { "name": "WindY", "displayName": "Wind direction y", "description": "Wind in the y direction. This would typically come from a wind system instead of a material property, but is here as a proof of concept.", "type": "Float", "defaultValue": 0.0, "min": -1.0, "max": 1.0, "connection": { "type": "ShaderInput", "name": "m_windY" } }, { "name": "WindBendingStrength", "displayName": "Bending strength", "description": "Bending strength. This would typically come from a wind system instead of a material property, but is here as a proof of concept.", "type": "Float", "defaultValue": 0.0, "min": 0.0, "max": 7.0, "connection": { "type": "ShaderInput", "name": "m_bendingStrength" } }, { "name": "WindBendingFrequency", "displayName": "Wind Bending Frequency", "description": "The frequency that the object sways back and forth caused by the wind. This would typically come from a wind system instead of a material property, but is here as a proof of concept.", "type": "Float", "defaultValue": 0.0, "min": 0.0, "max": 1.5, "connection": { "type": "ShaderInput", "name": "m_windBendingFrequency" } } ] }打开
VegetationBending_Common.azsli。如果还没有删除前面的偏移变量,请在
MaterialSrg中声明弯曲属性变量:float m_detailFrequency; float m_detailLeafAmplitude; float m_detailBranchAmplitude; float m_windX; float m_windY; float m_bendingStrength; float m_windBendingFrequency;在 Material Editor 中打开叶材质 (
aspen_leaf.material)。确保选择叶材质,因为这是树其他部分的父材质。在 检查器 中,滚动到 植被弯曲 属性组。确保您刚刚添加的 7 个属性都在那里。
调整属性!您可以将它们调整为以下内容,以确保以后可以看到弯曲:
- Detail bending frequency -
0.3 - Detail bending leaf amplitude -
0.3 - Detail bending branch amplitude -
0.3 - Wind direction x -
0.5 - Wind direction y -
0.5 - Bending strength -
4.0 - Wind bending frequency -
0.7
- Detail bending frequency -
添加过程弯曲功能
首先,添加一个函数来处理进程弯曲,您的多个顶点着色器可以调用该函数。稍后,您将为弯曲的不同部分编写更多函数,并从此函数中调用它们。
打开
VegetationBending_Common.azsli。在底部,添加一个将应用弯曲的函数,然后返回顶点的世界位置。赋予此函数的参数有助于确定弯曲。
float4 ProcessBending(float currentTime, float3 objectSpacePosition, float3 normal, float4 detailBendingParams, float4 worldPosition, float4x4 objectToWorld) { float4 adjustedWorldPosition = float4(worldPosition); if (o_color_isBound) { // You will add function calls here. } return adjustedWorldPosition; }Note:和以前一样,请注意如何使用带有o_color_isBound的条件来确保只有具有顶点流的网格执行弯曲。在顶点着色器中调用
ProcessBending函数。打开
VegetationBending_ForwardPass.azsli并找到顶点着色器VegetationBending_ForwardPassVS。在
OUT.m_worldPosition = worldPosition.xyz上方,调用ProcessBending函数。要传入的参数是顶点着色器的输入、已计算的值以及
m_time,即自应用程序启动以来的秒数。m_time由 scene 着色器资源组 (SceneSrg) 提供。float currentTime = SceneSrg::m_time; worldPosition = ProcessBending(currentTime, IN.m_position, IN.m_normal, IN.m_optional_color, worldPosition, objectToWorld); OUT.m_worldPosition = worldPosition.xyz; OUT.m_position = mul(ViewSrg::m_viewProjectionMatrix, worldPosition); return OUT;Note:该代码必须位于两行OUT行上方,因为它会更新worldPosition,而worldPosition会相应地调整OUT变量。
对
VegetationBending_DepthPass.azsli中的深度通道和VegetationBending_DepthPass_WithPS.azsli中的 PS 深度通道重复步骤 3。
设置风弯
让我们开始编辑代码以添加 wind。
打开
VegetationBending_Common.azsli。在
ProcessBending函数上方,添加一个函数,根据顶点的时间和世界位置计算风的振幅、频率和相位。风的相位使用worldPosition来模拟风对附近物体的影响方式,但对远处物体的影响不同。这是因为在现实生活中,远处的物体可能不会受到同样的微风的影响。稍后,您将使用此函数来计算顶点的适当移动。
float4 SetUpWindBending(float currentTime, float4 worldPosition) { float2 wind = float2(MaterialSrg::m_windX, MaterialSrg::m_windY); float bendingStrength = MaterialSrg::m_bendingStrength; float2 amplitude = float2(wind.x * 0.4 + wind.y * 0.2, wind.y * 0.4 - wind.x * 0.2); float2 frequency = float2(MaterialSrg::m_windBendingFrequency, MaterialSrg::m_windBendingFrequency * 1.125); // Using the world position to modify the phase makes it so different trees near each other are at similar but not equal points in the animation, // so they appear to be reacting to the same wind but at different times as the wind moves through the vegetation. float2 phase = worldPosition.xy * 0.08; float2 bendAmount = sin(currentTime * frequency + phase) * amplitude; float4 result; result.xy = bendAmount + wind; result.z = length(wind); result.w = 0.3 * length(result.xy); result.xyz *= bendingStrength * 0.08; return result; }Note:默认情况下,此函数在 GPU 上的每个顶点运行一次。相反,您可以在 CPU 上的每个对象运行一次它,从而使结果更新 ObjectSrg 中的每个帧。权衡是在 GPU 上按对象、每个顶点、每个帧重新计算,还是按对象每帧使用一次额外的 SRG 编译进行计算。
您的选择可能取决于您拥有的内容量,因为冗余 GPU 成本会随着顶点密度的增加而增加。您的选择可能还取决于 GPU 或顶点着色器是瓶颈,还是顶点着色器受带宽限制或算术逻辑单元 (ALU) 限制。
在
ProcessBending函数中,在条件语句中调用SetUpWindBending函数。if (o_color_isBound) { // Overall wind float4 currentBending = SetUpWindBending(currentTime, worldPosition); } return adjustedWorldPosition;
太好了,现在您已经设置了风弯功能!请注意,这暂时不会对树进行任何更改,树应该正常呈现。
添加细节弯曲
使用您刚刚计算的风弯曲常数,您现在可以确定树叶的弯曲。
打开
VegetationBending_Common.azsli。添加一个
DetailBending函数,用于计算移动量并返回顶点的结果位置。将此函数放在ProcessBending函数的上方。float3 DetailBending(float3 objectSpacePosition, float3 normal, float4 detailBendingParams, float currentTime, float4 worldPosition, float bendLength) { // The information from the vertex colors about how to bend this vertex. float edgeInfo = detailBendingParams.x; float branchPhase = detailBendingParams.y; float branchBendAmount = detailBendingParams.z; // Phases (object, vertex, branch) float objPhase = dot(worldPosition.xyz, 2.0); branchPhase += objPhase; float vtxPhase = dot(objectSpacePosition, branchPhase); // Detail bending for leaves // x: is used for leaves, y is used for branch float2 wavesIn = currentTime; wavesIn += float2(vtxPhase, branchPhase); float4 waves = (frac(wavesIn.xxyy * float4(1.975, 0.793, 0.375, 0.193)) * 2.0 - 1.0) * MaterialSrg::m_detailFrequency * bendLength; waves = abs(frac(waves + 0.5) * 2.0 - 1.0); // x: is used for leaves, y is used for branches float2 wavesSum = waves.xz + waves.yw; // Leaf and branch bending (xy is used for leaves, z for branches) float3 movement = wavesSum.xxy * float3(edgeInfo * MaterialSrg::m_detailLeafAmplitude * normal.xy, branchBendAmount * MaterialSrg::m_detailBranchAmplitude); return objectSpacePosition + movement; }在
ProcessBending函数中,在条件语句中:调用
DetailBending函数。设置并返回调整后的世界位置,以便实际的顶点着色器输出使用
DetailBending函数的输出。
if (o_color_isBound) { // Overall wind float4 currentBending = SetUpWindBending(currentTime, worldPosition); // Detail bending float3 currentOutPosition = DetailBending(position, normal, detailBendingParams, currentTime, worldPosition, currentBending.w); adjustedWorldPosition = mul(objectToWorld, float4(currentOutPosition, 1.0)); } return adjustedWorldPosition;Note:传递到DetailBending函数中的currentBending.w参数根据风的强度和方向控制整体弯曲长度。打开 Editor。你应该看到你的树的叶子略微弯曲。如果没有,请尝试在 Material Editor 中增加所有属性。
添加主弯曲
树叶现在动了,但树还没有摇晃。在此步骤中,您将添加主要弯曲,即整棵树所经历的整体摇摆和运动。
打开
VegetationBending_Common.azsli。在
ProcessBending函数上方,添加一个函数以使树摇晃。使用顶点的当前位置(在从细节弯曲更改后)和由风确定的弯曲,可以将树作为一个整体弯曲。float3 MainBending(float3 objectSpacePosition, float4 bending) { float windX = bending.x; float windY = bending.y; float bendScale = bending.z; // More bending occurs higher up on the object float bendFactor = objectSpacePosition.z * bendScale; bendFactor *= bendFactor; // Rescale the displaced vertex position with the original distance to the object's center // to restrict vertex movement to minimize deformation artifacts float len = length(objectSpacePosition); float3 newPos = objectSpacePosition; newPos.xy += float2(windX, windY) * bendFactor; return normalize(newPos) * len; }在调用
ProcessBending函数的DetailBending函数后调用MainBending函数。if (o_color_isBound) { // Overall wind float4 currentBending = SetUpWindBending(currentTime, worldPosition); // Detail bending float3 currentOutPosition = DetailBending(position, normal, color, currentTime, worldPosition, currentBending.w); currentOutPosition = MainBending(currentOutPosition, currentBending); adjustedWorldPosition = mul(objectToWorld, float4(currentOutPosition, 1.0)); }打开 编辑器。你应该看到你的树摇晃着,叶子仍然弯曲。如果没有,请尝试在 Material Editor 中增加风属性。
太神奇了,你的树现在会摇晃并对风做出反应!尝试放置多棵树,并观察树木在靠近和远离时如何以不同的方式摇晃。另外,添加一些照明让树木流行起来!
添加运动矢量
由于你的树会移动,你可以使用 运动矢量通道 添加很酷的效果。运动矢量由运动模糊和 时间抗锯齿 (TAA) 等效果使用。
如果您查看MeshMotionVectorVegetationBending.azsl文件,则顶点着色器看起来与其他顶点着色器类似,但有一个新的输出。OUT.m_worldPosPrev 是向量在上一帧中的位置。像素着色器使用上一个向量位置和当前向量位置来计算运动向量。
但是,没有顶点着色器输入为我们提供上一个位置。因此,在顶点着色器中,您不仅会计算当前时间的弯曲,还会计算上一个时间范围的弯曲。
让我们添加运动矢量着色器,然后编辑其顶点着色器:
打开
VegetationBending.materialtype。在shaders列表的底部,添加运动矢量通道:{ "file": "./MeshMotionVectorVegetationBending.shader", "tag": "MeshMotionVector" }打开
MeshMotionVectorVegetationBending.azsl。要使运动矢量正常工作,您需要在当前帧时间和前一帧时间执行弯曲。
在
float4 prevWorldPosition声明下的OUT.m_worldPos上方,添加以下内容:调用
ProcessBending函数并传入当前时间和世界位置。这类似于您在早期着色器中所做的调用。再次调用
ProcessBending,但这次,传入前一帧时间和前一世界位置。使用SceneSrg::m_prevTime获取上一帧时间。
float currentTime = SceneSrg::m_time;
worldPosition = ProcessBending(currentTime, IN.m_position, IN.m_normal, IN.m_optional_color, worldPosition, objectToWorld);

float prevTime = SceneSrg::m_prevTime;
prevWorldPosition = ProcessBending(prevTime, IN.m_position, IN.m_normal, IN.m_optional_color, prevWorldPosition, prevObjectToWorld);
查看像素着色器,了解运动矢量是如何计算的!无需编辑像素着色器。
太棒了,您已经添加了需要为运动矢量添加的所有内容!但是,如果您打开 编辑器 并只查看树,您会发现没有区别。要观察运动矢量通道是否正常工作,你可以使用 Pass Tree Visualizer。
使用 Pass Tree Visualizer 进行调试
打开 Editor,然后按 Ctrl-G 进入游戏模式。
按键盘上的 Home 键。这将在顶部显示工具栏。
选择Atom Tools > Pass Viewer。
在PassTree View弹窗中,启用Preview Attachment 和 Show Pass Attachments。
在PassTree中,查找MotionVectorPass > MeshMotionVectorPass并选择
CameraMotion。确保您正在查看您的树。
Note:您可能只会在左下角的预览中看到黑色,因为运动矢量很小,这意味着树的移动最小。
为了更好地查看运动矢量,您可以移动摄像机或快速平移树。您还可以打开
MeshMotionVectorVegetationBending.azsl并在像素着色器中缩放OUT.m_motion,以确保运动矢量的方向正常工作。
此视频显示了将 OUT.m_motion 缩放 10000.0 时的运动矢量。
Tip:Pass Tree Visualizer 工具也有助于调试着色器和通道。当您在 PassTree 中选择不同通道的某些步骤时,它允许您查看这些步骤的输出。
下载 AtomTutorial Gem 示例
现在,您已经完成了本教程,您可以将结果与 o3de/sample-code-gems 存储库 中 AtomTutorials Gem 中的 VegetationBending 材料类型的工作版本进行比较。您可以下载 最终工作植被弯曲文件 并将其放置在您的项目中,也可以下载 Gem 并将其添加到引擎中。
要下载并启用 AtomTutorials Gem,请执行以下操作:
下载或克隆 o3de/sample-code-gems repository .
Note:如果您遵循了本教程,则表示您已经下载或克隆了此存储库,并且可能已将Assets/VegetationBending/Objects/中的文件移出存储库。您可以将文件移回原处,或者重新下载或克隆存储库。打开
VegetationBending.materialtype并将{your-path-to-o3de}的所有实例替换为 O3DE 的绝对路径。将 AtomTutorials Gem 注册到您的项目中。在命令行界面中,运行以下命令:
cd {path-to-o3de-engine}
scripts\o3de register -gp {your-path-to-sample-code-gems}\atom_gems\AtomTutorials -espp {your-project-path}
例如,使用 paths:
scripts\o3de register -gp C:\sample-code-gems\atom_gems\AtomTutorials -espp C:\MyProject将 AtomTutorials Gem 添加到您的项目中。按照 在项目中添加和删除 Gem 中的说明进行操作。
通过单击 Build Project或单击
 并选择Build。
Note:如果您同时拥有您的植被弯曲材料类型和我们的版本,则可能存在 Asset Processor 中指定的命名重复错误。您可以重命名一个版本,也可以在检出一个版本或另一个版本时将其暂时从项目文件夹中移开。
祝贺!您现在已完成本教程。