IN THIS ARTICLE
并行模式和批处理测试编写
编辑器自动测试的工作原理
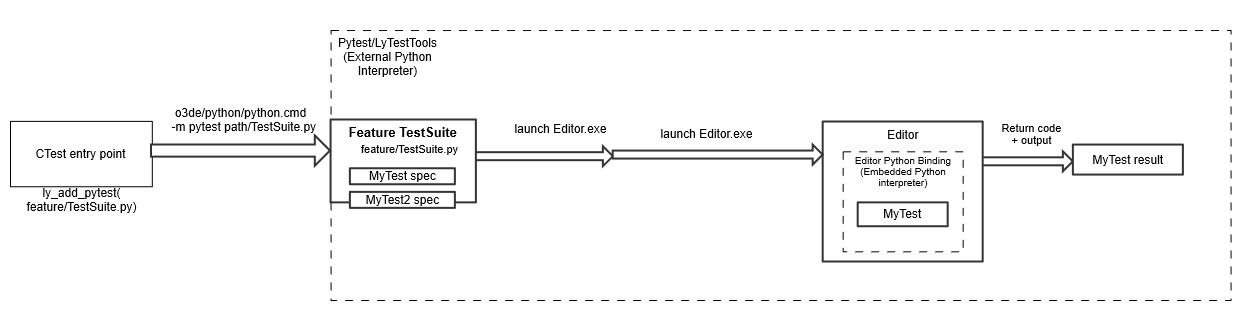
Open 3D Engine (O3DE) 使用 CTest 来驱动整个引擎的所有测试。Python 用于自动化引擎测试。
A Python automated test uses two Python interpreter instances:
- 外部 Python 解释器:测试套件的测试驱动程序。外部解释器负责启动 O3DE Editor 并提供在嵌入式解释器中运行的测试。此实例使用 pytest 框架和 LyTestTools 来指定测试。LyTestTools 是一组围绕 pytest 编写的 Python 工具和实用程序。
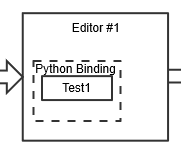
- 嵌入式编辑器 Python 解释器 :O3DE Editor 中的解释器实例,具有用于驱动编辑器活动和获取反馈的绑定。此实例负责执行实际测试,并且是 Editor Python Bindings Gem 的一部分。
测试完成后,O3DE Editor 将根据测试结果关闭并返回退出代码,0表示成功,0xF表示失败。如果 O3DE Editor 在测试期间崩溃,则操作系统将设置其他返回代码。
这两个实例都使用o3de/python/中的相同 Python 可执行文件。
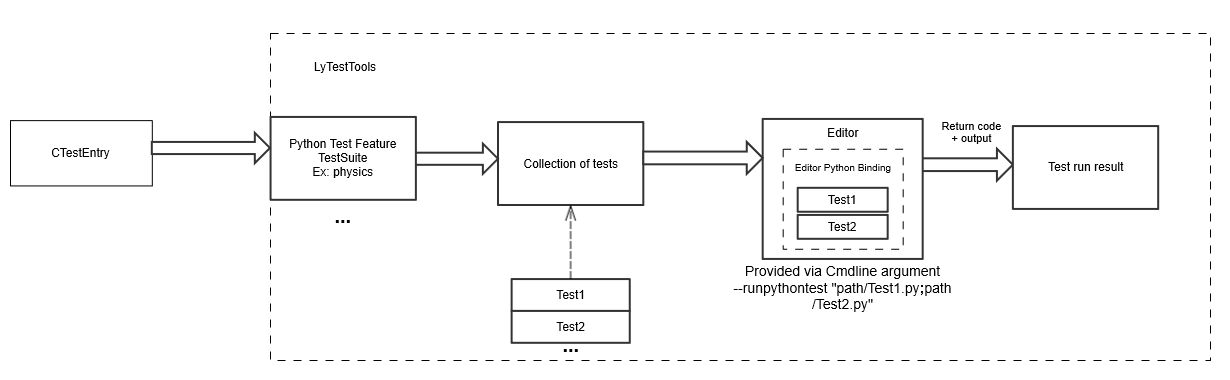
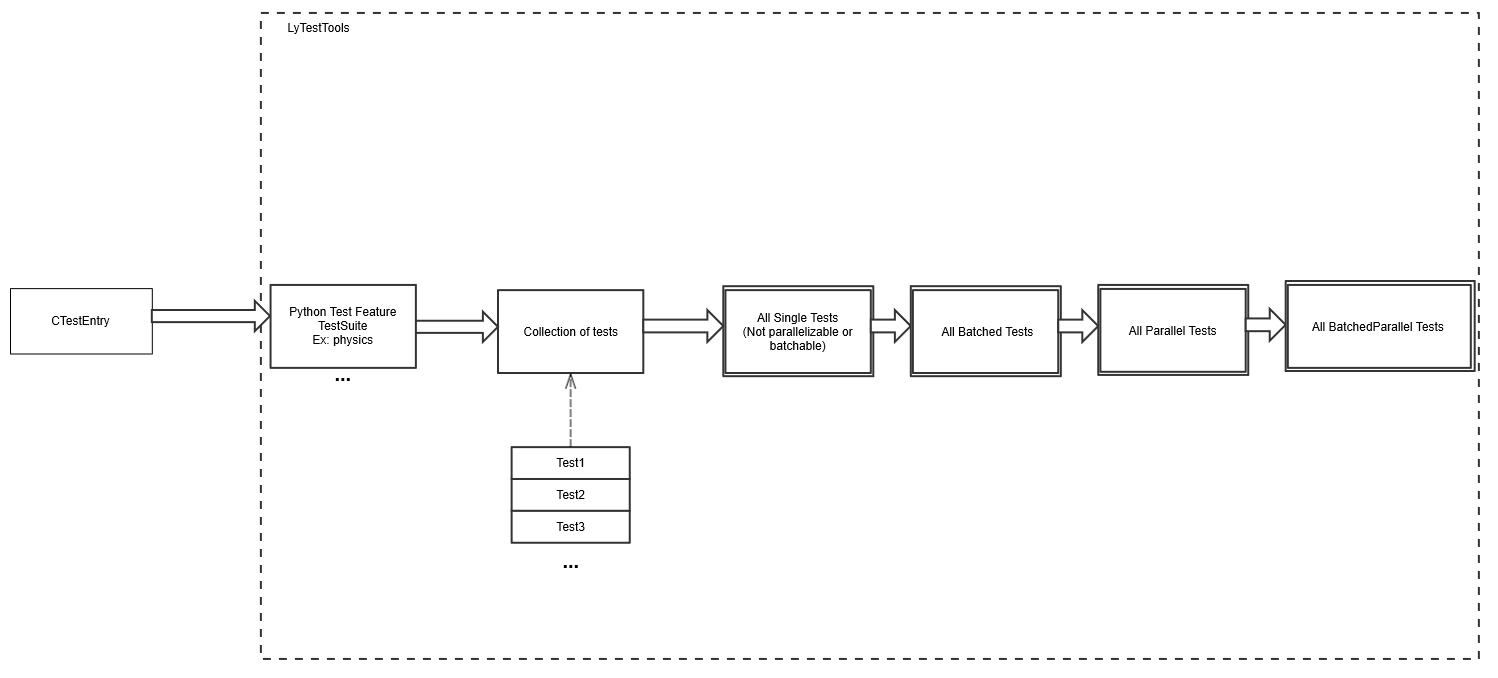
这是 Python 测试的基本流程:
测试结构
自动化测试包括:
- 测试套件:针对特定功能的测试集合。测试类必须继承自
EditorTestSuite。
# This file will be used by the external Python interpreter to launch O3DE Editor, specifying what test files will be run.

import pytest
from ly_test_tools import LAUNCHERS
from ly_test_tools.o3de.editor_test import EditorTestSuite, EditorSingleTest

@pytest.mark.parametrize("launcher_platform", ['windows_editor']) # This test works on Windows version of O3DE Editor
@pytest.mark.parametrize("project", ["AutomatedTesting"]) # Use AutomatedTesting project
class TestAutomation(EditorTestSuite):
    class Check_EnterGameMode_test(EditorSingleTest):
        from .tests import MyFeature_CheckEnterGameMode as test_module
- 单独测试:这是编辑器将运行的实际 Python 测试。
from editor_python_test_tools.utils import Report

def MyFeature_CheckEnterGameMode():
    # azlmbr contains everything that has been exposed to o3de Python bindings
    import azlmbr
    import azlmbr.legacy.general as general
    # 1) Open an empty level
    general.open_level_no_prompt("EmptyLevel")
    # 2) Enter game mode
    general.enter_game_mode()
    # 3) Execute a frame and then check that we entered into game mode successfully
    general.idle_wait_frames(1)
    assert general.is_in_game_mode(), "Couldn't enter into game mode"

if __name__ == "__main__":
    Report.start_test(MyFeature_CheckEnterGameMode)
- CMake 配置文件:要将 Python 测试套件添加到 CI 管道中,必须通过
CMakeLists.txt文件将其注册到 CTest。
    # PAL_TRAIT_BUILD macros are used by platform detection.
    if(PAL_TRAIT_BUILD_TESTS_SUPPORTED AND PAL_TRAIT_BUILD_HOST_TOOLS)
        ly_add_pytest(
            NAME AutomatedTesting::MyFeature_Main
            TEST_SUITE main
            TEST_SERIAL
            PATH ${CMAKE_CURRENT_LIST_DIR}/TestSuite_Main.py
            RUNTIME_DEPENDENCIES
                Legacy::Editor
                AZ::AssetProcessor
                AutomatedTesting.Assets
            COMPONENT
                MyFeature
        )
    endif()
所有 O3DE 测试都必须使用AutomatedTesting项目执行,并且位于Gem/PythonTests/<Feature>目录中。
建议的结构如下:
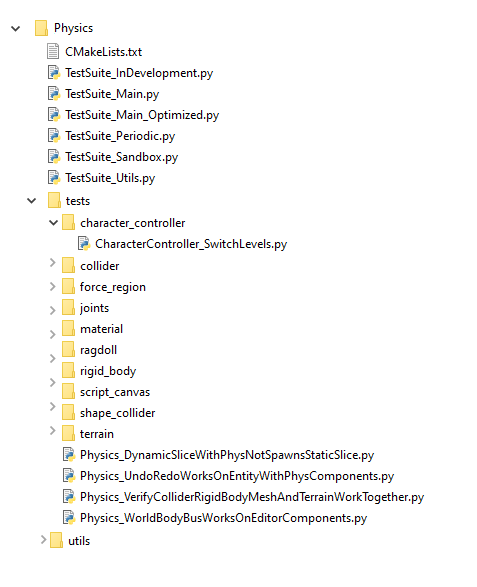
/ - 测试的根文件夹应包含
CMakeLists.txt文件和功能测试套件。功能必须包含每种类型(Smoke、Main、Periodic 和 Sandbox)的一个测试套件文件。这些文件将仅由外部 Python 解释器运行。utils/ (可选) -
utils目录为TestSuite文件的多个测试提供了通用的实用程序。用于特定测试的实用程序应作为其测试文件的一部分。
Note:对于跨多个套件、跨功能使用或在整个测试基础架构之间共享的工具,请将您的实用程序放在AutomatedTesting项目的Gem/PythonTests/EditorPythonTestTools/editor_test_tools/目录中。
tests/ -
tests目录包含使用 O3DE Editor 的 Python 嵌入式解释器运行的测试本身。测试名称必须遵循模式<FeatureName>_<TestThatDoesSomething>.py格式。任何不应该是测试的东西(比如 utilities)都必须遵循UpperCamelCase,如下例所示。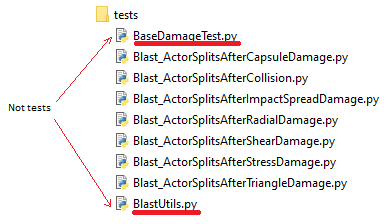
子目录可用于组织测试。这些目录必须遵循
snake_case格式才能被AutomatedTesting项目选取。
编写自动化测试
对于编写自动化测试,强烈建议使用作为LyTestTools 一部分提供的 editor_test.py 实用程序,位于o3de/Tools/LyTestTools/ly_test_tools/o3de/editor_test.py.
使用 editor_test.py编写测试提供了一种编写套件的简单方法:
- 最少的代码和几乎“面向数据”的测试规范
- 车祸检测
- 自定义设置/拆解
- 基于返回代码的测试执行
- 自动 Asset Processor 生命周期管理,在多个测试之间共享
- 开箱即用的批处理和测试并行化
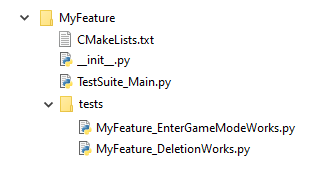
以下示例演示了名为MyFeature的示例功能的目录结构:
创建测试套件
首先,创建测试套件。测试套件包含有关要运行的测试及其参数的说明。

每个测试套件都需要一个主套件类,该类继承自EditorTestSuite,包含在Tools/LyTestTools/ly_test_tools/o3de/editor_test.py目录中。在套件的主类中,声明继承自 EditorSingleTest 的子类,并加载各个测试中的测试模块,以便在嵌入式解释器中运行。
import pytest
from ly_test_tools import LAUNCHERS
from ly_test_tools.o3de.editor_test import EditorTestSuite, EditorSingleTest

@pytest.mark.SUITE_main # Marks the test suite as being part of a Main test suite
@pytest.mark.parametrize("launcher_platform", ['windows_editor']) # This test works on Windows editor
@pytest.mark.parametrize("project", ["AutomatedTesting"]) # Use the AutomatedTesting project
class TestAutomation(EditorTestSuite):

    # Declaring a class that extends from EditorSingleTest declares a single test.
    class MyFeature_EnterGameModeWorks(EditorSingleTest):
        # This sets the class variable test_module to be loaded into a `EnterGameWorks.py` file, run by the Editor as a test.
        from .tests import MyFeature_EnterGameModeWorks as test_module

    # Another single test of another subfeature
    class MyFeature_DeletionWorks(EditorSingleTest):
        from .tests import MyFeature_DeletionWorks as test_module
EditorTestSuite 还为其测试提供了可配置的参数。覆盖 test suite 类中的相应方法或变量:
class TestAutomation(EditorTestSuite):
    # The tests in this suite must run with a renderer
    use_null_renderer = False # Note: Default is True

    class Lightning_PointLightIlluminatesMesh(EditorSingleTest):
        from .tests import Lightning_PointLightIlluminatesMesh as test_module
以下设置可用于 EditorTestSuite:
| 设置 | 说明 | 默认值 |
|---|---|---|
global_extra_cmdline_args | 用于所有套件测试的命令行参数列表。 | ["-BatchMode", "-autotest_mode"] |
use_null_renderer | 是否对测试使用 null 渲染器。在没有 GPU 的计算机上需要 Null 渲染器。 | True |
timeout_editor_shared_test | 一个 O3DE Editor 实例运行多个测试所需的最长时间(以秒为单位)。 | 180 |
get_number_parallel_editors() | 可覆盖的函数,该函数返回要同时运行的最大 O3DE Editor 实例数。 | Lambda: 8 |
每个测试也有可配置的设置。这些设置取决于测试的类型,因为共享测试不允许某些设置。
class TestAutomation(EditorTestSuite):

    # Only this test will use a renderer
    class Lightning_PointLightIlluminatesMesh(EditorSingleTest):
        use_null_renderer = False # Note: Default is None, which means no override from the suite
        from .tests import Lighting_PointLightIlluminatesMesh as test_module
以下设置可用于EditorSingleTest:
| 设置 | 说明 | 默认值 |
|---|---|---|
test_module (required) | 此测试将运行的测试文件。此设置是强制性的,可以使用from .tests import <MyTest> as test_module. | None |
use_null_renderer | 是否对此特定测试使用 null 渲染器。在没有 GPU 的计算机上运行测试时,必须使用 null 渲染器。 | True |
timeout | 此测试运行的最长时间(以秒为单位)。 | 180 |
attach_debugger | 启动测试时提示附加调试器。这发生在可执行文件启动时的最早时刻。 | False |
wait_for_debugger | 等待 debugger for be attached 以开始执行。 | False |
setup() | 将在启动 O3DE 编辑器并加载测试之前调用的自定义回调。 | None |
teardown() | 在 O3DE Editor 完成运行测试后将调用的自定义回调。 | None |
wrap_run() | 此函数包装测试的运行时。yield 之前的所有代码将在启动 O3DE Editor 之前运行,而 yield 后的代码将在关闭 O3DE Editor 后运行。 | None |
wrap_run 示例:
@classmethod
def wrap_run(cls, instance, request, workspace, editor, editor_test_results, launcher_platform):
    print("Before the test")
    yield  # Run Test
    print("After the test")
编写单独的编辑器测试
下一步是编写将在 O3DE 编辑器中运行的测试。O3DE Editor 的内部 Python 运行时启动并加载指定为命令行参数的测试。
测试的结构如下:
def MyFeature_MyTest():
    # Test content, an exception or assert will make the test to fail
    # This will drive the test. The Report class is also useful to report different steps/results

if __name__ == "__main__":
    from editor_python_test_tools.utils import Report
    Report.start_test(MyFeature_MyTest)
如何构建在 O3DE Editor 中运行的测试的完整示例:
# Test Case Title : Check that entering into gamemode works

# List of results that we want to check, this is not 100% necessary but its a good
# practice to make it easier to debug tests.
# Here we define a tuple of tests
class Results():
    enter_game_mode          = ("Entered game mode",        "Failed to enter game mode")

def MyFeature_EnterGameModeWorks():
    # A description of the test is always very helpful.
    # Description: This test checks that entering into gamemode works by openning an empty level
    # and entering into the gamemode. The is in gamemode state should be changed after doing it

    # Import report and test helper utilities
    from editor_python_test_tools.utils import Report
    from editor_python_test_tools.utils import TestHelper as helper
    # All exposed python bindings are in azlmbr
    import azlmbr.legacy.general as general

    # Required for automated tests
    helper.init_idle()

    # Open the level called "Base".
    # This level is an empty level where we can run automated tests to avoid creating one
    helper.open_level(level="Base")

    # Using the exposed Python API from editor in CryEditPy.py we can enter into gamemode this way
    general.enter_game_mode()

    # The script drives the execution of the test, to return the flow back to the editor,
    # we will tick it one time
    general.idle_wait_frames(1)

    # Now we can use the Report.result() to report the state of a result
    # if the second argument is false, it will mark this test as failed, however it will keep going.
    Report.result(Results.enter_game_mode, general.is_in_game_mode())

    # Instead of using Report.result(), you can also use:
    # assert is_in_game_mode, "Didn't enter into gamemode"
    # However this would stop the test at this point and not report anything when it succeeds

    # The test will end at this point, is good practice to exit gamemode or reset any changed stated
    # *DO NOT* close the editor, the editor will close automatically and report the error code
    general.exit_game_mode()

if __name__ == "__main__":
    # This utility starts up the test and sets up the state for knowing what test is currently being run
    from editor_python_test_tools.utils import Report
    Report.start_test(MyFeature_EnterGameModeWorks)
运行测试
要手动运行测试,请使用根 O3DE 目录中的以下命令:
python\python.cmd -m pytest --build-directory <directory containing bin/ from build> .\AutomatedTesting\Gem\PythonTests\MyFeature\TestSuite_Main.py
如果一切正常,测试运行将显示以下结果:
============================================ test session starts ========================================
platform win32 -- Python 3.10.5, pytest-6.2.5, py-1.11.0, pluggy-0.13.1
rootdir: <O3DE root dir>
plugins: mock-2.0.0, timeout-1.3.4, ly-test-tools-1.0.0
collected 2 items

AutomatedTesting\Gem\PythonTests\MyFeature\TestSuite_Main.py ..                                    [100%]
============================================= 2 passed in 39.97s ========================================
如果测试失败,则会打印错误诊断,其中包括失败测试的回溯及其失败的原因。例如,下面表示一个小型失败的测试:
def MyFeature_EnterGameModeWorks():
    assert False, "Testing failure of test"
if __name__ == "__main__":
    from editor_python_test_tools.utils import Report
    Report.start_test(MyFeature_EnterGameModeWorks)
运行此测试时,它会在失败时生成以下错误输出:
           Failed: Test MyFeature_EnterGameModeWorks:
E           Test FAILED
E           ------------
E           |  Output  |
E           ------------
E           Starting test MyFeature_EnterGameModeWorks...
E           Test MyFeature_EnterGameModeWorks finished.
E           Report:
E           EXCEPTION raised:
E             Traceback (most recent call last):
E               File "<O3DE root>\automatedtesting\gem\pythontests\editorpythontesttools\editor_python_test_tools\utils.py", line 166, in start_test
E                 test_function()
E               File "<O3DE root>/AutomatedTesting/Gem/PythonTests/MyFeature/tests/MyFeature_EnterGameModeWorks.py", line 18, in MyFeature_EnterGameModeWorks
E                 assert False, "Testing failure of test"
E             AssertionError: Testing failure of test
E           Test result:  FAILURE
批处理和并行化测试
在 O3DE 编辑器中运行的测试支持 batched 和 parallel 测试。批处理测试是可以在单个 O3DE Editor 实例中一起运行的测试集合,而并行测试会启动多个编辑器。测试既可以是批处理的一部分,也可以并行运行。
批处理测试
在批处理模式下,一个 O3DE Editor 实例运行一批测试。批处理测试减少了启动和关闭 Editor 以运行测试所需的时间。
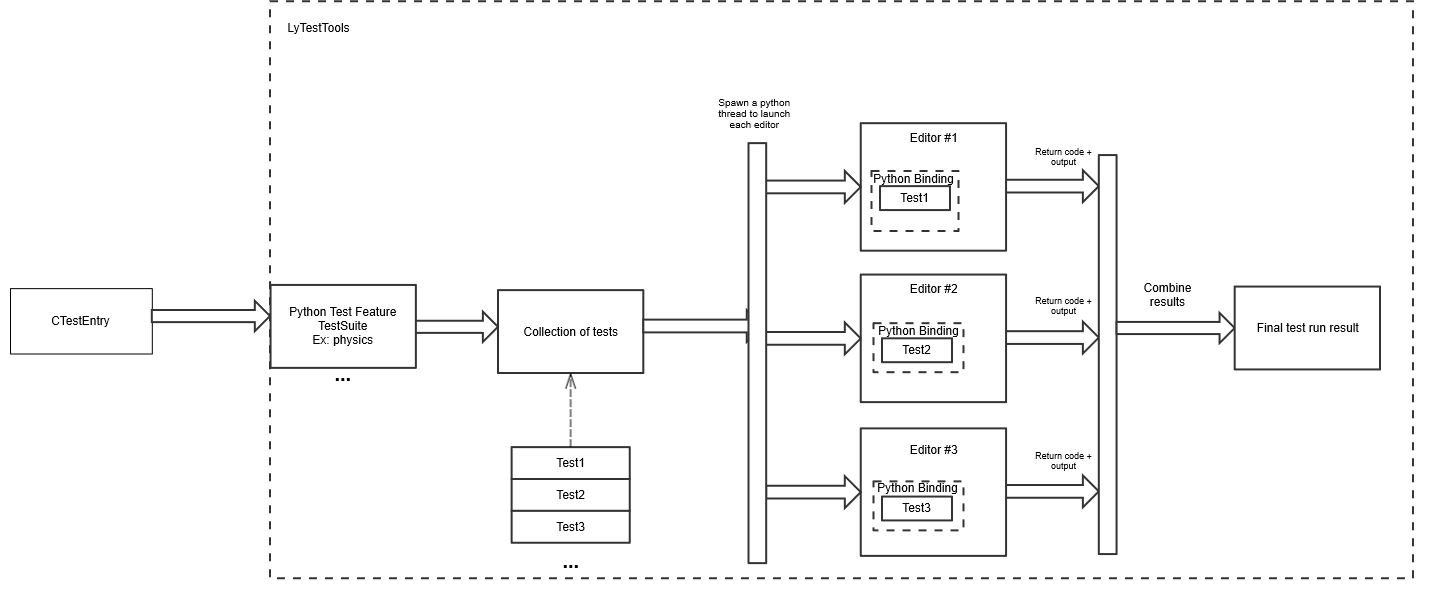
并行测试
在并行模式下,多个 Editor 同时启动,每个 Editor 运行一个测试。您可以设置允许的 Editor 实例的最大数量。 如果达到最大值,则当实例关闭时,将启动新的 O3DE Editor 实例。
并行批处理测试
测试也可以并行批处理运行,也称为 **共享测试 **。当测试可以在同一个 O3DE Editor 实例中运行而不依赖于任何其他测试的效果(批处理模式),并且多个独立编辑器运行每个单独的批处理(并行模式)时,应该使用共享测试。如果可能,应将测试作为共享测试,以便利用最大化并行化提供的性能改进。
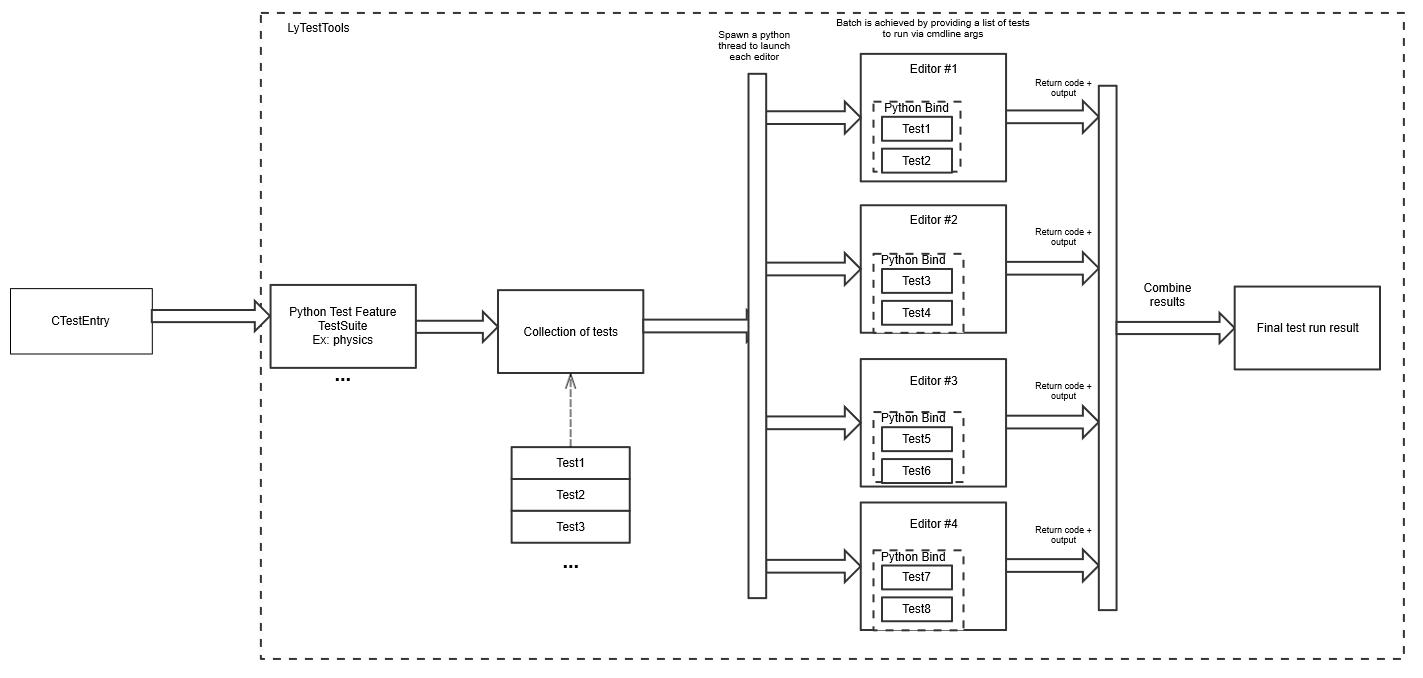
Note:在此模式下,将批处理任意分配给 O3DE Editor 实例。
混合测试模式
并行测试、批处理测试和共享测试可以混合在同一个测试套件中。因此,每组测试都根据其模式按顺序运行:
启用批处理和并行化
为了使用这些模式中的任何一种,唯一必要的更改是修改加载和运行每个测试的类。使用 EditorBatchedTest, EditorParallelTest, 和 EditorSharedTest 超类代替 EditorSingleTest.
下面的示例演示了这些类的用法:
import pytest
from ly_test_tools import LAUNCHERS
from ly_test_tools.o3de.editor_test import EditorTestSuite, EditorBatchedTest, EditorParallelTest, EditorSharedTest

@pytest.mark.SUITE_main
@pytest.mark.parametrize("launcher_platform", ['windows_editor'])
@pytest.mark.parametrize("project", ["AutomatedTesting"])
class TestAutomation(EditorTestSuite):

    # This test will be batched in the same editor
    class MyFeature_EnterGameModeWorks(EditorBatchedTest):
        from .tests import MyFeature_EnterGameModeWorks as test_module

    # This test will be batched along with the previous one in the same editor
    class MyFeature_DeletionWorks(EditorBatchedTest):
        from .tests import MyFeature_DeletionWorks as test_module

    # The following two tests will be run in individual editor instances at the same time.
    class MyFeature_ParallelTest1(EditorParallelTest):
        from .tests import MyFeature_ParallelTest1 as test_module

    class MyFeature_ParallelTest2(EditorParallelTest):
        from .tests import MyFeature_ParallelTest2 as test_module

    # This test will be launched along with other shared tests in a parallel fashion,
    # but may run in the same editor as other tests in any order.
    # MyFeature_FeatureToggleWorks(EditorSharedTest):
        from .tests import MyFeature_FeatureToggleWorks as test_module
Important:EditorBatchedTest,EditorParallelTest, 和EditorSharedTest具有与EditorSingleTest相同的类。但是 不要 提供任何方法覆盖。批处理测试、并行测试和共享测试不能使用setup(),teardown(), 或wrap_run().
何时启用批处理或并行化
在批处理、并行或共享池中进行测试时要小心!所有测试都应该是原子的,并且不能以干扰可能在同一 Editor 中运行的 other 测试的方式修改 Editor 状态。
由于在批处理、并行和共享测试中缺少对设置、拆解或测试包装的支持,请避免将任何依赖此支持的测试放入共享池中。
可以批处理但不能并行运行的测试示例是物理测试,该测试在开始时对项目范围的物理配置进行修改,并在完成时恢复为默认设置。通过更改在 O3DE Editor 实例之间共享的资源(在磁盘存储中)的状态,可能会导致并行测试失败。
通常,需要与 I/O 交互的测试可能存在这些问题。作为一般规则,最好让测试在内存中进行更改,而不是在磁盘上进行更改。
用于配置测试模式的命令行设置
某些测试模式可以通过命令行选项禁用或管理:
--no-editor-parallel: 不要并行运行测试。并行测试将变为串行测试,共享测试将变为批处理测试。--no-editor-batch: 不要批量测试。所有测试都在单个 O3DE Editor 实例中运行。共享测试将变为并行测试,或者如果并行测试也被禁用,则共享测试将变为串行测试。--editor-parallel: 覆盖要并行运行的最大 O3DE Editor 实例数。将此选项设置为1等效于--no-editor-parallel.
最佳实践
- 除非必要,否则不要创建关卡. 使用现有的空级别,并且在测试结束时不保存更改。
- 测试应该是独立的。任何外部工具都不应确定测试是通过还是失败。相反,O3DE Editor 应该完成这项工作。使用编辑器的返回代码之一作为测试结果,
0x0表示成功,0xF表示失败。 - 不要直接读取 O3DE Editor 日志文件。要读取 O3DE Editor 日志信息,请使用“
DebugTraceBus”和“Tracer”实用程序。’DebugTraceBus’ 能够捕获所有记录的信息,而无需在文件上创建 I/O 依赖项。
with Tracer() as section_tracer:
    # Do stuff

# section_tracer now contains all prints,errors and warnings that happened inside the block
if section_tracer.has_errors:
        assert False, "AZ_Errors happened during execution"
- 测试必须是确定性的。应用程序将以不同的帧速率运行,并且加载资产所需的时间也不同。确保测试在这些条件下是确定性的。
- 等待条件,而不是等待时间。 某些测试需要执行操作并等待完成。要优化测试运行的时间量,并避免超时导致的漏报,请等待条件而不是设定的时间:
### BAD ###
enable_gravity()
# Wait 5 seconds for the entity to fall
idle_wait(5.0)
if entity.position.y >= 0:
        assert False, "Entity didn't fall"

### GOOD ###
enable_gravity()
def has_fallen():
        return entity.position.y < 0
# Wait for the entity to fall, a maximum time of 5 seconds
# has_fallen() will be called in every frame as long it returns False
helper.wait_for_condition(has_fallen, 5.0)
if entity.position.y >= 0:
        assert False, "Entity didn't fall"
** 对值使用范围而不是相等性(尤其是对于浮点值)使用范围会使测试更有可能成功。Vector 和其他数学结构具有用于检测特定范围内值的实用函数。
### BAD ###
if entity.position != azlmbr.math.Vector3(50.0, 50.0, 50.0):
        assert False, "Entity is not in correct position"

### GOOD ###
if not entity.position.IsClose(azlmbr.math.Vector3(50.0, 50.0, 50.0)):
        assert False, "Entity is not in correct position"
调试测试
在测试开发过程中,逐个测试启动 O3DE Editor 可能非常耗时。相反,您可以正常启动 O3DE 编辑器,然后从控制台使用“pyRunFile”命令:
pyRunFile ../../Gem/PythonTests/<MyFeature>/tests/<MyFeature>_<TestName>.py
要将调试器附加到正在运行的测试,请使用以下实用程序之一:
- 等待调试器:启动 O3DE 编辑器时,请使用命令行参数
--wait-for-debugger来运行测试。此参数在执行的最早时刻暂停 O3DE Editor,并在附加调试器时恢复。此行为也可以使用编辑器测试规范中的wait_for_debugger变量进行控制,或者通过调用general.wait_for_debugger()来强制执行。 - 附加调试器:使用命令行参数
attach_debugger强制立即提示将调试器附加到测试。此行为也可以使用编辑器测试规范中的attach_debugger变量进行控制,或者通过调用general.attach_debugger()来强制执行。