IN THIS ARTICLE
同步动画图形: 示例
您可以使用同步动画图来同步演员之间的动画。例如,一个角色的动画可能会触发另一个角色的动画。一个动画图可以是主要动画图,也可以有多个辅助动画图。同样,一个动画图既可以是一个图的辅助图,也可以是另一个图的主要图。
本主题介绍同步两个动画图形的以下主要步骤:
为要同步的实体添加所需的组件,包括 Anim Graph 组件。
使用动画编辑器创建动作集和一个或多个动画图形。
为辅助图形添加一个参数,以便从主图形接收更改事件。
为主图表添加一个参数。
在主图表中添加仆从参数操作,以便向辅助图表发送更改事件。
使用 O3DE 的 Event Bus (EBus) 系统和 Lua 脚本同步图形。
本专题以两个角色(一个机器人角色(“Jack”)和一个枪角色)为例说明图形同步。当玩家激活同步模式并使用键盘开火时,机器人会做出开火动作,枪也会开火。当玩家关闭同步模式时,机器人会做出开火动作,但枪支不会开火。
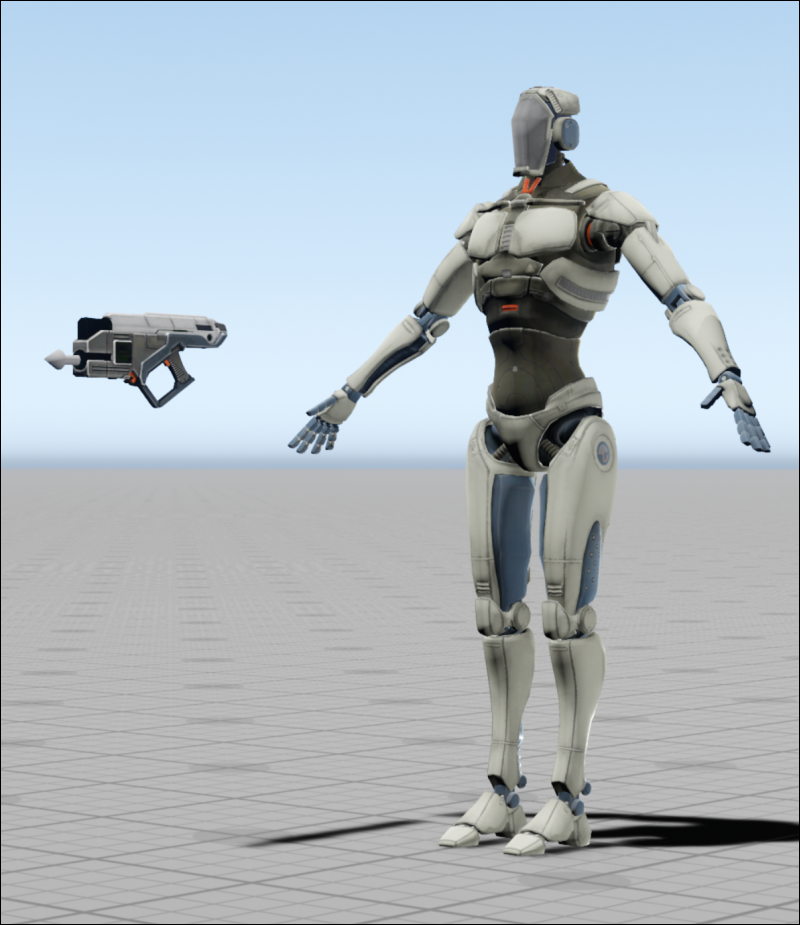
机器人使用syncFeature_Jack动画图形,喷枪使用syncFeature_Gun 图形。机器人图形是主要图形,喷枪图形是次要图形。
同步模式开启时,枪会与机器人同步开火。当机器人开火时,辅助图的shoot参数将接收主图的 gunTrigger参数状态。附属于喷枪的辅助图形会接收参数变化事件并发射喷枪。
1. 添加所需组件
第一步是为要同步的实体添加所需的组件。示例中实体使用的机器人和喷枪组件将在以下章节中介绍。
Robot Entity 组件
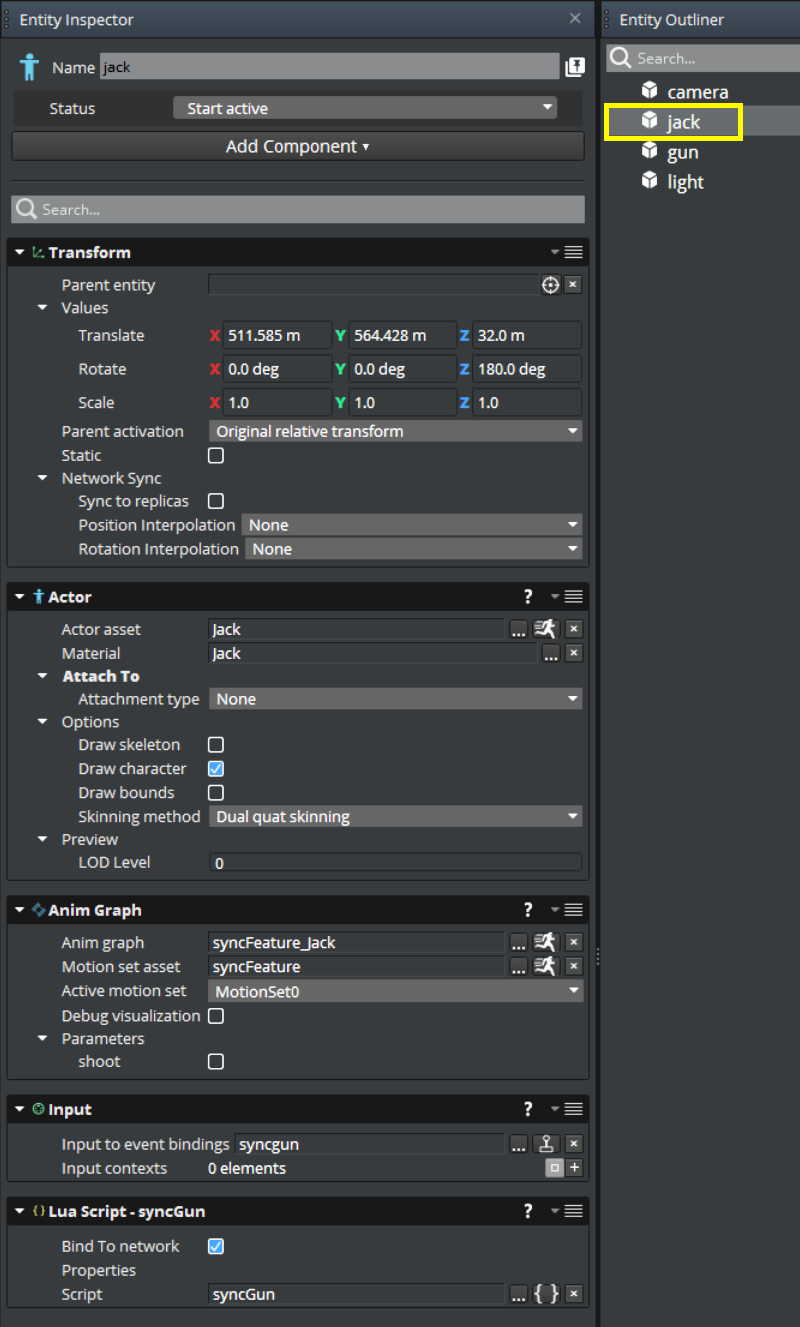
机器人实体使用以下组件:
- Transform
- Actor
- Anim Graph
- Input
- Lua Script
下图显示了实体检查器中机器人实体组件的配置。
Gun Entity 组件
喷枪实体使用以下组件:
- Transform
- Actor
- Lua Script
- Anim Graph
- Input
下图显示了实体检查器中枪支实体组件的配置。

2. 创建运动集和动画图形
设置好实体和组件后,创建一个运动集和两个动画图形。运动集包含图形所使用的运动,而辅助和主要动画图形则对实体进行动画和同步。
创建运动集和两个动画图形
- 创建动作集。有关创建动作集的信息,请参阅
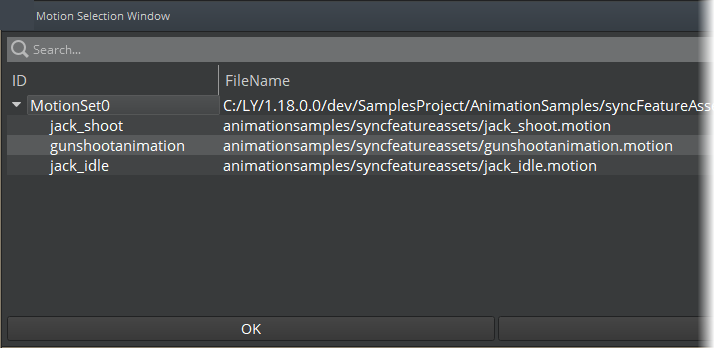
动画编辑器入门。本例的MotionSet0包含
gunshootanimation、jack_shoot和jack_idle动作。
创建辅助动画图。有关创建辅助动画图的信息,请参阅 动画编辑器入门。辅助图形控制一个或多个实体,其动作由主图形决定。
本例中的
syncFeature_Gun二级图具有一个 BindPose0 节点和一个 Motion0 节点。Motion0 节点包含gunshootanimation动作。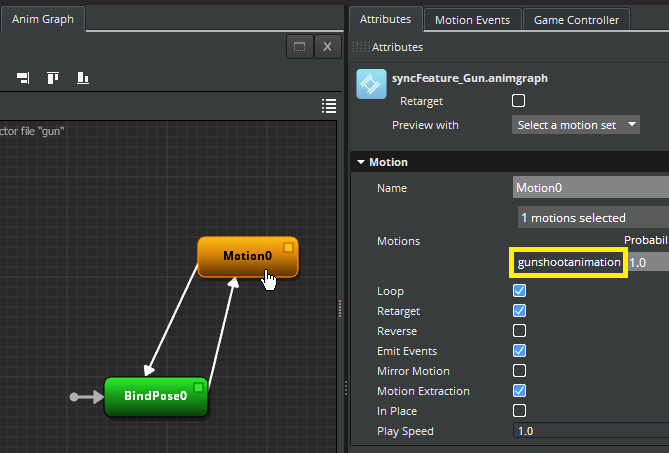
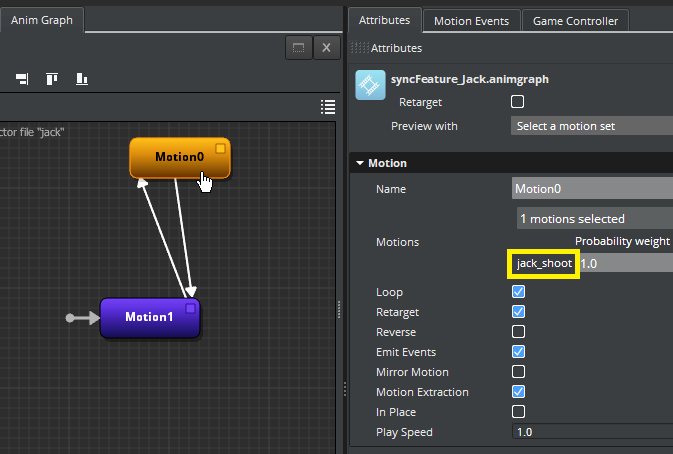
创建主图形。主图形向辅助图形发送控制事件。
本例的
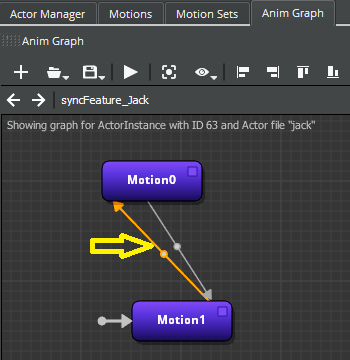
syncFeature_Jack主动画图中有一个 Motion1 节点和一个 Motion0 节点。Motion1 节点包含jack_idle动作,而 Motion0 节点包含jack_shoot动作。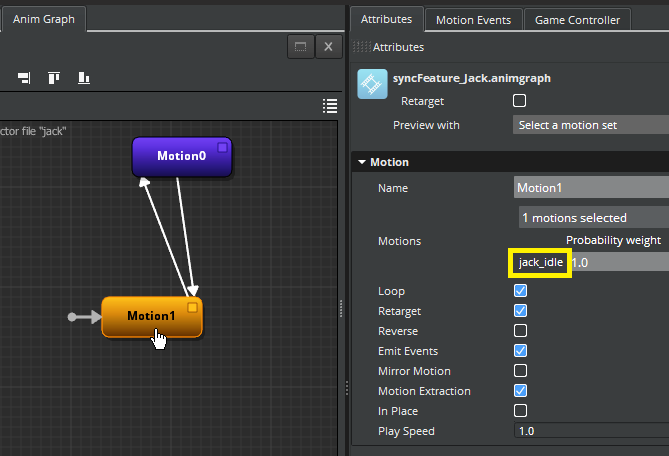
3. 在辅助图形中添加参数
现在,您已准备好向辅助图形添加参数,该图形将接收来自主图形的参数更改事件。添加参数后,再添加参数条件,指定动画从一个动作过渡到另一个动作的时间。
要在辅助图形中添加一个参数,以接收来自主图形的更改事件
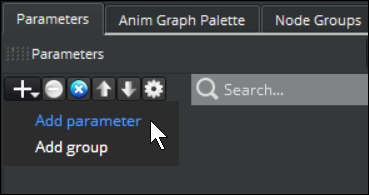
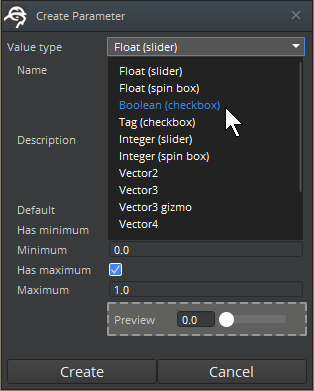
- 在辅助动画图形的Parameters选项卡上,单击加号(+)图标,然后选择Add parameter。
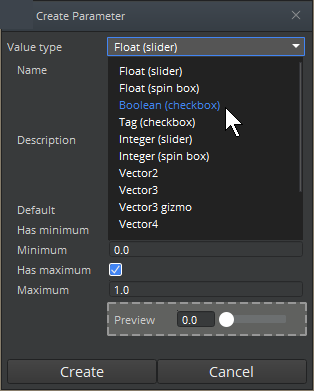
- 在Create Parameter对话框的Value type中,选择要用于参数的数据类型。本例使用 Boolean (checkbox) 值类型,因为枪炮触发器要么开要么关。
- 在 Name 中,输入参数的名称。本例使用
gunTrigger。
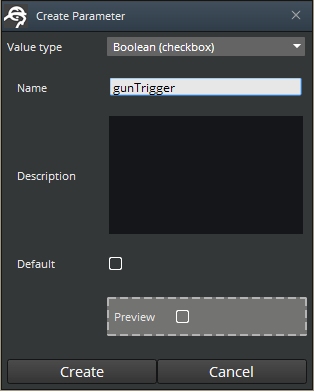
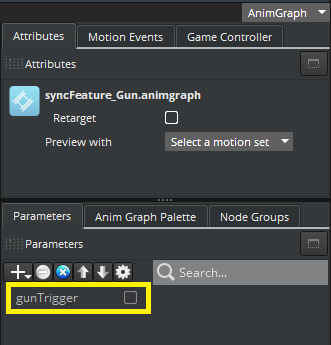
- 点击Create。Parameters列表会显示您创建的参数。
为辅助图形添加参数条件
在本节中,在过渡线上添加参数条件,指定动画何时发生变化。在示例中,条件表示是否已按下喷枪扳机。
为辅助图形添加参数条件
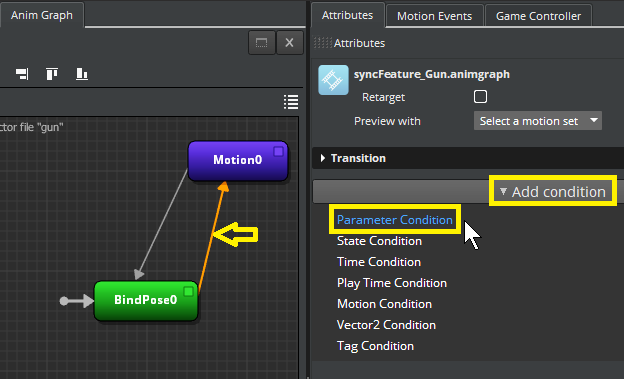
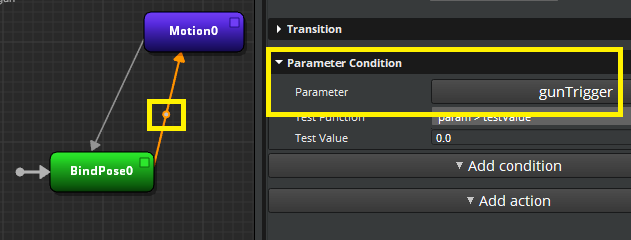
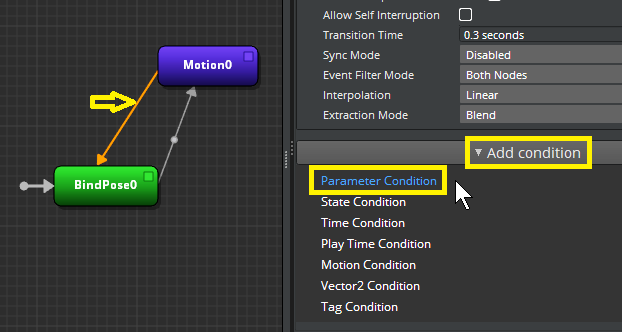
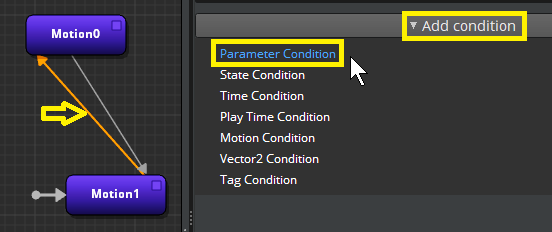
- 单击从 BindPose0 节点到 Motion0 节点的过渡线。然后,在Attributes窗格中,单击Add condition,并选择Parameter Condition。
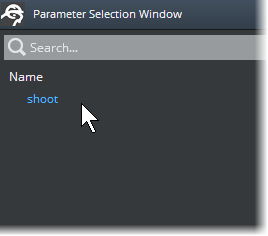
- 点击 Select parameter。
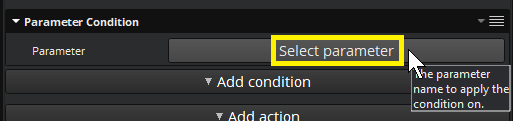
- 在Parameter Selection Window中,选择刚刚创建的参数,然后点击 OK。

在Attributes窗格中,Parameter Condition部分显示了您添加的参数。在过渡行上,一个小圆节点表示该行有一个参数条件。
对于 Test Function,使用 param > testValue 的默认值。在本例中,这意味着如果触发器接收到的值大于 0,枪就会发射。
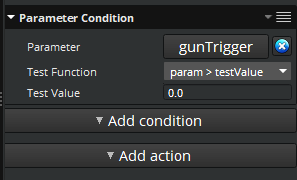
对于 Test Value, 保持默认值 0.0。
单击从 Motion0 节点到 BindPose0 节点的过渡线。然后,在Attributes窗格中,单击Add condition,并选择Parameter Condition。
点击 Select parameter。
在Parameter Selection Window中,选择要使用的参数。示例中使用的是
gunTrigger参数。对于 Test Function,使用 param == testValue 的默认值。在本例中,这意味着如果触发值等于零,则运动会转回空闲状态,枪支不再开火。
对于 Test Value,保持默认值 0.0。
现在,辅助动画图形已准备好接收来自主图形的信号。
4. 在主图表中添加参数和参数条件
在主图表中添加参数和参数条件,就像在辅助图表中一样。不过,您还可以在主图形中添加辅助(“仆人”)参数动作。这些操作会向辅助图形发出信号,使其模仿主图形的动画。
向主图形添加参数
- 在Parameters标签页上,点击 (+) 图标,选择 Add parameter。

- 在Create Parameter对话框的Value type中,选择要用于参数的数据类型。本例使用 Boolean (checkbox) 值类型,因为枪炮触发器要么开要么关。
- 在 Name 中,输入参数的名称。本例使用
shoot。
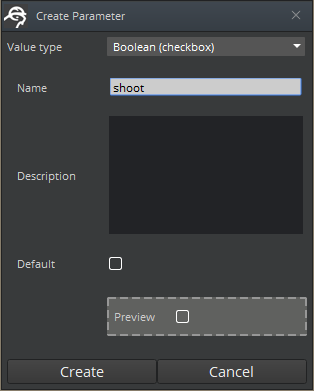
- 点击 Create。
在主图表中添加参数条件
现在,您可以在主图表的过渡线上添加参数条件,就像在辅助图表上一样。
向主图形添加参数条件
- 单击从 Motion1 节点到 Motion0 节点的过渡线。然后,在Attributes窗格中,单击Add condition,并选择Parameter Condition。
点击 Select parameter。
在Parameter Selection Window中,选择刚刚创建的参数。本例使用
shoot。
对于 Test Function,使用param > testValue的默认值。
对于 Test Value,使用0.0的默认值。
单击从 Motion0 节点到 Motion1 节点的过渡线。然后,在Attributes窗格中,单击Add condition,并选择Parameter Condition。

点击 Select parameter。
在Parameter Selection Window中,选择要使用的参数。示例中使用的是
shoot。对于 Test Function,使用 param == testValue 的默认值。
对于 Test Value,使用 0.0 的默认值。
5. 在主图表中添加仆从参数操作
现在,您可以向主图表添加辅助(“仆人”)参数操作。脚本将使用这些操作来同步两个图表。
向主图表添加仆从参数操作
- 在动画编辑器中,再次单击选择第一条过渡线。本例选择了从
jack_idle节点 Motion1 到jack_shoot节点 Motion0 的线条。
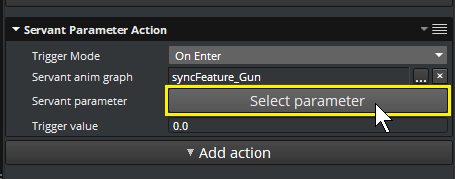
- 在主图表的Attributes窗格中,单击Add action,Servant Parameter Action。

- 对于Servant Parameter Action,在Trigger Mode框中,保留默认的On Enter。On Enter指定在进入状态或转换时触发操作。

在 Servant anim graph 框中,单击Browse (…) ,然后选择具有要使用的参数的辅助动画图。本例选择了一个名为 syncFeature_Gun 的辅助动画图。
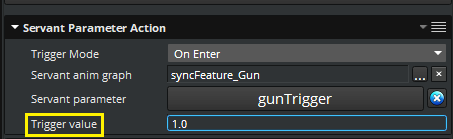
单击Select parameter,从刚才选择的二级动画图形中选择一个参数。本例选择了gunTrigger参数。
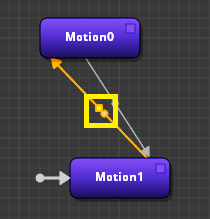
在过渡线上,一个小方块节点表示过渡线有一个参数动作。旁边的小圆节点表示您之前添加的参数条件。
- 对于 Trigger value,指定动作触发时要发出的值。由于 Trigger value 被视为单个浮点数,因此可用于浮点数、布尔值和整数参数。本例中指定的是
1.0,即枪发射时的值。
单击从 Motion0 到 Motion1 的线条,然后重复步骤,为剩余的过渡线条添加仆人参数动作。
在 Trigger value 框中指定一个不同的值。示例中指定的触发值为
0.0,即喷枪空闲时的值。
现在动画图形已经准备就绪,您可以执行下一个步骤:收集用户输入并编写 Lua 脚本以同步图形。
6. 同步主图和辅助图
同步主图表和辅助图表包括以下步骤:
从玩家获取键盘输入。
在辅助实体上放置 Lua 脚本组件和 Lua 脚本。
在主实体上放置 Lua 脚本组件和 Lua 脚本。
Lua 脚本通过在 O3DE 的 Event Bus (EBus) 系统中处理动画图形事件来同步两个图形。
获取玩家输入
在示例中,主图和副图的同步状态以及枪的发射由用户的以下键盘输入或击键控制。事件值乘数是发送到输入系统和 Lua 脚本的实际值。
| 按键 | 说明 | Event Value Multiplier |
|---|---|---|
| 1 | 开启同步模式 | 1 |
| 2 | 关闭同步模式 (默认为关闭) | -1 |
| S | 开枪 | 1 |
| D | 停止开枪 | -1 |
为了收集这些输入,示例在机器人实体和枪实体中添加了 Input 组件。
要使用输入组件,必须为项目启用
Starting Point Input Gem 。 Starting Point Input Gem 能解释硬件输入,并将其转换为pressed, released, 和 held等输入事件。
每个输入组件都引用一个 .inputbindings 文件。.inputbindings 文件将一组输入绑定到一个事件。这些输入可以来自鼠标、键盘或游戏控制器。要创建输入绑定文件,可以使用 O3DE 编辑器中的Input Bindings Editor。更多信息,请参阅
在 Open 3D Engine 中使用玩家输入。
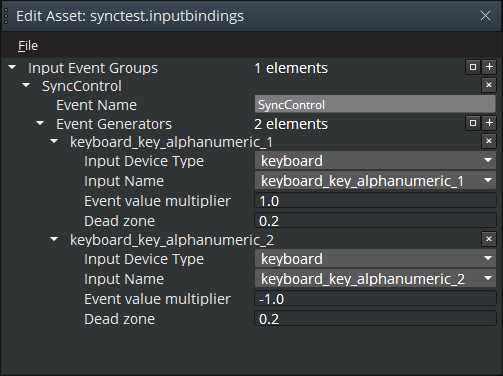
获取键盘输入以控制图表同步
在示例中,枪实体有一个输入组件。输入组件使用 synctest.inputbindings 资产将键盘输入1和2绑定到 SyncControl 事件。SyncControl 事件控制同步模式,该模式决定机器人开火时枪支是否开火。
下图显示了Input Bindings Editor中相应的输入绑定。
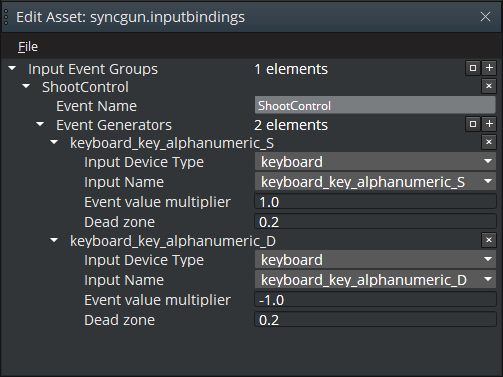
获取键盘输入来控制拍摄
机器人上的Input组件使用syncgun.inputbindings资产将键盘输入S和D与 ShootControl事件绑定。ShootControl事件控制枪的发射。
下图显示了Input Bindings Editor中相应的输入绑定。
在辅助图形上使用脚本切换同步
该示例在主(机器人)和次(枪)实体上都使用了 Lua 脚本组件。主实体上的脚本控制枪的发射。二级实体上的脚本控制同步模式。要在实体中添加 Lua 脚本,请在实体中添加 Lua Script 组件 ,然后将脚本附加到组件上。
枪实体上的 Lua 脚本接收来自键盘的输入,以切换同步模式。为了将辅助图形同步到主图形,脚本使用了 SyncAnimGraph EBus 事件。在下面的示例中,self.entityId 参数指的是辅助实体(枪)。self.Properties.PrimaryEntity 参数指的是机器人。
AnimGraphComponentRequestBus.Event.SyncAnimGraph(self.entityId,self.Properties.PrimaryEntity);
要使辅助图形与主图形不同步,同一脚本会使用 DesyncAnimGraph EBus 事件。
AnimGraphComponentRequestBus.Event.DesyncAnimGraph(self.entityId,self.Properties.PrimaryEntity);
完整脚本显示了 SyncAnimGraph 和 DesyncAnimGraph 方法如何处理 SyncControl 输入事件。
-- syncSample.lua
local syncSample =
{
	Properties =
    {
		PrimaryEntity = { default = EntityId() }
	},
}

function syncSample:OnActivate()
    self.SyncControlInputBusId = InputEventNotificationId("SyncControl");
    self.SyncControlInputBus = InputEventNotificationBus.Connect(self, self.SyncControlInputBusId);
    self.ShootControlInputBusId = InputEventNotificationId("ShootControl");
    self.ShootControlInputBus = InputEventNotificationBus.Connect(self, self.ShootControlInputBusId);
	self.SyncControl = false;
	self.Shooting = false;
end

function syncSample:HandleSyncControl(floatValue)
	if (floatValue > 0 and self.SyncControl == false ) then
		AnimGraphComponentRequestBus.Event.SyncAnimGraph(self.entityId, self.Properties.PrimaryEntity);
		self.SyncControl = true;
	elseif(floatValue < 0 and self.SyncControl == true ) then
		AnimGraphComponentRequestBus.Event.DesyncAnimGraph(self.entityId, self.Properties.PrimaryEntity);
		self.SyncControl = false;
	end
end

function syncSample:HandleInput(floatValue)
	if (InputEventNotificationBus.GetCurrentBusId() == self.SyncControlInputBusId) then
		self:HandleSyncControl(floatValue);
	end
end

function syncSample:OnPressed(floatValue)
	self:HandleInput(floatValue);
end

function syncSample:OnHeld(floatValue)
    self:HandleInput(floatValue);
end

return syncSample;
在主图上使用脚本控制拍摄
主实体(机器人)上的 Lua 脚本示例会接收键盘输入,从而切换枪的发射。机器人实体动画图的 “射击 ”参数使用Boolean (checkbox) 类型。开枪时shoot参数为 “true”。由于shoot是一个已命名的布尔参数,因此主实体上的 Lua 脚本使用了 AnimGraphComponentBus 上的 SetNamedParameterBool函数。
完整脚本显示了如何使用 SetNamedParameterBool 函数切换拍摄状态。
-- syncGun.lua
local syncGun =
{
}

function syncGun:OnActivate()
    self.ShootControlInputBusId = InputEventNotificationId("ShootControl");
    self.ShootControlInputBus = InputEventNotificationBus.Connect(self, self.ShootControlInputBusId);
	self.Shooting = false;
end

function syncGun:HandleShootControl(floatValue)
	if (floatValue > 0 and self.Shooting == false ) then
		AnimGraphComponentRequestBus.Event.SetNamedParameterBool(self.entityId, "shoot", true);
		self.Shooting = true;
	elseif(floatValue < 0 and self.Shooting == true ) then
		AnimGraphComponentRequestBus.Event.SetNamedParameterBool(self.entityId, "shoot", false);
		self.Shooting = false;
	end
end

function syncGun:HandleInput(floatValue)
	if (InputEventNotificationBus.GetCurrentBusId() == self.ShootControlInputBusId) then
		self:HandleShootControl(floatValue);
	end
end

function syncGun:OnPressed(floatValue)
	self:HandleInput(floatValue);
end

function syncGun:OnHeld(floatValue)
    self:HandleInput(floatValue);
end

return syncGun;
行动范例
下面的动画图片展示了同步模式关闭时的成品示例。机器人开火,但枪没有开火。
下面的动画图片显示了同步模式开启时的示例。机器人开火时,枪也会开火。